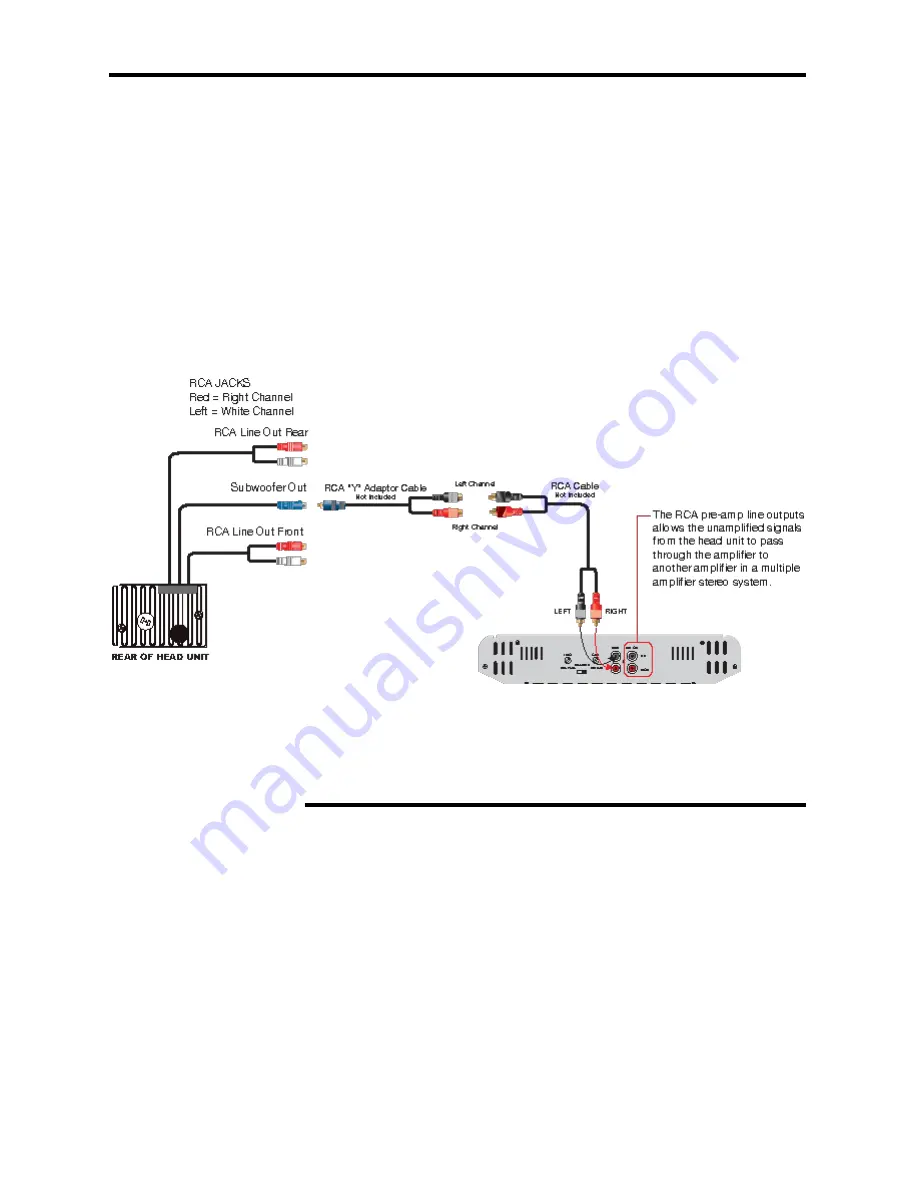
background image

3

SUBWOOFER OUTPUT

To power a subwoofer you will need to 

connect an amplifier to the unit using the 

subwoofer output. 
The head unit sends only low frequency 
signals to the subwoofer output.

Most single channel amplifiers have both 

left and right RCA input jacks which require 
a “Y” adaptor to connect this head unit’s 

subwoofer output to the amplifier. 

To Enable the Subwoofer Output

1. Press and hold the SETUP button, 
choose EXPERT from the SETUP menu. 
Or press the SW button on the remote 
directly for SUBWOFFER ON/OFF.

. On the EXPERT menu use the arrow 
buttons to choose SUBWOOFER. 

3. Press the ENTER button on the remote 
control to turn the SUBWOFFER jack ON or 
OFF.

ANTI-THEFT SYSTEM

Removing the Faceplate


1. Press the PWR button to turn the unit OFF. 
. Press OPEN button to release the panel. 
3. Pull the panel out. 
4. Place the panel into the case and take it with you when you leave the car.

Subwoofer Output

Содержание ELITE VRVD400IV

Страница 1: ...iPOD SD USB A V Input RDS 1 80 WATTS VRVD400IV AM FM Stereo IPOD VIDEO MP3 WMA OGG PLAYER MP3 WMA JPEG M JPEG ID3 OGG...

Страница 2: ...stomerservice vr 3 com and a member of our technical service team will respond by email to your questions Our in house technical service team will expedite delivery of your part advise you on installa...

Страница 3: ...aker leads to the chassis ground Do not open the top or bottom cover Modifying the unit will void the warranty and may damage the unit cause the unit to malfunction or cause damage the vehicle s elect...

Страница 4: ...pes of media used by this unit Memory Type Icon Content Size Playtime USB Flash Memory Audio Video Up To 2GB Varies with size of files SD Card Audio Video Up To 2GB Varies with size of files MMC MMC A...

Страница 5: ...structions or consider having the VRVD400IV profes sionally installed Before starting the installation disconnect the negative battery cable from the battery s negative terminal Before final installat...

Страница 6: ...age will include the following parts accessories for installation and operation of the unit Parts Included 1 Faceplate 1 Faceplate Case 1 Remote Control 2 Removal Keys 1 Metal Mounting Strap 1 Rubber...

Страница 7: ...tual Reality Video Labs and or its affiliates waives any and all liability when this wire is NOT connected as directed Driver can only watch a movie when the parking brake is ON Before starting the in...

Страница 8: ...the exist ing head unit before disconnecting any wires If a wiring diagram is not available contact the head unit s manufacturer 1 While the old unit is playing discon nect the wires from one speaker...

Страница 9: ...2 Follow the diagram in Fig 3 for installing the rear mount ing strap to the head unit The rear mounting strap will help keep the head unit from moving around inside the dashboard Insert fingers into...

Страница 10: ...BAND 5 VOL Knob 6 NEXT 7 IR Sensor 8 PREVIOUS 9 LCD 10 AV Input Jack 11 MEM 12 OK 13 OPEN 14 USB Port 1 2 3 4 5 6 7 8 9 10 1112 13 14 15 16 17 18 19 FRONT PANEL INNER PANEL BEHIND FACEPLATE 15 SD MMC...

Страница 11: ...3V lithium battery only Remove the battery if the remote control is not to be used for a month or longer Do not short circuit or disassemble Do not drop the remote control it may become jammed under t...

Страница 12: ...button to enter setting menu use to set audio data 11 VOL Press this button to decrease the volume 12 BAND RDM In Radio mode press to select the a radio band FM1 FM2 FM3 AM1 AM2 In other modes press...

Страница 13: ...y video file 26 SUB T Press to select sub title language when play video file it need video files support sub title in multi languages 27 PROG PTY In Radio mode press to activate the PTY search In oth...

Страница 14: ...RM SEEK TA VOL Supports 50 levels Default level is 0 EXPERT DX LOCAL Set search radio station by DX or LOCAL mode STEREO Set radio audio for STEREO or MONO mode STEREO MONO BEEP Sets sound of button p...

Страница 15: ...ns PRESET 1 6 press and hold to set AF ON OFF In USB SD CARD mode press to pause play Press and hold to stop In IPOD mode press to pause play MUTE FUNCTION Press the POWER MUTE button on the faceplate...

Страница 16: ...er mode press this button to scan the preset memorized stations each preset will scan for 5 seconds Press again to stop operation DIGITAL TUNER Note RBDS service availability varies with areas Please...

Страница 17: ...first song in the first folder After playing all the files sequentially in the first folder the unit will play all the files sequentially in the next folder The unit will continue playing through all...

Страница 18: ...o grammed list 5 Press PROG again to cancel program play SELECTING AUDIO MODES ONLY FOR MP4 FILES Press AUDIO button on the remote repeat edly to select the audio language Press AUDIO button on the re...

Страница 19: ...faceplate 6 The head unit will turn the iPod ON and switch to the iPod mode automatically and the iPOD Connect screen will be displayed as the iPod and head unit connect Fig 4 Notes Remove the iPod f...

Страница 20: ...screen In Video mode press and hold the OSD button on remote to show elapse bar elapse remain timing bar FAST FORWARD FAST REVERSE Press the button or the button more than 2 seconds to activate fast f...

Страница 21: ...go to the sub menu of MUSIC VIDEO COMPATIBLE FILES 1 Audio files MP3 WMA OGG 2 Video files DivX TM1 3 11 4X 5X and 6X versions Nero Digital TM2 Real time MPEG2 MP ML display Real time MPEG1 D1 720X480...

Страница 22: ...to observe the area or blind spot behind the vehicle when you are operating your vehicle in reverse gear Please connect your back up camera s video output to the back up camera input RCAM_VIN on the r...

Страница 23: ...Enable the Subwoofer Output 1 Press and hold the SETUP button choose EXPERT from the SETUP menu Or press the SW button on the remote directly for SUBWOFFER ON OFF 2 On the EXPERT menu use the arrow b...

Страница 24: ...Resolution 320x240 pixels Aspect ratio 4 3 16 9 Contrast ratio 400 1 Brightness 350 cd m2 to 250 cd m2 FM Stereo Radio Frequency range 87 5 107 9 MHz Usable sensitivity 15dB Preset memory stations 18...

Страница 25: ...n of the product damage to tapes speakers accessories or car electrical systems 7 VIRTUAL REALITY VIDEO LABS will not be responsible for any charge incurred for installation OWNER S RESPONSIBILITIES V...

Страница 26: ...lectual Solutions Inc All rights reserved All designs logos and images are the exclusive property of Intellectual Solutions Inc and or its affiliates U S and Foreign Patents Pending 072009 Printed in...

Отзывы: