background image

- 4 - 


3. Operating manual 


3.1. Installation and putting into operation 
 

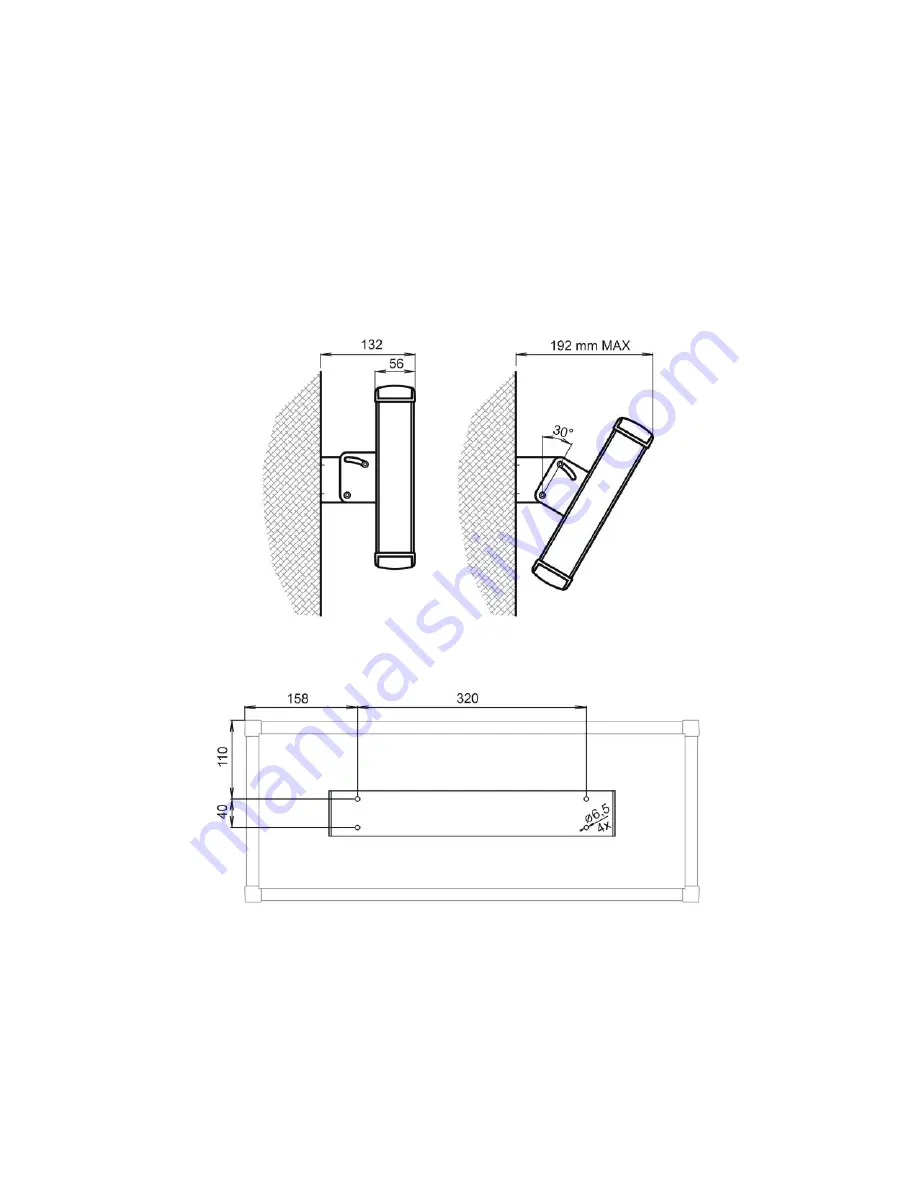
The  clock  is  installed  depending  on  the  type  of  installation.  At  the  rear  gripping, 
you have to mount the console with four screws to desired position. Respect proper 
console  rotation.  Slip-on  the  console  as  the  clip  at  the  rear  side  of  the  clock  is 
located  from  the  outside  and  mount  with  applied  screws  M6.  Mount  in  desired 
elevation angle and finalize the screws. 


Obr.2: Rear gripping  


Obr.3: Terminals in gripping console 

 
The side gripping is possible to a vertical column or a wall. Mounting to a column 
is  possible  with  steel  (rostfest)  mounting  stripes.  Use  at  least  two  stripes  that  are 
placed to jags in upper and lower part of the console. To achieve higher stability, 
you  can  use  up  to  5  stripes.  Stripes  are  firmly  finalized  and  fixed  by  clips.  The 

Содержание VDH17

Страница 1: ...Large digital clock VDH17 User manual RMC s r o Tren ianska 863 66 018 51 Nov Dubnica Tel 042 4455621 Fax 042 4434175 E mail rmc rmc sk www rmc sk...

Страница 2: ...2 Contents 1 Technical description 3 2 Technical data 3 3 Operating manual 4 3 1 Installation and putting into operation 4 3 2 Parameters setup 6 4 Certificate of warranty 8...

Страница 3: ...the rear or side wall of the clock depending on chosen type of installation The clock is supplied also in two sided version with the same depth 2 Technical data Power supply 15 30 VDC protection again...

Страница 4: ...ock is located from the outside and mount with applied screws M6 Mount in desired elevation angle and finalize the screws Obr 2 Rear gripping Obr 3 Terminals in gripping console The side gripping is p...

Страница 5: ...nal Mount the power supply cover and finalize screws and both terminals If you have to place the power supply further from the clock you can use the applied installation box with terminal and jacks an...

Страница 6: ...the first digit blinks After overwriting the value with the 0 9 button the next digit blinks In this way you can set up hours and minutes and the whole cycle than repeats Desired value can be set by...

Страница 7: ...ion setup Is used for time measure correction For proper setup you have to know how the time changes in seconds in a week A letter H is displayed and the number after shows the value in seconds that m...

Страница 8: ...rranty time if these conditions are met The warranty is prolonged by the time when the product was in warranty repair it means from the date when the product was delivered to repair till its taking ov...

Отзывы: