61
Operating and Maintenance Instructions – 6 Installation – "Getting Started"
Rittal Liquid Cooling Package Plus
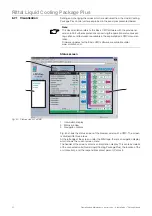
Setup screen
Fig. 54:
Setup window for the actual temperature
1
Information display
2
Status window
3
Navigation display
Fig. 54 shows the setup screen of the browser window of a CMC. The screen is
divided into three areas.
In the setup screen, the setup window is located underneath the header. The
values which are to be set are shown and entered in this window.
Beneath the setup window there are also two buttons, "Accept" and "Reset".
These are used to either accept or reject the entries, which have been made.
- The "Accept" button is used to accept the changed values.
- The "Reset" button is used to clear the changed values.
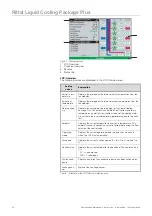
Fig. 54 shows the setup window for the server-in temperature. Either the follo-
wing values are displayed or the following settings may be made in this screen:
2
3
1
Note:
The layout of the left edge of the screen and the header corresponds to that
of the status screen.
Setpoint
Explanation
Unit name:
Name of the RLCP unit (max. 10 characters)
Type:
Message type
Sensor status:
Temperature and status of the message are displayed in colour.
Message text:
Text message which appears in the status window
(may be edited).
Setpoint high:
This setpoint may be used to generate and forward an alarm mes-
sage in case of overheating (temperature sensor).
Setpoint
warning:
This setpoint may be used to generate and forward a warning
message.
Setpoint low:
This setpoint may be used to generate and forward an alarm mes-
sage in case of overcooling (temperature sensor).
Alarm relay:
Serves to switch the PU's alarm relay on and off.


