background image

11

2001475_A


Identifique las piezas del Producer III

Información sobre las piezas

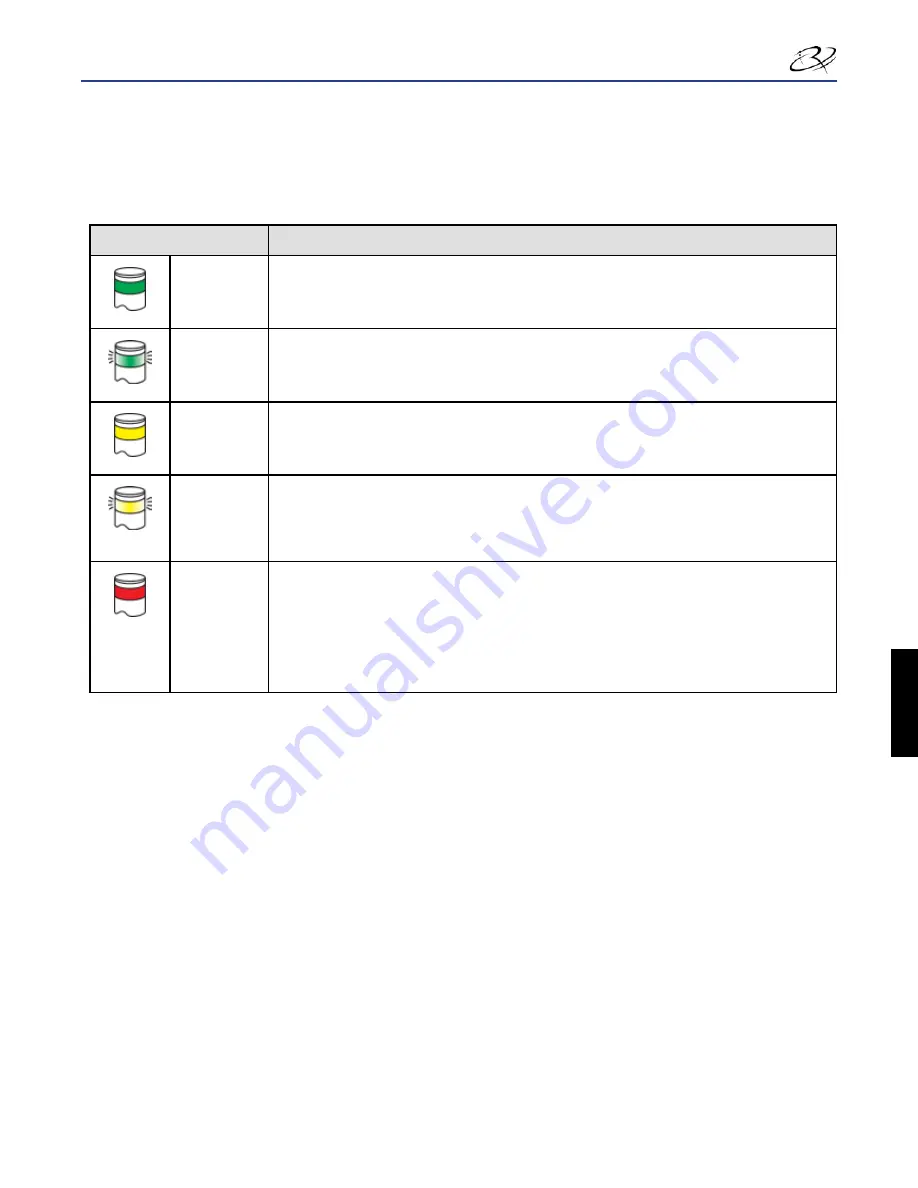
Luz de estado

El Producer III puede estar equipado con una luz de estado opcional que indica diversas condiciones. Esta tabla muestra los 
estados de esta luz y explica las condiciones que indica cada uno de ellos.

Estado de la luz

Condición del sistema

Luz verde 

encendida

El sistema funciona correctamente. Actualmente no hay trabajos en proceso.

Luz verde 

parpadeando

El sistema funciona correctamente. Actualmente hay trabajos en proceso.

Luz amarilla 

encendida

El autoloader está esperando que el software se inicie. Si no se inicia el Centro de control, 
enciéndalo. Revise las conexiones de los cables del autoloader y del Centro de control.

Luz amarilla 

parpadeando

Es posible que la puerta delantera esté abierta. Cierre la puerta delantera para que se 
procesen los trabajos.

Es posible que se estén agotando la cinta o los medios de impresión. Consulte el panel de 
funcionamiento para determinar qué suministro se está agotando.


Luz roja 

encendida

El carrusel no contiene discos en blanco. Llene los contenedores de suministro con el tipo 

de medio adecuado.

Error del sistema que requiere la intervención del usuario. Verifique si hay algún mensaje 

en la estación de trabajo del cliente o en el Centro de control.

Error del equipo en el arranque inicial, como por ejemplo, falta un carrusel. Verifique si hay 

algún mensaje en la estación de trabajo del cliente o en el Centro de control.

Panel de funcionamiento

El panel de funcionamiento tiene una pantalla de dos líneas que le informa sobre las operaciones o sobre las condiciones 
que puedan requerir la intervención del usuario. Esto incluye el estado de los insumos. Después de la inicialización, el 

Producer IIIN muestra el nombre del equipo incorporado. Consulte la sección 

Funcionamiento de Gemini Utilities


en la 

página 25 para ver otras opciones.


Nota

: el símbolo de intercalación ‘^’ que aparece en el ángulo superior derecho de la pantalla indica que el software de 

Rimage se está comunicando actualmente con el autoloader.

Botón de funcionamiento

Para acceder al botón de funcionamiento, abra la puerta delantera. Presione el botón de funcionamiento para girar el 

carrusel y posicionar un contenedor de manera tal que los discos se puedan cargar o descargar. Cada vez que presiona el 

botón de funcionamiento, el carrusel gira al siguiente contenedor.


Sugerencia:

 el carrusel girará a un contenedor sólo después que se haya iniciado el autoloader.

Dispensador de discos

El dispensador de discos coloca los discos en el contenedor de salida. Únicamente los modelos 6100, 6100N y 8100N 
cuentan con el dispensador de discos y el contenedor de salida.

Español

Содержание Producer III 6100

Страница 1: ...the information needed to operate the Rimage Producer III identify the autoloader parts and align the printer Benutzerhandbuch Manuale per l utente Gu a del usuario Manuel d utilisation Producer III U...

Страница 2: ...to notify any person or organization of such revisions or changes This document may contain links to web sites that were current at the time of publication but may have moved or become inactive since...

Страница 3: ...the Producer III 12 Pause the Producer III 12 Install the Carousel 13 Remove the Carousel 13 Load the Discs 14 Unload the Discs 14 Set Your Printing Preferences 14 Maintain the Producer III 15 Overvi...

Страница 4: ...ive methods that may not be obvious and helps you understand the benefits and capabilities of the product Important An Important note provides information essential to the completion of a task You can...

Страница 5: ...ical description of the problem Exact error message received My Rimage Product Information Copy this information from your Rimage Product for future reference Note Make sure you update the Serial Numb...

Страница 6: ...ult in loss or damage to the equipment product software or data Safety Precautions To ensure safety read these precautions and familiarize yourself with their meaning before using the equipment Warnin...

Страница 7: ...his Class A digital apparatus complies with Canadian ICES 003 Issue 4 2004 Cet appareil numerigue de la classe A est conforme a la norme NMB 003 du Canade This product complies with CAN CSA C22 2 No 6...

Страница 8: ...tus light is 6 in 15 2 cm high Leave an additional 3 5 in 9 cm for cabling Recorders 1 1 2 4 Standard system 6100 autoloader Everest or Prism printer Rimage Producer Software Suite PSS and external PC...

Страница 9: ...r to your printer user guide for the correct printer ribbons Rimage Media Kits include the required print ribbons Label design requirements Refer to your printer user guide for label design requiremen...

Страница 10: ...ed Front View Disc Dispenser Operator Button Operator Panel Output Bin Carousel Embedded PC Power Button 6100N Only Front Door Recorder Lift Arm 6100 and 6100N Disc Dispenser 8100N only Operator Butto...

Страница 11: ...5_A Rimage Producer III User Guide 7100N 8100N 6100N 6100 Back View 7100N 8100N Power Cord Network Cable Power Switch Power Cord Network Cable Power Switch 6100N Power Switch USB Cable Power Cord 6100...

Страница 12: ...sing carousel Check the client workstation or control center for a message Operator Panel The operator panel has a two line display that informs you of operations or conditions that require operator i...

Страница 13: ...Off the Producer III 1 Close all open applications If you have a Producer 6100 continue to step 3 If you have a Producer 6100N 7100N or 8100N continue to step 2 2 Briefly press the PC power button Thi...

Страница 14: ...s into the bearing guide 3 Close the front door Remove the Carousel Remove the carousel from the autoloader to load or unload discs Important If the Rimage software is currently running an operation o...

Страница 15: ...side facing down Tip You may designate bins 1 through 4 as input output reject or a specific media type through your software 4 Repeat steps 2 3 until the required bins are filled 5 Close the front d...

Страница 16: ...er III Instead apply the cleaner to the cloth first Observe precautions for electrostatic sensitive devices whenever you access the embedded PC Preventative Maintenance Schedule Note Your system may r...

Страница 17: ...ostic Tests Access Diagnostic Mode 1 Power on the autoloader 2 Allow the autoloader to initialize This may take several minutes 3 Open the front door of the autoloader 4 Press and hold the operator bu...

Страница 18: ...ROUSEL CHK DIAGNOSTIC 3 Release the operator button 4 Press the operator button to rotate the carousel from the current bin position to the next bin position Note Each time the carousel rotates the op...

Страница 19: ...nt If you are updating the autoloader firmware you must prompt the system to run the carousel calibration test immediately after the lift arm calibration test Calibrate the Lift Arm This test calibrat...

Страница 20: ...measures the position of the carousel as well as the gear train backlash of the carousel 1 Remove all discs from the carousel bins 2 Make sure that the autoloader is in diagnostic mode Refer to the A...

Страница 21: ...c into bin 1 The autoloader exits diagnostic test 3 and the system restarts Note Diagnostic test 3 causes the autoloader to exit diagnostic mode To continue the diagnostic tests refer to the Access an...

Страница 22: ...e recessed print pad b If the disc is not centered side to side on the print pad align the printer side to side i Loosen the side to side screws ii Slide the printer not the printer tray until the dis...

Страница 23: ...retainer and the disc is correct 7 Manually slowly raise the lift arm away from the printer tray 8 Press the printer button The printer tray closes 9 Press the disc release button The gripper release...

Страница 24: ...image Software online help for additional information 2 From the Windows Start menu select All Programs Rimage Utilities Gemini Utilities Gemini Utilities opens Note When the desired tasks are complet...

Страница 25: ...nden Sie Informationen ber den Betrieb des Rimage Producer III die Identifizierung der Teile und die Konfiguration der Druckeinstellungen Zur Einrichtung und Installation des Rimage Producer III siehe...

Страница 26: ...en ber solche Revisionen oder nderungen in Kenntnis zu setzen Dieses Dokument enth lt m glicherweise Links zu Websites die zur Zeit der Ver ffentlichung aktuell waren jedoch inzwischen verschoben oder...

Страница 27: ...oducer III ausschalten 13 Producer III anhalten 14 Karussell einbauen 14 Karussell ausbauen 14 Discs laden 15 Discs entladen 15 Druckeinstellungen konfigurieren 15 Wartung des Producer III 17 bersicht...

Страница 28: ...weise nicht unmittelbar erschlie en und hilft Ihnen die Vorteile und Funktionen des Produkts zu verstehen Wichtig Ein wichtiger Hinweis enth lt Informationen die zur Durchf hrung einer Aufgabe unbedin...

Страница 29: ...43 Fax 49 0 6074 8521 100 Wenn Sie sich an den Rimage Kundendienst wenden halten Sie folgende Informationen bereit Seriennummer des Systems und Softwareversion Funktionelle und technische Beschreibun...

Страница 30: ...ngen beim Personal welches das Ger t bedient oder wartet f hren k nnen n n Vorsicht Weist darauf hin dass bei Nichtbeachtung dieser Richtlinie das Ger t das Produkt oder die Software besch digt werden...

Страница 31: ...schen Anforderungen ICES 003 Issue 4 2004 Cet appareil numerique de la classe A est conforme a la norme NMB 003 du Canada Dieses Produkt entspricht der Norm CAN CSA C22 2 Nr 60950 1 03 1 Ausgabe Hinwe...

Страница 32: ...oboter Station 6100 Everest oder Prism Drucker Rimage Producer Softwarepaket PSS externer PC Roboter Station 6100N 7100N oder 8100N Everest oder Prism Drucker Rimage Producer Softwarepaket PSS Kapazit...

Страница 33: ...n das Druckband entnehmen Sie dem Benutzerhandbuch Ihres Druckers Die erforderlichen Druckb nder sind in den Rimage Media Kits enthalten Grafikdesign Die entsprechenden Grafikdesignanforderungen entne...

Страница 34: ...usgabeablage Bedienertaste Bediener Display Ausgabefach Karussell Netzschalter am integrierten PC nur 6100N Vordere Geh uset r Rekorder Greifarm 6100 und 6100N Disc Ausgabeablage nur 8100N Bedienertas...

Страница 35: ...A Rimage Producer III Benutzerhandbuch 7100N 8100N 6100N 6100 R ckansicht 7100N 8100N Netzkabel Netzwerkkabel Netzschalter Netzkabel Netzwerkkabel Netzschalter 6100N Netzschalter USB Kabel Netzkabel 6...

Страница 36: ...iff erfordert berpr fen Sie ob an der Client Workstation oder am Control Center eine Meldung angezeigt wird Beim Initialisieren ist ein Ger tefehler aufgetreten wie etwa ein fehlendes Karussell berpr...

Страница 37: ...er aktiviert wird wenn ein Benutzereingriff erforderlich ist Lesen Sie die am Bediener Display oder auf dem PC Monitor angezeigte Fehlermeldung und ergreifen Sie die erforderlichen Ma nahmen um das Pr...

Страница 38: ...er Station und der integrierte PC werden eingeschaltet Producer III ausschalten 1 Schlie en Sie alle offenen Anwendungen Wenn Sie einen Producer 6100 haben fahren Sie mit Schritt 3 fort Wenn Sie einen...

Страница 39: ...ein so dass der mittlere Stift in das Loch in der Lagerf hrung eingreift b Drehen Sie das Karussell bis sich das obere Traglager in die Lagerf hrung absenkt 3 Schlie en Sie die vordere Geh uset r Kar...

Страница 40: ...e als Eingabe Ausgabe Abweisungsfach oder als Fach f r einen bestimmten Medientyp definieren 4 Wiederholen Sie die Schritte 2 und 3 bis alle erforderlichen F cher gef llt sind 5 Schlie en Sie die vord...

Страница 41: ...eugender Wartungsma nahmen Hinweis Wenn das System in einem besonders staubigen Umfeld wie z B einem Lager eingesetzt wird kann eine h ufigere Durchf hrung der Wartungsma nahmen ratsam sein Voraussetz...

Страница 42: ...oter Station 4 Dr cken Sie so lange auf die Bedienertaste bis auf dem Bediener Display BUTTON DIAGNOSTIC Tastendiagnose angezeigt wird Hinweis W hrend die Bedienertaste gedr ckt ist werden auch andere...

Страница 43: ...gnose angezeigt wird 3 Lassen Sie die Bedienertaste los 4 Dr cken Sie die Bedienertaste um das Karussell von der aktuellen in die n chste Fachposition zu drehen Hinweis Jedes Mal wenn das Karussell ge...

Страница 44: ...ig Wenn Sie die Firmware der Roboter Station aktualisieren m ssen Sie das System dazu auffordern den Karussell Kalibriertest unmittelbar nach dem Greifarm Kalibriertest durchzuf hren Kalibrieren des G...

Страница 45: ...sells sowie das Zahnradgetriebespiel des Karussells gemessen 1 Nehmen Sie alle Discs aus den Karussellf chern heraus 2 Stellen Sie sicher dass sich die Roboter Station im Diagnosemodus befindet Weiter...

Страница 46: ...eis Diagnosetest 3 veranlasst die Roboter Station den Diagnosemodus zu beenden Wenn Sie mit den Diagnosetests fortfahren m chten finden Sie weitere Informationen im Abschnitt Zugriff auf und Auswahl v...

Страница 47: ...tig zur Druckunterlage positioniert ist richten Sie den Drucker entsprechend seitlich aus i L sen Sie die Schrauben f r die seitliche Ausrichtung ii Verschieben Sie den Drucker nicht die Schublade bis...

Страница 48: ...rs und der Disc korrekt ist 7 Bewegen Sie den Greifarm von der Schublade des Druckers weg 8 Dr cken Sie die Druckertaste Die Druckerschublade wird geschlossen 9 Dr cken Sie die Disc Freigabetaste Der...

Страница 49: ...amme Rimage Utilities Gemini Utilities Gemini Utilities wird ge ffnet Hinweis Wenn die gew nschten Aufgaben abgeschlossen sind starten Sie die Rimage Dienste Anzeigenamen der Roboter Station ndern Ver...

Страница 50: ...ormations requises pour utiliser le Rimage Producer III identifier ses composants et configurer les pr f rences d impression pour le syst me Rimage Producer III Pour configurer et installer votre Rima...

Страница 51: ...aviser quiconque de telles r visions ou modifications Ce document peut contenir des liens vers des sites Web qui taient actifs au moment de la publication mais qui depuis cette poque ont pu tre d pla...

Страница 52: ...sion du Producer III 13 Mise en pause du Producer III 14 Installation du carrousel 14 Retrait du carrousel 14 Chargement des disques 15 D chargement des disques 15 Configuration de vos pr f rences d i...

Страница 53: ...thodes alternatives qui ne sont pas forc ment videntes et vous aider comprendre certains avantages et fonctions du produit Important Fournit des informations essentielles pour compl ter une t che Tan...

Страница 54: ...de E mail support rimage de T l phone 49 0 1805 7462 43 T l copie 49 0 6074 8521 100 Lorsque vous contactez les services g n raux Rimage veuillez fournir le num ro de s rie du syst me et la version du...

Страница 55: ...National Standards Institute un avertissement est utilis pour indiquer des situations qui pourraient provoquer des blessures au personnel d exploitation ou de maintenance de l quipement n n Attention...

Страница 56: ...UL 60950 1 1re dition Avis pour le Canada This Class A digital apparatus complies with Canadian ICES 003 Issue 4 2004 Cet appareil num rique de la classe A est conforme la norme NMB 003 du Canada Ce...

Страница 57: ...9 cm 3 5 po suppl mentaires pour le c blage Graveurs 1 1 2 4 Syst me standard Chargeur automatique 6100 imprimante Everest ou Prism logiciel Rimage Producer Software Suite PSS et PC externe Chargeur a...

Страница 58: ...ance des sp cifications des supports Les kits de support Rimage comprennent les rubans d impression n cessaires Sp cifications de conception des tiquettes Reportez vous au guide de l utilisateur de vo...

Страница 59: ...nde Panneau de l op rateur Magasin de sortie Carrousel Bouton de mise sous tension du centre de contr le PC int gr 6100N uniquement Porte avant Graveur Bras de levage 6100 et 6100N Distributeur de dis...

Страница 60: ...I 7100N 8100N 6100N 6100 Vue arri re 7100N 8100N Cordon d alimentation C ble r seau Interrupteur d alimentation Cordon d alimentation C ble r seau Interrupteur d alimentation 6100N Interrupteur d alim...

Страница 61: ...ient ou dans le centre de contr le Erreur de l quipement lors du premier d marrage par exemple absence d un carrousel V rifiez la pr sence d un message sur la station de travail client ou dans le cent...

Страница 62: ...ntit lorsqu une intervention de l utilisateur est n cessaire Lisez le message d erreur qui s affiche sur le panneau de l op rateur ou sur le moniteur de votre PC et prenez la mesure appropri e pour co...

Страница 63: ...sous tension Le chargeur automatique et le PC int gr sont mis sous tension Mise hors tension du Producer III 1 Fermez toutes les applications en cours Si vous poss dez un Producer 6100 passez l tape 3...

Страница 64: ...lisse travers l ouverture en forme de fente du guide d appui b Faites tourner le carrousel jusqu ce que le roulement de support sup rieur s abaisse sur le guide d appui 5 Refermez la porte avant Retra...

Страница 65: ...de sortie de rejet ou de type de support sp cifique en fonction de la configuration de votre logiciel 4 R p tez les tapes 2 3 jusqu ce que les magasins requis soient remplis 5 Refermez la porte avant...

Страница 66: ...de maintenance pr ventive Remarque Votre syst me n cessitera sans doute des interventions de maintenance plus fr quentes s il est install dans un endroit poussi reux par exemple un atelier ou un entre...

Страница 67: ...ton de commande et maintenez le enfonc jusqu ce que l intitul BUTTON DIAGNOSTIC Bouton de diagnostic s affiche sur le panneau de l op rateur Remarque D autres messages d tat s affichent sur le panneau...

Страница 68: ...est positionn correctement dans le chargeur automatique 1 Assurez vous que le chargeur automatique est en mode Diagnostic Reportez vous la section Tests de diagnostic acc s et s lection page 18 2 Appu...

Страница 69: ...retirer du bras de levage 11 Appuyez sur le bouton de commande et maintenez le enfonc pour quitter le test et repasser en mode Diagnostic 12 Reportez vous la section Fermeture du mode Diagnostic page...

Страница 70: ...tic reportez vous la section Tests de diagnostic acc s et s lection page 18 Calibrage du carrousel Ce test mesure la position du carrousel ainsi que le jeu du train d engrenages du carrousel 1 Retirez...

Страница 71: ...diagnostic 3 oblige le chargeur automatique quitter le mode Diagnostic Pour poursuivre les tests de diagnostic reportez vous la section Tests de diagnostic acc s et s lection page 18 Alignement de l i...

Страница 72: ...l videment du support d impression b Si le disque n est pas centr au milieu du support d impression alignez le bord bord i Desserrez les vis bord bord ii Faites glisser l imprimante et non le plateau...

Страница 73: ...s de levage en l loignant du plateau de l imprimante 8 Appuyez sur le bouton de l imprimante Le plateau de l imprimante se ferme 9 Appuyez sur le bouton de lib ration du disque Le dispositif de pr hen...

Страница 74: ...rams Tous les programmes Rimage Utilities Utilitaires Gemini Utilities Utilitaires Gemini Les utilitaires Gemini s ouvrent Remarque Lorsque les op rations souhait es sont termin es lancez les services...

Страница 75: ...orciona la informaci n necesaria para poner en funcionamiento el Producer III de Rimage identificar sus piezas y configurar las preferencias de impresi n Para configurar e instalar el Producer III de...

Страница 76: ...a ninguna persona u organizaci n acerca de dichas revisiones o cambios Es posible que este documento contenga enlaces a sitios Web actuales al momento de la publicaci n pero que pueden haberse cambia...

Страница 77: ...ucer III 14 Instalaci n del carrusel 14 Extracci n del carrusel 14 Carga de discos 15 Descarga de discos 15 Configuraci n de las preferencias de impresi n 15 Mantenimiento del Producer III 17 Introduc...

Страница 78: ...Indica m todos alternativos que probablemente no sean obvios y le ayuda a comprender los beneficios y las capacidades del producto Importante Brinda informaci n fundamental para completar una tarea P...

Страница 79: ...y t cnica del problema El mensaje de error exacto recibido Informaci n sobre mi producto Rimage Copie esta informaci n sobre su producto Rimage para referencia futura Nota aseg rese de actualizar el...

Страница 80: ...s puede ocasionar p rdidas o da os para el equipo el producto el software o los datos Precauciones de seguridad Como medida de seguridad lea estas precauciones y familiar cese con su significado antes...

Страница 81: ...o digital Clase A cumple con la norma canadiense ICES 003 Publicaci n 4 2004 Cet appareil numerique de la classe A est conforme a la norme NMB 003 du Canade Este producto cumple con la norma CAN CSA C...

Страница 82: ...3 5 pulgadas 9 cm adicionales para cableado Grabadoras 1 1 2 4 Sistema est ndar Autoloader 6100 impresora Everest o Prism conjunto de software Producer de Rimage PSS y equipo externo Autoloader 6100N...

Страница 83: ...r cu les son las cintas correctas Los Media Kits de Rimage incluyen las cintas de impresi n necesarias Requisitos para el dise o de etiquetas Consulte la Gu a del usuario de su impresora a fin de obte...

Страница 84: ...ionamiento Panel de funcionamiento Contenedor de salida Carrusel Bot n de encendido del equipo incorporado nicamente 6100N Puerta delantera Grabadora Soporte elevador 6100 y 6100N Dispensador de disco...

Страница 85: ...image 7100N 8100N 6100N 6100 Vista trasera 7100N 8100N Cable de alimentaci n Cable de red Interruptor de encendido Cable de alimentaci n Cable de red Interruptor de encendido 6100N Interruptor de ence...

Страница 86: ...ci n de trabajo del cliente o en el Centro de control Error del equipo en el arranque inicial como por ejemplo falta un carrusel Verifique si hay alg n mensaje en la estaci n de trabajo del cliente o...

Страница 87: ...te un sonido cuando se requiere la intervenci n del usuario Lea el mensaje de error que aparece en el panel de funcionamiento o en el monitor de su equipo y tome las medidas correspondientes para solu...

Страница 88: ...oloader y el equipo incorporado se encender n Apagado del Producer III 1 Cierre todas las aplicaciones abiertas Si tiene un Producer 6100 contin e con el paso 3 Si tiene un Producer 6100N 7100N u 8100...

Страница 89: ...rav s de la abertura de la ranura de la gu a del cojinete b Gire el carrusel hasta que el cojinete de soporte superior baje hasta la gu a del cojinete 3 Cierre la puerta delantera Extracci n del carru...

Страница 90: ...el 1 al 4 como de entrada salida rechazado o un tipo de medios espec fico en el software 4 Repita los pasos 2 y 3 hasta que los contenedores necesarios est n completos 5 Cierre la puerta delantera Des...

Страница 91: ...es donde quede expuesto a la suciedad como dep sitos o almacenes Antes de comenzar Advertencia Apague el autoloader y desconecte el cable de alimentaci n siempre que deba acceder al equipo integrado 1...

Страница 92: ...stico en el panel de funcionamiento El autoloader estar en modo diagn stico Selecci n de una prueba de diagn stico 1 Presione el bot n de funcionamiento la misma cantidad de veces que el n mero de la...

Страница 93: ...carrusel se muestra como A 00000 y la pr xima posici n del carrusel se muestra como T 00000 5 Repita el paso 4 para cada uno de los cuatro contenedores del carrusel Nota el carrusel girar primero haci...

Страница 94: ...licitar al sistema que ejecute la prueba de calibraci n del carrusel inmediatamente despu s de la prueba de calibraci n del soporte elevador Calibraci n del soporte elevador Esta prueba calibra el sop...

Страница 95: ...bi n el contragolpe del tren de engranajes del carrusel 1 Quite todos los discos de los contenedores del carrusel 2 Aseg rese de que el autoloader est en modo diagn stico Consulte la secci n Acceso y...

Страница 96: ...o 3 y el sistema se reiniciar Nota si realiza la prueba de diagn stico 3 el autoloader saldr del modo diagn stico Para continuar con las pruebas de diagn stico consulte la secci n Acceso y selecci n d...

Страница 97: ...n rebajada b Si el disco no se centra bien en la almohadilla de impresi n alinee la impresora lado a lado i Afloje los tornillos laterales ii Deslice la impresora no la bandeja de impresi n hasta que...

Страница 98: ...ador para quitarlo de la bandeja de la impresora 8 Presione el bot n de la impresora Se cerrar la bandeja de la impresora 9 Presione el bot n de liberaci n del disco El sujetador liberar el disco Suge...

Страница 99: ...ilities Utilidades Gemini Utilities Herramientas de Gemini Gemini Utilities se abrir Nota cuando se hayan completado las tareas deseadas comenzar n los servicios de Rimage Cambio del nombre a mostrar...

Страница 100: ...Rimage Producer IIIN 8100N 7100N 6100N 6100 Rimage Everest III Rimage Producer III...

Страница 101: ...rt Einstein Str 26 63128 Dietzenbach Germany 49 0 6074 8521 0 49 0 6074 8521 100 Rimage Corporation Rimage Corporation Rimage Corporation 2009 Rimage Corporation Rimage Rimage Corporation Rimage Produ...

Страница 102: ...4 4 5 Producer III 6 Producer III 9 9 10 11 11 11 11 11 11 Producer III 13 Producer III 13 Producer III 13 Producer III 13 14 14 15 15 15 Producer III 17 17 17 17 18 18 18 18 18 1 19 19 19 3 20 20 20...

Страница 103: ...r IIIN III Producer III Producer III Windows Windows XP Windows Vista Windows 2000 Windows Server 2003 n n Producer III Everest III 600 PrismPlus Producer 6100N 7100N 8100N PC PC Producer 6100N 7100N...

Страница 104: ...mage Support www rimage com support KnowledgeBase http rimage custhelp com Ask a Question 800 553 8312 952 946 0004 952 946 6956 Rimage Support Europe www rimage de E support rimage com 49 0 1805 7462...

Страница 105: ...4 2001475_A Rimage Producer III 7100N 8100N 6100N 6100 ANSI American National Standard Institute n n CD DVD 1 2 n n Rimage Producer 6100N 7100N 8100N...

Страница 106: ...e 89 336 EEC Low Voltage Directive 73 23 EEC EN 55022 1998 A1 2000 Class B Limit EN 55024 1998 EN 61000 3 2 2000 EN 61000 3 3 1995 A1 2001 EN 60950 2000 CE CE Marking Directive 93 68 EEC This is a Cla...

Страница 107: ...m 16 25 41 0 cm 16 25 41 9 cm 16 5 62 9 cm 24 75 62 9 cm 24 75 62 9 cm 24 75 62 9 cm 24 75 29 0 kg 64 38 1 kg 84 39 9 kg 88 45 4 kg 100 49 4 kg 109 58 5 kg 129 60 3 kg 133 65 8 kg 145 38 1 kg 84 47 2...

Страница 108: ...ows 2000 Professional SP4 Rimage PSS 8 1 Windows Server 2003 6100 Rimage 32 6100 PC Everest II Everest II Windows Vista 6100N 7100N 8100N PC Rimage Media Kits PC Rimage Producer Software Suite PSS 8 1...

Страница 109: ...9 2001475_A Producer III Producer III PC 6100N 6100 6100N 8100N 8100N PC 7100N 8100N...

Страница 110: ...10 2001475_A Rimage Producer III 7100N 8100N 6100N 6100 7100N 8100N 6100N USB 6100...

Страница 111: ...11 2001475_A Producer III Producer III 2 Producer IIIN PC 25 Gemini Rimage 1 6100 6100N 8100N Producer III PC 25...

Страница 112: ...II 14 1 Producer III Producer 6100N 7100N 8100N 2 Producer 6100 2 PC PC PC Producer III 1 Producer 6100 3 Producer 6100N 7100N 8100N 2 2 PC Windows PC n n PC PC PC 30 3 Producer III Producer 6100N 710...

Страница 113: ...14 2001475_A Rimage Producer III 7100N 8100N 6100N 6100 1 2 Producer III a b 3 1 2 3...

Страница 114: ...15 2001475_A Producer III 1 100 1 2 3 100 1 4 4 2 3 5 1 2 3 4 2 3 5 Producer III...

Страница 115: ...17 2001475_A Producer III Producer III Producer III Producer III Producer III n n Producer III Producer III Producer III PC Producer III PC PC 1 Producer III 2 6100N 7100N 8100N PC 22 T25 Torx...

Страница 116: ...00N 8100N 6100N 6100 3 601 Producer III Producer IIIN 3 601 www rimage com support html Rimage Producer III 1 2 3 4 BUTTON DIAGNOSTICS BUTTON DIAGNOSTIC 5 CHOOSE DIAGNOSTIC 1 2 5 3 3 3 CHOOSE DIAGNOST...

Страница 117: ...19 2001475_A Producer III 1 2 1 2 1 18 2 01 CAROUSEL CHK DIAGNOSTIC 01 3 4 A 00000 T 00000 5 4 4 1 4 4 1 6 1 18 2 01 CAROUSEL CHK 01 3 4 5 6 1 7 1 7 20 3 8 1 9 2 3 4 6 8 10 11 12 18...

Страница 118: ...20 2001475_A Rimage Producer III 7100N 8100N 6100N 6100 3 2 2 1 18 2 3 3 03 CALIBRATE 03 3 5 5 4 1 1 1 1 1 3 5 1 1 2 1 4 CAL CAROUSEL POS PUT DISC ON GRPR 1 20 8 3 3 18 1 2 18 3 3 3 03 CALIBRATE 03 4...

Страница 119: ...21 2001475_A Producer III 5 6 1 7 1 8 6 3 mm 0 25 CAL CAROUSEL POS O 00000 N 00000 O 00000 N 00000 O 00000 N 00000 9 4 10 1 BACKLASH O 00000 N 00000 O 00000 N 00000 O 00000 N 00000 1 3 3 18...

Страница 120: ...22 2001475_A Rimage Producer III 7100N 8100N 6100N 6100 Everest Prism T25 Torx 5 32 1 13 Producer III 2 1 2 3 4 a b c d 5 6 a...

Страница 121: ...23 2001475_A Producer III b i ii iii c 7 8 9 10 Everest 1 6mm 0 063 Prism 0 25 0 38 mm 0 010 0 015...

Страница 122: ...7100N 8100N Windows Windows XP Windows Vista Windows 2000 Windows Server 2003 Gemini 1 Rimage Rimage Software 2 Windows Start All Programs Rimage Utilities Gemini Utilities Gemini Gemini Rimage Gemin...

Страница 123: ...manuale fornisce le informazioni necessarie per utilizzare identificare le parti e configurare le preferenze di stampa del Rimage Producer III Per configurare e installare il Rimage Producer III fare...

Страница 124: ...un obbligo di notificare tali revisioni o modifiche a persone o organizzazioni Il presente documento potrebbe contenere collegamenti a siti Web validi al momento della pubblicazione ma che potrebbero...

Страница 125: ...one del dispositivo girevole 14 Rimuovere il dispositivo girevole 14 Caricare i dischi 15 Scaricare i dischi 15 Impostare le preferenze di stampa 15 Manutenzione del Producer III 17 Panoramica 17 Info...

Страница 126: ...n caso di esigenze particolari Un Suggerimento pu contenere metodi alternativi che possono non sembrare ovvi e contribuisce a far comprendere vantaggi e funzionalit del prodotto Importante una nota im...

Страница 127: ...1805 7462 43 Fax 49 0 6074 8521 100 Contattando i Servizi Rimage si prega di fornire quanto segue Numero di serie del sistema e versione del software Descrizione tecnica e funzionale del problema Mes...

Страница 128: ...ni al personale che utilizza l apparecchiatura o ne effettua la manutenzione vanno usate opportune avvertenze n n Attenzione indica che la mancata osservanza dell istruzione pu causare la perdita di o...

Страница 129: ...tura digitale di classe A conforme a ICES 003 n 4 2004 Cet appareil numerique de la classe B est conforme a la norme NMB 003 du Canada Questo prodotto conforme a CAN CSA C22 2 N 60950 1 03 a edizione...

Страница 130: ...15 2 cm 6 Lasciare ulteriori 9 cm 3 5 per il cablaggio Masterizzatori 1 1 2 4 Sistema standard Autoloader 6100 stampante Everest o Prism Rimage Producer Software Suite PSS e PC esterno Autoloader 6100...

Страница 131: ...l utente della stampante I Rimage Media Kit comprendono i nastri per la stampa necessari Requisiti del modello di etichetta Per i requisiti di progettazione delle etichette fare riferimento alla guida...

Страница 132: ...ativo Vassoio di uscita Dispositivo girevole Pulsante di accensione PC incorporato solo 6100N Sportello anteriore Masterizzatore Braccio di sollevamento 6100 e 6100N Distributore dischi solo 8100N Pul...

Страница 133: ...100N 8100N 6100N 6100 Vista posteriore 7100N 8100N Cavo di alimentazione Cavo di rete Interruttore di accensione Cavo di alimentazione Cavo di rete Interruttore di accensione 6100N Interruttore di acc...

Страница 134: ...ale messaggio della workstation del client o del Control Center Errore dell apparecchiatura all avvio iniziale per esempio dispositivo girevole mancante Controllare l eventuale messaggio della worksta...

Страница 135: ...no che suona quando necessario l intervento dell utente Leggere il messaggio di errore visualizzato sul pannello operativo o sul monitor del PC e intraprendere le azioni appropriate per risolvere il p...

Страница 136: ...il PC incorporato L autoloader e il PC incorporato sono accesi Spegnere il Producer III 1 Chiudere tutte le applicazioni aperte Se si possiede un autoloader Producer 6100 continuare con la fase 3 Se s...

Страница 137: ...girevole facendolo scorrere in modo che il perno al centro scorra attraverso la fessura della guida di supporto b Ruotare il dispositivo girevole finch il supporto superiore non scende nella guida 3...

Страница 138: ...are i vassoi da 1 a 4 come alimentazione scarico rifiuto o per un tipo specifico di supporto tramite il software 4 Ripetere le fasi 2 3 finch non sono riempiti tutti i vassoi desiderati 5 Chiudere lo...

Страница 139: ...detergente prima su un panno Quando si accede al PC incorporato rispettare le precauzioni per i dispositivi sensibili alle scariche elettrostatiche Pianificazione della manutenzione preventiva Nota i...

Страница 140: ...ere l inizializzazione dell autoloader L operazione pu impiegare qualche minuto 3 Aprire lo sportello anteriore dell autoloader 4 Tenere premuto il pulsante operativo finch sul pannello di controllo n...

Страница 141: ...o nell autoloader 1 Assicurarsi che l autoloader sia in modalit diagnostica Fare riferimento alla sezione Accesso e selezione dei test diagnostici a pagina 18 2 Tenere premuto il pulsante operativo fi...

Страница 142: ...r rilasciare il disco e rimuoverlo dal braccio di sollevamento 11 Tenere premuto il pulsante operativo per uscire dal test e ritornare alla modalit diagnostica 12 Fare riferimento alla sezione Uscita...

Страница 143: ...Accesso e selezione dei test diagnostici a pagina 18 Calibrazione del dispositivo girevole Questo test misura la posizione del dispositivo girevole e il gioco del treno di trasmissione del dispositivo...

Страница 144: ...L autoloader esce dal test diagnostico 3 e il sistema si riavvia Nota il test diagnostico 3 fa s che l autoloader esca dalla modalit diagnostica Per continuare con i test diagnostici fare riferimento...

Страница 145: ...assato b Se il disco non centrato da parte a parte sul tappetino di stampa allineare la stampante da parte a parte i Allentare le viti da una parte e dall altra ii Far scorrere la stampante non il vas...

Страница 146: ...accio allontanandolo dal vassoio di stampa 8 Premere il pulsante della stampante Il vassoio della stampante verr chiuso 9 Premere il pulsante di rilascio del disco La pinza rilascia il disco Suggerime...

Страница 147: ...Utilities Utilit Gemini Utilities Utilit Gemini Utilit Gemini si apre Nota quando le attivit desiderate sono state completate avviare i servizi Rimage Modifica del nome del display dell autoloader Ut...

Отзывы: