background image


Warranty manual 


(According to Law 23/2003 of 10 July, on Guarantees for the Sale of Consumer Goods) 
 

RIEJU manufacturer's warranty rules. 

 
The company RIEJU  hereby guarantees to the end consumer, purchaser of a vehicle 
manufactured by RIEJU  , that both  the materials and the manufacture are free from 
defects in accordance with the highest quality standards. Consequently, RIEJU hereby 
warrants  to the final purchaser (hereinafter the "purchaser"), in accordance with the 
conditions set forth below, the repair of any defects in materials  or workmanship 
detected on a new motorcycle free of charge within the warranty period and without 
any limitation as to the number  of  kilometres travelled or the number of hours of 
operation. 
 

Warranty period 

 
The warranty period shall commence on the day of delivery of the vehicle to the 
purchaser by a RIEJU licensing dealer, or in the case of demonstration models, on the 
date the vehicle first starts operating. The seller is liable for any lack of conformity 
which becomes manifest within the time period established under the Law 23/2003 of 
July on Warranties in the Sale of Consumer Goods from the time of delivery and  in 
accordance with Directive 1999/44/EC for the rest of the Member States of the 
European Community. For countries outside the European  Community, the warranty 
period will be governed by the rules in force. However, if the lack of conformity 
becomes apparent during the first  six months from the date of delivery of the 
motorcycle, it is presumed that this fault existed when it was delivered; from the sixth 
month, the consumer must prove that the non-conformity existed at the time of delivery 
of the goods. During the first six months after the delivery of the  repaired good, the 
seller shall be liable for any lack of conformity which motivated the repair. 
Any defects detected in the product must be brought to the attention of a dealer 
authorized by RIEJU  within the warranty period. If the last day of the warranty period 
falls on a Sunday or an official holiday, the warranty period will be extended in such a 
way that the last day of the warranty period is the first business day after the Sunday or 
an official holiday. 
 

Warranty claims for defects not brought to the attention of a dealer 
authorized by RIEJU before the end of the warranty period will be 
excluded. 


Obligations of the buyer 

 
RIEJU will be entitled to reject warranty claims if and to the extent that: 

a.)  The  buyer has not proceeded to subject the vehicle to any of the inspections 

and/or maintenance work required in the user manual or has exceeded the date 
stipulated for such inspections or maintenance work; also excluded from the 
warranty are any defects that appear before the date set for an inspection or 
maintenance work that would have never been carried out, or that will be 
carried out after the established date. 

b.)  Inspection, maintenance work or repair carried out by third parties not 

recognized or authorized by RIEJU. 

c.)  Any maintenance or repair that has been carried out in breach of the technical 

requirements, specifications and instructions stated by the manufacturer. 

74 

Содержание MR 200

Страница 1: ...MR 300 250 200 Owner s manual ...

Страница 2: ...on beforehand to make any changes to components parts or accessories which it considers necessary to improve the product or which are required for manufacturing or construction reasons Not all versions models shown in this publication are available in all countries The availability of each model should be checked at the official RIEJU sales network Copyright 2014 Rieju S A All rights reserved Repr...

Страница 3: ...tions will be communicated by updates to this manual Note Provides key information to make the procedure easier to understand and carry out Caution Refers to specific procedures to carry out for preventing damages to the vehicle Warning Refers to specific procedures to carry out to prevent injuries to the repairer Personal safety Failure to completely observe these instructions will result in seri...

Страница 4: ...tch 36 2 Clutch discs 36 3 Throttle cable 36 4 Spark plug 36 5 Air filter 37 Removing the filter 37 Cleaning the filter 38 6 Carburettor 38 7 Transmission oil 39 8 Piston and ring 40 9 Cylinder head cylinder and exhaust valve 40 10 Exhaust system 40 11 Muffler fibre 41 12 Connecting rod and bearings 41 13 Kick starter and gear shift pedal 41 14 Rubber gasket exhaust silencer 41 15 Motor bearings 4...

Страница 5: ... 55 43 Battery charge 56 Settings 57 Introduction 58 Carburator setting 58 Opening of the throttle valve and influences 58 Idle jet and mixing screw 58 Carburettor needle 59 Main jet 59 Reference carburetion competition only 59 Correction factors 60 Secondary transmission ratio 61 Suspension setting 61 Available settings 61 Suspension Settings 62 Rear Shock Absorber Kyb 63 Static SAG 63 Correction...

Страница 6: ...General information ...

Страница 7: ...eviews vital for your RIEJU to be highly reliable you can enjoy the most comfortable and fulfilling motorcycling Thank you for your trust and welcome to RIEJU Legal notices In the interest of technical development RIEJU reserves the right to modify the construction equipment and accessories of the motorcycle without prior notice Measurements weight and power data are understood to include the resp...

Страница 8: ...ur RIEJU has been designed for off road use it has not been designed for long journeys on the road or motorway Such use may result in damage to the engine due the high revolutions and the tires are not suitable for use on paved surfaces It has not been designed for urban use either Long stops at traffic lights in the city could cause engine overheating Keep your RIEJU in good condition To avoid an...

Страница 9: ...r 2 Headlight position long and short beam 12 Front brake disc 3 Front turn signals 13 Front brake calliper 4 Rear view mirrors 14 Front fork 5 Overflow pipe 15 Starter 6 Fuel tank 16 Gear shift pedal 7 Fuel valve 17 Secondary exhaust 8 Air filter 18 Carburettor 9 Side stand 19 Chain 10 Chain guard 20 Chain guide 1 2 3 4 6 7 8 9 10 11 5 12 13 14 15 16 17 18 19 20 9 ...

Страница 10: ...Footpegs 23 Seat 32 Rear brake pedal 24 Rear shock absorber gas tank 33 Centrifugal regulation 25 Kick starter 34 Crankcase guard 26 VIN chassis number 35 Exhaust 27 Radiator 36 Manufacturer s identification plate 28 Rear brake disc 29 Rear brake calliper 28 29 30 31 32 33 34 35 36 21 22 23 24 25 26 27 10 ...

Страница 11: ...tch fluid reservoir 8 Steering lock 3 Multifunction gauge 9 Stop 4 Front brake fluid tank 10 Throttle 5 Clutch lever 11 Front brake lever 6 Turn signals lights horn and starter Number Name Number Name 1 Long and short beam lights 4 Start 2 Horn 5 Stop 3 Turn signals 1 2 3 4 5 6 8 9 10 11 7 1 2 4 5 3 11 ...

Страница 12: ...right side of the steering column Steering lock Your RIEJU has a steering lock It is located on the right side of the lower fork flange To lock the steering 1 Turn the handlebar all the way to the left 2 Insert the key into the lock and turn it anti clockwise back 3 Press the key in 4 Turn the key clockwise to its initial position and remove it The closure must be sunk so that the lock is effectiv...

Страница 13: ...des 0 7 0 8 mm TRANSMISSION Primary reduction 3 31 63 19 Gearbox 6 speeds cascade Gear ratio 1ª 2 07 14 29 2ª 1 63 16 26 3ª 1 33 18 24 4ª 1 10 20 22 5ª 0 91 23 21 6ª 0 79 24 19 Secondary transmission By chain Secondary reduction 4 16 12 50 MR 200 3 67 13 49 MR 250 3 69 13 48 MR 300 Competition models only 3 30 13 42 MR 200 250 300 Chain 110 Links 5 8 x 1 4 with seals 112 links competition model on...

Страница 14: ...1 piston floating calliper Brake discs Front NG wave Ø260 mm disc Rear NG wave Ø220 mm disc FLUIDS RECOMMENDED Fuel Lead free minimum RON 98 Recommended Fuel Gasoline with a content of 10 ethanol Oil mixture JASO FC LIQUI MOLY 2T SYNTH OFFROAD RACE 100 synthetic oil at 2 50 1 Semi synthetic oil at 2 50 1 Mineral oil at 3 32 1 Coolant 2 LIQUI MOLY RAF12 Antifreeze mixture at 30 Brake fluid LIQUI MO...

Страница 15: ...General information 15 ...

Страница 16: ...General information 16 ...

Страница 17: ...General information 17 ...

Страница 18: ...ank Measure Torque Nm Screw Tank silentblock chassis M6 10 Rear shock absorver Measure Torque Nm Screw Upper shock absorber M12 60 Loctite 243TM Screw Lower shock absorber M12 50 Link Measure Torque Nm Nut Tie rod chassis M12 80 Loctite 243TM Nut Tie rod Rocker arm M12 80 Loctite 243TM Nut Rocker arm swinging arm M12 80 Loctite 243TM Swing arm Measure Torque Nm Nut Swinging arm nut M14 80 Screw Sh...

Страница 19: ...ctricity Measure Torque Nm Screw Battery M5 2 5 Gear shift pedal Measure Torque Nm Screw Gear shift pedal M6 12 Kick starter Measure Torque Nm Screw Kick starter M6 12 Loctite 243TM Seat Measure Torque Nm Screw Seat M6 10 Table of tightening torques Nº Part name Measure Torque Nm 1 Valve cover bolts M5x15 8 2 Crankcase bolt M6x25 12 3 Gear shift pedal bolt M6x12 14 1 2 3 19 ...

Страница 20: ...General information Nº Part name Measure Torque Nm 4 Kick starter to axle bolt M6x20 12 5 Kick starter pedal bolt M6x75 10 4 5 1 2 3 20 ...

Страница 21: ...r head bolt M8 27 6 Reed block bolt M6 12 7 Ignition cover bolt M6 8 8 Engine drain plug M12 15 9 Oil fill bolt M12 15 Ratchet plate bolt M6 8 Stator bolts M5 8 Ignition motor coil bolt M10 60 Selector spring fixing bolt M8 15 Primary nut M20 80 Clutch spring bolts M6 10 Valve control support bolt M5 8 Loctite 243TM Clutch hub nut M18 80 4 5 6 7 8 9 21 ...

Страница 22: ...er the wheel length mode press MOD E 10 seconds CLOC K Format If the units are in Km 24h If the units are in mi 12h To increase the hour digits press MOD E 2 seconds To increase the hour digits quickly press MOD E 2 seconds To increase the minute digits press SET 2 seconds To increase the minute digits quickly press SET 2 seconds To exit the clock mode and save the values press MOD E ET 2 seconds ...

Страница 23: ... bike Manufacturer s identification plate 1 Catalysed exhaust 1 Homologated front and rear sprockets 1 Carburettor Dell Orto PHBG21 1 Fuel overflow assembly 1 Front and rear turn signals 4 Homologated licence plate holder light reflector 1 1 1 Front reflectors 2 Speedometer 1 Horn 1 Rear view mirror 2 Steering lock 1 Secondary air valve 1 Air filter restriction 1 Throttle opening limiter 1 Homolog...

Страница 24: ...Operating instructions ...

Страница 25: ...t to carry out the breaking in phase by doing this you will ensure the duration and correct function of your engine in the long term The intervals to be performed are the following 1 From 0 to 200 Km Riding at between 50 and 75 load throttle opening alternately without continued use at 75 load 2 From 200 to 300 Km Riding the same but reaching on occasion without keeping it more than 5 10 seconds a...

Страница 26: ...uel to the carburettor the motorcycle will not run this position is used only when the engine is stopped If you can see that there is little fuel in the tank it should be started with the tap in the RES position and go immediately to refuel If everything is correct you must always use the tap in the ON position NOTE Always turn off the fuel tap OFF position when the engine stops What is the oil le...

Страница 27: ...nd handlebar turned to the right in this position unlatch the tank lid together with its rubber bellows beware of DI RT it is necessary to have a clean space in which to leave the disassembled parts slowly turn the handlebar to the left until the liquid level is parallel to the top edge of your tank The average level should not be more than 6 8 mm from the top edge of the tank If the level is lowe...

Страница 28: ...immediately to your official RIEJU service centre The official RIEJU service centre will be happy to assist you and to ensure your safety Does the side stand feel OK The stand is a part of the motorcycle that often causes problems including safety problems because it is a part that receives severe treatment If you notice that it feels strange or difficulty in its redeployment you must first thorou...

Страница 29: ...this affects your safety Is the seat correctly set This is a vital point for your safety if you have any doubts about this go to your official RIEJU service centre Is there any element that runs the risk of detachment Fenders side covers fuel tank dust covers etc If so you should try to attach it or take it off completely to avoid it falling off for your safety Contact your RIEJU dealer to repair ...

Страница 30: ...ycles 5 Rinse with a jet of water at low pressure 6 Let the motorcycle drain naturally 7 Take a short ride on the motorcycle until the engine reaches its operating temperature 8 Lubricate the chain and all other elements that need it see Maintenance section WARNING Never clean the vehicle using high pressure equipment Avoid direct contact with multifunction gauge coil pipe plug carburettor switche...

Страница 31: ...spark plug Fill up the fuel tank Check the points in the section Daily inspection before riding General lubrication OBD Operation The OBD On Board Diagnostic system incorporates a MI L indicator light to indicate a malfunction When the motorcycle is started the MIL Malfunction Indicator Light light is on If there is no error the MI L turns off after 5 seconds If the OBD system detects an error the...

Страница 32: ...BD system has If the system detects an historical error the MIL stays on permanently Also if you use the Creader VI scan tool you can see in Monitor Status the information MIL status ON With the key light in red at the top You can cancel the error if you go to Diagnosis Menu Erase error If you return to the Monitor Status screen the MIL Status is OFF and at the top the green light appears and the ...

Страница 33: ...Maintenance ...

Страница 34: ...lencer 10 hours when needed 15 Crankshaft bearings 80 hours 120 h or When needed 16 coolant 30 hours 17 Radiator tube and connections 10 hours 40 hours 18 brakes adjustment 20 hours when needed 19 brakes wear 30 hours when needed 20 Brake fluid Every 2 years 21 Brake fluid level 10 hours 20 hours when needed 22 brake pump piston and dust cover Every 2 years 23 brake piston and dust cover Every 2 y...

Страница 35: ...ingarm and linkage 20 hours when needed 20 hours 40 rear suspension Every 2 years when needed when needed 41 chain 10 hours when needed 42 tires 5 hours when needed 43 Battery charge 12 hours slow charge If the vehicle is used in competition maintenance intervals should be shortened 35 ...

Страница 36: ...he end of the throttle cable turn the adjuster 3 to obtain optimum play Tighten locking nut again If the free play cannot be established by adjusting the cable remove the cable shield in the carburettor tighten it with a tensioner at the end of the cable tighten the locking nut and reinstall the guard 4 SPARK PLUG The standard spark plug Denso W24ESR U or NGK BR8EG on 250 300cc must be tightened t...

Страница 37: ... that of the engine If the ceramic is white the spark plug should be replaced by a colder one If it is black you must replace it with a warmer one NOTE If engine performance drops replace spark plug to regain normal performance 5 AIR FILTER Removing the filter To access the air filter remove the left side cover 1 Remove the left side cover by pulling it by its three ends 2 Remove the filter handle...

Страница 38: ...hout fail before and after each race or session Clean if necessary Clean the filter in a ventilated area and make sure there are no sparks or flames near the work place include a powerful light bulb Do not use petrol to clean the filter as this may cause an explosion WARNING Inspect the filter for damage If it is damaged replace it or dirt will get into the carburettor Grease all air filter connec...

Страница 39: ...h insufficient deteriorated or contaminated transmission oil can accelerate wear and damage transmission Checking the oil level 1 If the bike has been used wait a few minutes 2 Check the oil level using the level indicator on the lower right side of the engine 1 3 The oil level must be between the maximum and the minimum 4 If the level is too high remove the excess through the drain plug 2 5 If th...

Страница 40: ...pour new transmission oil in 8 Check the oil level after operating the kick starter 3 or 4 times 9 Screw the oil filler cap 8 PISTON AND RING For this check adjustment or change please contact your official RIEJU service centre 9 CYLINDER HEAD CYLINDER AND EXHAUST VALVE For this check adjustment or change please contact your official RIEJU service centre 10 EXHAUST SYSTEM The exhaust and muffler r...

Страница 41: ...ficial RIEJU service centre 13 KICK STARTER AND GEAR SHIFT PEDAL Lubricate the moving and articulated parts with oil or grease excessive lubrication can cause your boots to slip on the pedals 14 RUBBER GASKET EXHAUST SILENCER For this check adjustment or change please contact your official RIEJU service centre 15 MOTOR BEARINGS For this check adjustment or change please contact your official RIEJU...

Страница 42: ... anti corrosive specific for aluminium engines and radiators according to the manufacturer s instructions Coolant level 1 Put the motorcycle in the use position 2 Unscrew the radiator cap 1 anticlockwise and wait a few seconds for the vapours to escape Then tighten and turn in the same direction to complete the removal of the plug 3 Check the coolant level The liquid should be just below the rubbe...

Страница 43: ... To avoid burns do not remove the radiator cap or try to change the liquid when the engine is still hot Wait until it cools down DANGER If liquid falls on the tires it makes them more slippery and can cause an accident Immediately clean any liquid that may fall into the chassis engine or wheels Inspect the old liquid White spots on the liquid will mean that the aluminium parts of the cooling syste...

Страница 44: ...18 BRAKES ADJUSTMENT Front brake lever Adjust the brake lever 1 until you feel comfortable To adjust it loosen the nut 2 After adjusting it tighten securely Check that the brake responds correctly Rear brake pedal When the brake pedal 3 is in the rest position you should have a play of 5 7 mm Check the brake for correct response and do not rub it DANGER If the brake pedal or brake lever feels spon...

Страница 45: ...nging the front brake pads To change the front brake pads follow these steps 1 Loosen the pin 1 and remove it 2 Remove the pads 2 3 Put a paper or cloth around the brake fluid tank to prevent it from falling Open the cover by loosening the screws 3 NOTE For better access it is recommended to loosen the screw 4 and turn the throttle assembly 4 Remove the cover 5 ensuring that no brake fluid falls o...

Страница 46: ...5 in case the new pads do not have them 5 Loosen the screws 6 and remove the cap of the brake fluid tank 6 Put a paper or cloth around the brake fluid tank to prevent it from falling 7 Retract the calliper piston so as not to damage it 8 Install the new brake pads 9 Attach the pin and its protector 10 Replace the cap of the tank 11 Operate the brake pedal several times until you get the proper fee...

Страница 47: ... change its specification always adhere to the DOT 4 specification it is not important that the brake fluid is of the same brand but it is NECESSARY that it is of the same specification Do not use fluid from a container that is not sealed unopened at origin NEVER use brake fluid from an unsealed container or of course brake fluid that has already been used 21 BRAKE FLUID LEVEL The front 1 and rear...

Страница 48: ... the axial centring Place the dial on the inside of the circumference of the rim 2 turn the wheel and the difference between the highest and the lowest amount is the centring If it is slightly off centre it can be corrected by loosening or tightening some spokes with the spindle tensioning wrench 3 If the tire is bent or curved it should be replaced NOTE A welded area on the rim may show excessive...

Страница 49: ...table support The front fork must be fully extended Change of fork spring In case you need to change the front fork spring follow these steps 1 Remove the bar from the suspension flanges 2 Loosen the upper nut of the fork 3 Remove the inner oil from the fork 4 Loosen the lower nut of the fork 5 Remove the inner cartridge 6 Remove the spring Replace the spring and follow the steps in reverse order ...

Страница 50: ...vel of oil in the inside of the fork and its correct operation Recommended oil KYB 48 KYB 01M Oil for closed cartridge suspension Oil volume 350 ml 32 BOLTS NUTS AND FASTENERS Every day before using the bike you should check that all nuts and bolts are tightened Also check that the other fasteners are in place and in good condition 33 PETROL TUBE If you observe a pinch narrowing in the pipe 1 in a...

Страница 51: ...eering is not too tight Squat down in front of the motorcycle grip the lower part of the front fork in the shaft push and pull the fork 1 If there is play the steering is too loose If the steering must be adjusted 1 Stabilize the motorcycle with the stand or with a special bench 2 Keep the front wheel from touching the ground 3 Remove the handlebar by loosening the screws on the handlebar clamps 2...

Страница 52: ... is necessary after riding on wet ground when the chain looks dry Its chain is made of seals therefore you must use a specific lubricant for this type of chain Your official RIEJU service centre will gladly supply you with one 37 STEERING BEARING For this check adjustment or change please contact your official RIEJU service centre 38 WHEEL BEARING For this check adjustment or change please contact...

Страница 53: ... stand or with a special bench 2 Keep the rear wheel from touching the ground with the help of a chock 3 Loosen the exhaust clamping screws 1 4 Disengage the exhaust springs 2 5 Unscrew the shock absorber from the underside of the rocker arm 3 6 Remove the screw and release the rocker arm 4 7 Loosen the top screw of the shock absorber to the frame 5 1 1 2 3 4 5 53 ...

Страница 54: ...e should be a space of 30 36 mm between the chain and the swingarm in the rear area of the chain guide You can check with your fingers but without overly forcing it 2 Loosen the rear axle nut 1 3 Find the point of maximum tension on the chain 4 Using the nuts 2 of the tensioner align the alignment of the chain on both ends of the swingarm using the notches on the swingarm and the lugs on the adjus...

Страница 55: ... centre will gladly supply you with one Lubrication Its chain is of the type that has seals this requires a special lubricant use the same lubricant for the guide the chain guide shoe and the front and rear sprocket NOTE We recommend you always have the chain correctly lubricated those chains that go dry lubricated dried shorten their life and that of the components that surround them to a signifi...

Страница 56: ...oltage before starting the charging process 9v When charging is complete unplug the charger from the battery Once charged leave the battery between 1 to 2 hours before checking the voltage If it is less than 10v change it Recharge the battery periodically If you do not use the motorcycle recharge every 3 months Use the battery charger for lithium batteries with the following technical characterist...

Страница 57: ...Settings ...

Страница 58: ...m Zone B from to load Influenced mainly by the height of the slide bezel Zone C from to load The carburettor needle is responsible Zone D from to full load The main jet is responsible for this Idle jet and mixing screw This controls the mixture from the closed position to load but has little effect on the total opening To adjust the mixture the air screw can be turned to change the air flow or cha...

Страница 59: ...ion which is the one that implies greater closure of fuel passage through the diffuser Main jet It has a greater effect from 75 to 100 load The number printed on the bottom of the jet 1 indicates the flow of petrol passing through the hole A larger number corresponds to a larger hole more petrol passes through Never use the jet gauge sets that are on the market Their use is INCORRECT Always use ne...

Страница 60: ...rburizing Example 1000 m height and temperature of 35 C correction 0 94 2 Using the correction factor select the main jet Example Factor 0 94 you must multiply the main jet by this number Main jet 175 x 0 94 165 3 Find your correction factor for the needle and air screw in the table and change the position of the clip and the air screw opening Example Lift up the needle clip and turn the air screw...

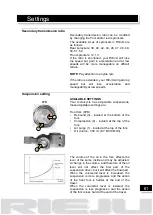
Страница 61: ...ETTINGS Your motorcycle has adjustable suspensions these adjustable settings are Front fork KYB Rebound 3 located at the bottom of the fork Compression 2 located at the top of the fork Air purge 1 located at the top of the fork Oil volume 350 ml KY B 010M Oil The volume of the oil in the fork affects the level of the same inside and may be adjusted A change in the volume and therefore of the oil l...

Страница 62: ... closed Standard 14 clicks from closed Sport 10 clicks from closed Compression Comfort 18 clicks from closed Standard 14 clicks from closed Sport 10 clicks from closed KYB 200 250 300 Spring From 65 to 75kg 50 N mm From 75 to 85kg 52 N mm STD From 85 to 95kg 54 N mm Rebound Comfort 12 clicks from closed Standard 10 clicks from closed Sport 8 clicks from closed Compression Low Speed Comfort 14 clic...

Страница 63: ...oint 3 Lower the bike from the stand and place it with both wheels on the floor not resting on the side stand 4 Measure the vertical distance between the rear axle nut and the upper fixed point If the difference between the measurements is different from 35 5 mm vary the pre load of the shock absorber until it is obtained The sag with the rider above the motorcycle should be 100 5 mm CORRECTION AC...

Страница 64: ...ernally in the fork If the motorcycle feels hard especially over bumps together with a lack of rear wheel traction and strong impacts from irregularities you should soften the adjustment of the compression of both the fork and the shock absorber If it cannot be corrected it can be indicative of too hard a spring or an excessive oil level in the fork Rebound If the motorcycle feels unstable or soft...

Страница 65: ...weight of the rider skill of the rider and the conditions of the terrain If you have a problem try changing your position on the bike to resolve it The suspension must be adjusted to the rider s strengths If you are fast on turns you must adjust the suspension to this point Make changes in small increments as it is very easy to get past The front and rear suspension must be balanced When evaluatin...

Страница 66: ...ed spanner in order to lock the adjustment system 2 Ensure the correct positioning and condition of the copper gasket 4 replace the plug 1 and tighten with a 27mm spanner and a maximum torque of 25Nm Adjustment Pre load value mm Site conditions or circuit type Engine performance 1 turn 14 2 250 300 No grip snow or mud Power and RPM limitation 1 5 turn 14 6 250 300 Difficult grip or technical circu...

Страница 67: ...Troubleshooting ...

Страница 68: ...flood the engine close the petrol remove the spark plug engage a gear and push the motorcycle several meters with the throttle fully open Visually you will know when the pre compression crankcase has been emptied Mount the spark plug and start the bike it is possible you may have to remove the spark plug again if the pushing operation of the motorcycle has not been enough the spark plug will get w...

Страница 69: ...muffler if necessary Dirty carburettor jets Remove the carburettor and clean the jets Worn or damaged crankshaft bearings Contact the official RIEJU official service The engine emits strange sounds Ignition problem Contact the official RIEJU official service Overheating See The engine overheats The exhaust emits backfires Presence of carbon in the combustion chamber Contact the official RIEJU offi...

Страница 70: ...ct the official RIEJU official service Worn shift fork axle Contact the official RIEJU official service selector position spring broken Contact the official RIEJU official service The clutch slips Excessive clutch fluid level Check the level and adjust if necessary Worn clutch discs Contact the official RIEJU official service Broken or weak clutch spring Contact the official RIEJU official service...

Страница 71: ... spring Brake disc worn Replace the brake disc Misplaced worn or glazed pads Reposition the pads or change them Damaged cylinder Contact the official RIEJU official service Supports nuts bolts badly tightened Check and adjust to the appropriate tightening torques The handlebar vibrates Worn tire Replace the tire Swingarm or its needle bearings are worn Contact the official RIEJU official service O...

Страница 72: ...service Bent front fork Contact the official RIEJU official service Wheels out of alignment check the tension of the spokes of the rims The brakes do not work properly Worn brake discs Change the discs Loss of brake fluid Contact the official RIEJU official service Impaired brake fluid Contact the official RIEJU official service Piston pump broken Contact the official RIEJU official service Worn b...

Страница 73: ...Warranty manual ...

Страница 74: ...delivery of the motorcycle it is presumed that this fault existed when it was delivered from the sixth month the consumer must prove that the non conformity existed at the time of delivery of the goods During the first six months after the delivery of the repaired good the seller shall be liable for any lack of conformity which motivated the repair Any defects detected in the product must be broug...

Страница 75: ... consequent corrosion due to external influences such as stones salt industrial exhaust fumes and other environmental impacts or improper cleaning with improper products e Damage caused by defects as well as expenses caused directly or indirectly by incidents of defects for example communication expenses accommodation expenses car rental expenses public transportation expenses crane expenses expre...

Страница 76: ...otorcycle repair 4 The warranty claims of the buyer under the contract of sale with the corresponding authorized dealer will not be affected by this warranty This warranty does not affect the buyer s additional contractual rights under the general conditions of business of the authorized dealer Such additional rights however can only be claimed from the authorized dealer 5 If the buyer resells the...

Страница 77: ...This page has been left blank intentionally ...

Страница 78: ...RIEJU S A C Borrassà 41 E 17600 FIGUERES GIRONA SPAIN Tel 34 972 50 08 50 Fax 34 872 50 69 50www riejumoto com e mail rieju riejumoto com ...

Отзывы: