background image

English

63

English

 LAN Control

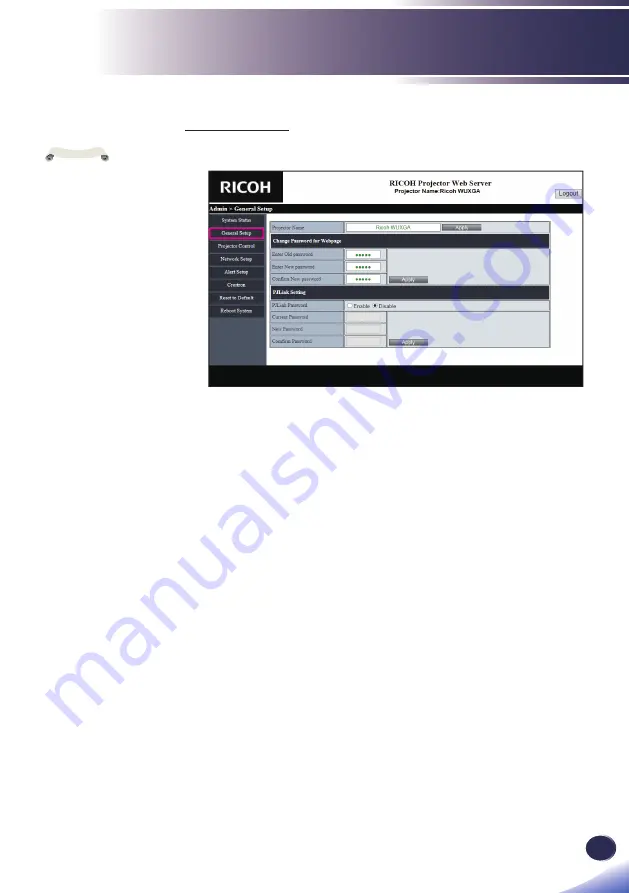
General Setup

You can change the projector name and password with this item.


Changing projector name.

Enter the new projector name in the “Projector Name” field.

Click “Apply”.


Changing the password for Webpage (Web Control).

Enter the current password in the “Enter Old Password” field.

Enter the new password in both the “Enter New Password” 

field and “Confirm New Password” field.

Click “Apply”.


Changing the password for PJLink.

Click “Enable” to enable password.

Enter the current password in the “Current Password” field.

Enter the new password in both the “New Password” field 

and “Confirm Password” field.

Click “Apply”.

 

The projector name 

set here is also used in 

PJLink control.

 

Only alphanumeric 

characters and symbols 

can be used as projector 

name. The maximum 

number of characters is 

22.

 

You can use 

only alphanumeric 

characters and symbols 

in the password. The 

maximum number 

of characters is 8. If 

you enter an invalid 

character, “Invalid 

Character” warning is 

displayed.

 

If the characters of 

new password and the 

characters of confi rm 

(new) password do not 

match, error message 

will be displayed. In 

this case, re-enter the 

password.

Note

Содержание PJ WUL5860

Страница 1: ...Basic Operations 4 User Settings 5 LAN Control 6 Troubleshooting 7 Appendices Read this manual carefully before you use this machine and keep it handy for future reference For safe and correct use be...

Страница 2: ......

Страница 3: ...e Projected Image 35 Adjusting the Position of Projector Image 35 Adjusting the Projector Zoom Focus and Lens Shift 36 Adjusting Projection Image Size 37 User Settings 39 Using the On Screen Display O...

Страница 4: ...ear babies and young children To avoid the threat of suffocation please keep away from their nose and mouth Warning Do not use any power sources other than those that match the speci cations shown in...

Страница 5: ...entative Use of the power cord could result in re or electric shock Warning Do not use the connection cable if it is deformed cracked or damaged Doing so could result in re or electric shock If the co...

Страница 6: ...ric shock Never spill liquid of any kind on the product Warning Do not remove any covers or screws There are high voltage components inside the machine that may cause electric shock Contact your servi...

Страница 7: ...hine Doing so may cause the machine to topple over possibly resulting in injury Caution Do not place the machine on an unstable or tilted surface If it topples over an injury might occur Caution Do no...

Страница 8: ...m the wall outlet and clean the prongs and the area around the prongs at least once a year Allowing dust to build up on the plug constitutes a re hazard Caution When performing maintenance on the mach...

Страница 9: ...are covered by the operating instructions e The product has been dropped or damaged in any way If the cabinet should break please handle with care to avoid injury Caution This product incorporates gl...

Страница 10: ...an 10 cm away from the ceiling or the oor and more than 30 cm away from the wall on the left side or on the right side Lens Shift W T ATTENTION Montez au dessus dela t te des enfants WARNING MOUNT ABO...

Страница 11: ...ide the beam Caution This projector has built in laser module Possibly hazardous optical radiation emitted from this product Do not stare into the beam May be harmful to the eyes Caution Use of contro...

Страница 12: ...cal attention Notes Be sure to use AAA R03 size batteries Dispose of batteries in a designated disposal area Attention should be drawn to the environmental aspects of battery disposal If the remote co...

Страница 13: ...e eyes Do not look into the light source light using optical instruments such as magnifying glasses and mirrors Visual impairment could result When turning on the projector make sure no one within pro...

Страница 14: ...ATTENTION Montez au dessus dela t te des enfants WARNING MOUNT ABOVE THE HEADS OF CHILDREN 1 2 3 Power Switch Symbols The meaning of the symbols for the switches on this machine as follows On Standby...

Страница 15: ...rmful interference in a residential installation This device generates uses and can radiate radio frequency energy and if not installed and used in accordance with the instructions may cause harmful i...

Страница 16: ...must be made using shielded cables to maintain compliance with FCC regulations Caution Changes or modi cations not expressly approved by the manufacturer could void the user s authority which is grant...

Страница 17: ...apan Importer RICOH Europe SCM B V Blankenweg 24 4612 RC Bergen op Zoom The Netherlands User Information on Electrical and Electronic Equipment Users in the countries where this symbol shown in this s...

Страница 18: ...result from inappropriate handling Recycling of products helps to conserve natural resources and protect the environment For more detailed information on collection and recycling systems for this pro...

Страница 19: ...d on batteries and accumulators This symbol means that in the European Union used batteries and accumulators should be disposed of separately from your household waste In the EU there are separate col...

Страница 20: ...when viewing images using 3D glasses with projector How 3D images are viewed may vary according to the individual Do not use 3D glasses for viewing any material other than 3D images Before viewing 3D...

Страница 21: ...1 1 36 WXL5860 or 1 1 3 WUL5860 zoom lens Built in full screen NTSC PAL SECAM video capability with S video Composite component through D sub terminals WUXGA 1080P UXGA WXGA Quad VGA SXGA SXGA XGA SVG...

Страница 22: ...enu Keystone Freeze Computer HDMI Video Digital Status Magnify Volume Projector Remote Control with Batteries please see page 27 CD ROM RGB Cable 1 8m Power Cord About the CD ROM Contains an user s ma...

Страница 23: ...Zoom lever 4 Lens shift dial 5 Control panel 6 Ventilation inlet 7 Security bar 8 Lens Product Overview 9 Adjustable feet 10 Remote receiver 11 Speaker 12 Anti theft lock hole Kensington lock 13 AC I...

Страница 24: ...1 In terminal 2 Service terminal 3 HDMI 2 MHL terminal supports HDMI MHL dongle 4 PC Control terminal 5 Video terminal 6 Computer In terminal 7 Audio In terminal 8 Microphone In terminal 9 Audio Out t...

Страница 25: ...nu Press Menu to launch the on screen display OSD or go back to the previous menu See page 39 5 Enter Select or con rm settings 6 AV Mute Receives signals from the IR remote Keep the signal path to th...

Страница 26: ...ired input source 4 Picture Select the preset picture mode 5 Four Directional Select Keys Use or to select items or make adjustments to your selection 6 Keystone Display menu Keystone 1 2 3 5 8 ID Set...

Страница 27: ...the projector display 15 Status Display menu Information 16 Computer Choose a signal from Computer In terminal 17 HDMI ChooseasignalfromHDMI1 HDMI2 terminal 18 Menu Press Menu to launch the On Screen...

Страница 28: ...thod 1 Press ID Set for 3 seconds and press 0 then 1 within 2 seconds 2 Press ID Set for 3 seconds and press 0 then 2 within 2 seconds 3 Press ID Set for 3 seconds and press 0 then 3 within 2 seconds...

Страница 29: ...he following precautions Use AAA R03 type battery Avoid contact with water or liquid Do not expose the remote control to moisture or heat Do not drop the remote control If the battery has leaked in th...

Страница 30: ...Key ston e Free ze Co mp ute r HD MI Vide o Digital Status Mag nify Vo lum e Remote Control Operating Range Point the remote control toward the projector Remote Receiver when pressing any button Maxi...

Страница 31: ...nd the rest of your equipment Follow these general guidelines Position the projector on a at surface at a right angle to the screen Position the projector to the desired distance from the screen The d...

Страница 32: ...g is fully inserted into both the projector AC inlet and the wall outlet The AC outlet must be near this equipment and must be easily accessible Due to the difference in applications for each country...

Страница 33: ...projector AC inlet and the wall outlet The AC outlet must be near this equipment and must be easily accessible Due to the difference in applications for each country some regions may have different a...

Страница 34: ...Projector 1 2 3 5 8 ID Set 0 MHL 6 4 7 9 AVMute Autoset ECO Input Picture Enter Aspect Menu Keystone Freeze Computer HDMI Video Digital Status Magnify Volume Power OR CAUTION Do not look into the lens...

Страница 35: ...5 seconds for cooling cycle and the Power indicator will ash red After cooling down the light stops ashing and then the projector will enter the standby mode 4 Disconnect the power cord from the elec...

Страница 36: ...the message below displays it indicates the cooling fan failed Stop using the projector and disconnect the power cord from the electrical outlet then contact your local dealer or our service center Wa...

Страница 37: ...ll the screen 1 Locate the adjustable foot you wish to modify on the underside of the projector 2 Rotate the adjustable ring clockwise to raise the projector or counter clockwise to lower it Repeat w...

Страница 38: ...terclockwise until the image is clear To adjust the image position turn the lens shift dial clockwise or counterclockwise to adjust the position of the projected image vertically Focus Distances lens...

Страница 39: ...to 5 56m Wide 42 to 300 1 07m to 7 62m WUXGA WUL5860 Tele 29 to 231 0 74m to 5 87m Wide 38 to 303 0 97m to 7 70m Image Width W Vertical Lens Shift Max XGA 0 15H WXGA 0 124H WUXGA 0 1H Image Height H L...

Страница 40: ...0 6 46 4 04 254 4 159 0 7 19 23 6 0 00 0 50 0 0 19 7 This table is for user s reference only Zoom ratio is 1 36x RICOH PJ WUL5860 WUXGA Diagonal Length Size of 16 10 Screen Screen Size WxH Projection...

Страница 41: ...key to view further settings Adjust the settings by using key or key 4 Select the next item to be adjusted in the sub menu and adjust as described above 5 Press Enter and the screen will return to th...

Страница 42: ...de for emphasizing color sRGB Standard color values DICOM SIM This mode is suitable for projecting a monochrome medical image such as an X ray radiography MRI etc Brightness Adjust the brightness of t...

Страница 43: ...tion Adjust the color saturation of the image Saturation Press the key to decrease the amount of color in the image Press the key to increase the amount of color in the image Sharpness Adjust the shar...

Страница 44: ...ion to enhance color and reproduce vivid colors NCE On Off On Enable NCE Off Disable NCE Advanced Con gure the advanced image settings Advanced Wall Color Select Enter Exit NCE Settings White Wall Col...

Страница 45: ...or key to adjust the color balance Saturation Use the or key to adjust the color saturation Gain Use the or key to adjust the color brightness Reset Return the NCE settings to the factory default valu...

Страница 46: ...10 Displays 16 10 aspect ratio Phase Eliminate icker from the image displayed Use the or key to adjust the value Phase Clock Adjust the number of total dots in one horizontal period Use the or key to...

Страница 47: ...the image down Press the key to move the image up Keystone Adjust image distortion caused by tilting the projector Keystone V Keystone H Keystone Four Corner Reset Select Enter Exit Auto Keystone Off...

Страница 48: ...Reset Exit OK Cancel Projection Mode Use this function to select the projector mode depending upon how the projector is mounted Projection Mode Normal Ceiling Rear Rear Ceiling Normal This is the def...

Страница 49: ...ange Process the input image with a limited RGB range Full Range Select this mode when computer signal or full range signal from AV equipment is input Start up Screen Set the start up screen Start up...

Страница 50: ...48 English User Settings Test Pattern Use this function to choose your desired test pattern between grid and white Choose Off to disable this function Test Pattern Off Grid White...

Страница 51: ...Enter to open the sub menu and then use the or or or key to select your preferred language Press Enter to nalize the selection Language Select Enter Exit Language Settings Auto Power Off Min Monitor...

Страница 52: ...Out Standby On Off On Enable the Monitor Out function at projector standby status Off Disable the Monitor Out function at projector standby status Network Standby Enable Disable the network function N...

Страница 53: ...vided from server IP Address IP Address Subnet Mask Set subnet mask number or display subnet mask number provided from server Subnet Mask Subnet Mask Gateway Set the default gateway of the network con...

Страница 54: ...without a password veri cation Security On Off Change Password Set the password Security Enter Security Code 6 Digits Exit Reset Return the adjustments and settings to the factory default values Choos...

Страница 55: ...ecrease the volume Press the key to increase the volume Audio Input Set the audio input source Audio Input Default Audio In MIC In Default Automatically outputs audio Audio In Only outputs audio from...

Страница 56: ...port Auto Source On Off Input Source Use this option to enable disable input sources Press the key to enter the sub menu and select which sources you require Press Enter to nalize the selection The p...

Страница 57: ...he projection time Laser Power Mode Set the brightness mode Choose Normal to increase the brightness Eco to dim the projector laser diode which will lower power consumption and extend the laser diode...

Страница 58: ...the button on the remote control to power on the projector Direct Power On On Off Sleep Timer Min Set the countdown timer interval The projector will shut down automatically after the countdown has r...

Страница 59: ...olution Color Space Laser Hours Laser Power No Data 1920X1200 60Hz 0 hr Source Display the current source Resolution Display the related information of the current source Color Space Display the color...

Страница 60: ...o select the appropriate 3D format content Enter Exit Select 3D Format Auto Side by Side Top and Bottom Frame Sequential Compatible 3D source 3D content and Optical 3D glasses are required for 3D view...

Страница 61: ...system to automatically select the appropriate 3D format content Side by Side Use this mode for Side by Side format 3D content Top and Bottom Use this mode for Top and Bottom format 3D content Frame S...

Страница 62: ...manual Network Status DHCP IP Address Subnet Mask Gateway DNS Apply MAC Address Select Enter Exit On Connected 2 Connection Enter the IP address that was veri ed by opening the web browser For example...

Страница 63: ...n the Password eld When a password is enabled you must enter the password The initial password is admin When a password is disabled the character of the Password will be dimmed Login by clicking the L...

Страница 64: ...eft side of the home screen System Status The current status of the projector is displayed You can check projector model name rmware version current LAN con guration and change the interface language...

Страница 65: ...ssword Enter the current password in the Current Password field Enter the new password in both the New Password field and Confirm Password field Click Apply The projector name set here is also used in...

Страница 66: ...er On The power of the projector turns on To turn ON click Settings Network standby Power Off Turns OFF the power of the projector Auto Set Resync the current source Input Toggle through the input sou...

Страница 67: ...initial value when you click the Reset button Volume Adjust volume by button Adjust the projector by selecting a value from the pull down menu Laser Power Mode Select the desired power mode between N...

Страница 68: ...e network settings from DHCP Check automatic setting and then click Apply Configuring the network settings manually Check manual setting enter appropriate values in the IP address Subnet Mask Default...

Страница 69: ...xx xxx xxx Send Test Mail When you click Send Test Mail test email will be sent The text will be Email Test xxx xxx xxx xxx Only alphanumeric characters and symbols can be used in the password The max...

Страница 70: ...ower Switch ON OFF the power Source List Correspondence between the input display and input terminal of the device is as follows Computer HDMI1 HDMI2 MHL Video Other buttons work in the same manner as...

Страница 71: ...Info You can display information about the rmware version of the projector and status of the laser After setting the user password you will be able to access Crestron s page by entering the password A...

Страница 72: ...Contacting the IT administrator of Crestron You can contact the IT administrators who are using X Panel Reset to Default You can reset the network to factory settings Press the re ect button Crestron...

Страница 73: ...English 71 English LAN Control Reboot System You can restart the system Press the restart button...

Страница 74: ...ntrol Adjust the computer display settings Verify the resolution setting is less than or equal to 1600 x 1200 3840 x 2160 for HDMI resolution See your operating system s Help le If you are using a Not...

Страница 75: ...our graphic card to make it compatible with the product Problem Image is out of focus Adjust the Focus Ring on the projector lens Make sure the projection screen is between the required distance refer...

Страница 76: ...st the image Problem Indicator lighting message STATUS POWER indicator TEMP indicator LAMP indicator Red Blue Red Red STANDBY POWER ON STANDBY LAN ON WARMING UP STATE Flashing COOLING DOWN Flashing Sc...

Страница 77: ...heat inside Check the environmental condition Please Warning TEMPERATURE TOO HIGH 1 Make sure air in and outlets are not blocked 2 Make sure the environment temperature is under 40 degree C Fan Error...

Страница 78: ...9 40 0 800x600 72 0 48 1 50 0 800x600 75 0 46 9 49 5 800x600 85 0 53 7 56 3 MAC 832x624 75 0 49 1 57 3 XGA 1024x768 60 0 48 4 65 0 1024x768 70 0 56 5 75 0 1024x768 75 0 60 0 78 8 1024x768 85 0 68 7 9...

Страница 79: ...680x1050 60 0 65 3 146 3 3 Component Signal 480p 720x480 59 94 31 5 27 0 576p 720x576 50 0 31 3 27 0 720p 1280x720 60 0 45 0 74 25 1280x720 50 0 37 5 74 25 1080i 1920x1080 60 0 33 8 74 25 1920x1080 50...

Страница 80: ...7 3 XGA 1024x768 60 0 48 4 65 0 1024x768 70 0 56 5 75 0 1024x768 75 0 60 0 78 8 1024x768 85 0 68 7 94 5 MAC 1152x864 75 0 67 5 108 0 SXGA 1280x1024 60 0 64 0 108 0 1280x1024 72 0 77 0 133 0 1280x1024...

Страница 81: ...g 1280x720 60 0 45 0 Frame Packing 1080p 1920x1080 24 0 27 0 Frame Packing 720p 1280x720 50 0 37 5 Top and Bottom 1280x720 60 0 45 0 Top and Bottom 1080i 1920x1080 50 0 25 28 13 Top and Bottom 1920x10...

Страница 82: ...Horiz sync Input Output Composite H V sync Input 6 Ground Red 7 Ground Green 14 Vert sync Input Output 8 Ground Blue 15 DDC CLK NC Do not connect anything 5 4 3 2 1 10 9 8 7 6 15 14 13 12 11 Contact y...

Страница 83: ...ut D sub 15pin Audio In 3 5mm stereo mini jack Microphone In 3 5mm stereo mini jack Audio Out 3 5mm stereo mini jack 5V 1 5A USB type A LAN AC In Speaker 8W x2 Laser diode life 20 000h Noise Level Nor...

Страница 84: ...82 English Appendices Cabinet Dimensions Unit mm...

Страница 85: ...English 83 English Appendices Holes for ceiling mount Screw size and max length 3 M4 9 mm...

Страница 86: ...DMI the HDMI Logo and High De nition Multimedia Interface are trademarks or registered trademarks of HDMI Licensing Administrator Inc MHL Mobile High De nition Link and MHL Logo are trademarks or regi...

Отзывы: