Ricoh MPC 1800 Скачать руководство пользователя страница 18

18

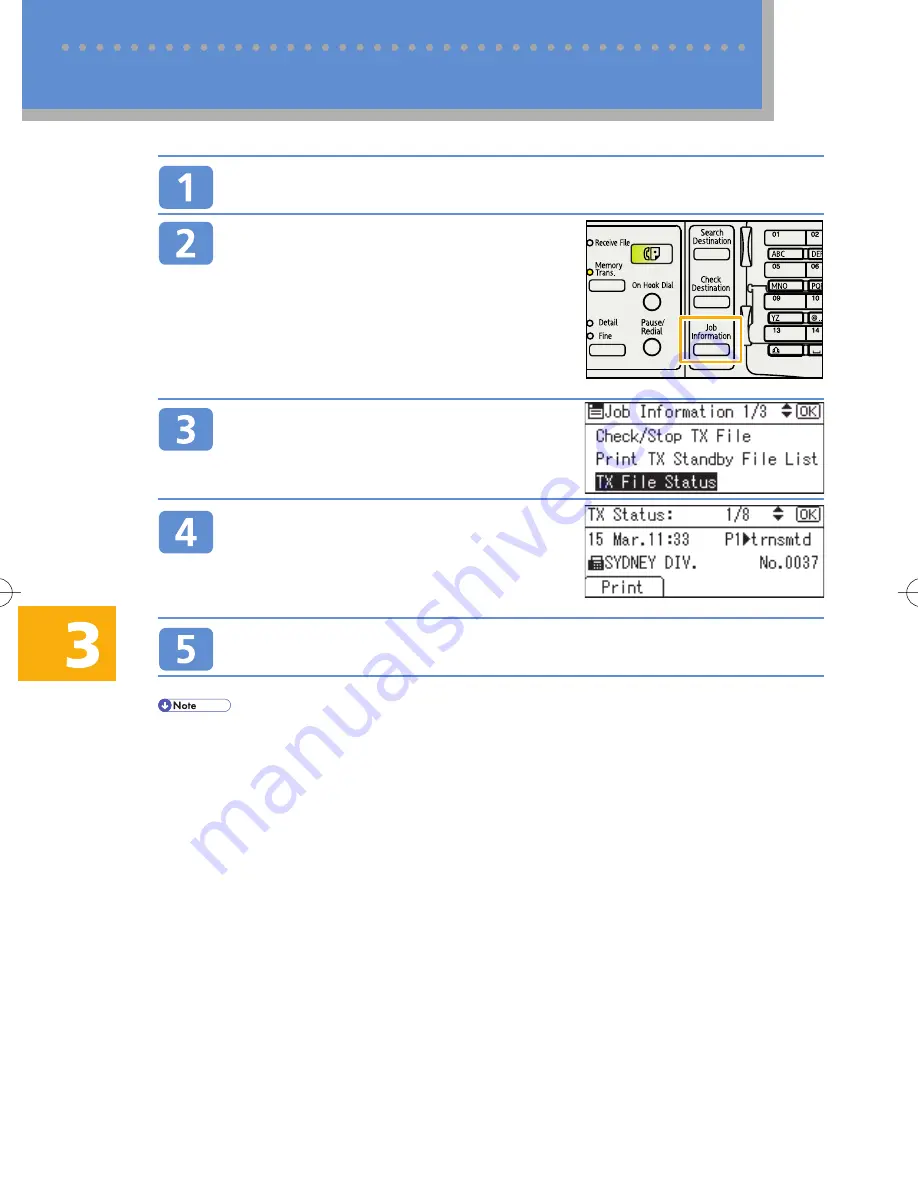
You can check the transmission status on the display.

Check that “Ready” is displayed on the screen.

If any other function is displayed, press the 

{

Facsimile

}

 key on the left of the control panel.

Press the 

{

{

{

{

{

Job Information

}

}

}

}

}

 key.

Select [TX File Status] using 

{U}

 or

{T}

 , and then press the 

{

OK

}

 key.

Check the transmission results using

{U}

 or 

{T}

.

If a fax has been sent, the recipient's Own Fax Number
or Own Name is displayed.

Press the 

{

{

{

{

{

Escape

}

}

}

}

}

 key twice to exit.

You can also print the fax transmission report.

Using the E-mail TX Results function, you can e-mail the Communication Result Report and Immediate TX
Result Report and view them on a computer. For details, see “Sender Settings” , Facsimile Reference on
the supplied CD-ROM.

Checking the Transmission Result (TX File Status)

3 Using the Basic Copier and Fax Functions

BDZ005S

Содержание MPC 1800

Страница 1: ...g the Basic Copier and Fax Functions Registering Fax Destinations andForwardingReceivedFaxes Printing Files and Scanned Copies On Envelopes Unusable PaperTypes and Manuals forThis Machine Quick Guide...

Страница 2: ...Auto Reduce Enlarge P15 Sending a Fax Memory Transmission P16 Sending a Fax Immediate Transmission P17 Checking the Transmission Result TX File Status P18 4 Registering Fax Destina tions and Forwardi...

Страница 3: ...ator printer mode 26 Original key copier scanner and facsimile mode 27 Lighter key Darker key copier scanner and facsimile mode 28 Full Colour B W key copier and scanner mode 29 fOnline key printer mo...

Страница 4: ...rity according to selected paper to Quality on the Print Quality tab in the printer properties dialog box Note that printing is slower with Quality selected BDZ012S clean the print heads p 5 7 if the...

Страница 5: ...re that both the one sheet bypass tray and the one sheet output tray are closed The machine cannot print if any tray is left open Check that A4L or 81 2 x 11L size paper is loaded in Tray 1 If it is n...

Страница 6: ...ds If the test pattern is satisfactory press End and then press the User Tools Counter key 2Troubleshooting Cleaning the Print Heads Print head cleaning consumes ink Do not attempt any other operation...

Страница 7: ...ush the print heads or adjust the print head position based on the problem indicated in the test pattern Problem Nozzles are clogged Flush the print heads For details about flushing the print heads se...

Страница 8: ...mpty during printing Press the User Tools Counter key Select Maintenance using U or T and then press the OK key Select Flush Print heads using U or T and then press the OK key Select the colour of the...

Страница 9: ...not be printed Do not attempt any other operations while the test pattern is printing out Press the User Tools Counter key Select Maintenance using U or T and then press the OK key Select Adjustment u...

Страница 10: ...lines adjustment is complete Press End and then press the User Tools Counter key to exit from the print head position adjustment setting Checking theTest Pattern to Adjust the Print Head Position Use...

Страница 11: ...size is aligned with the notch To load paper whose size is not shown on the paper size selector dial set the paper size selector dial to p and then specify the paper size in Paper Size in System Setti...

Страница 12: ...remain valid until they are reset After printing on glossy paper thick glossy paper thick paper special paper or preprinted paper be sure to clear the settings for the next user When using the one she...

Страница 13: ...iate paper size Then align the side and back paper guides with the edges of the loaded paper and lock the guides Bypass tray or One sheet bypass tray Set the Paper Type setting in the User Tools menu...

Страница 14: ...and load them face up in the ADF ARDF Do not stack originals above the limit mark Load paper so that the first page is on top Placing originals on the exposure glass Flip the original over as shown in...

Страница 15: ...isplayed press the Copy key in the centre of the control panel Make sure no previous settings are still in effect If any previous settings are still in effect press the Clear Modes key Press Auto R E...

Страница 16: ...y onto the exposure glass For details see step 5 on p 14 Using the Basic Copier Functions You can load double sided originals if you are using the ARDF For details about faxing double sided origi nals...

Страница 17: ...op key and then re enter the destination number Press the Start key To fax multiple page originals from the exposure glass after the first page is scanned place the next original on the glass and pres...

Страница 18: ...ssion results using U or T If a fax has been sent the recipient s Own Fax Number or Own Name is displayed Press the Escape key twice to exit You can also print the fax transmission report Using the E...

Страница 19: ...ress the OK key The Programmed message appears and then the screen returns to that of step 4 To exit Check Dest press the OK key The screen returns to that of step 2 From here you can begin faxing a f...

Страница 20: ...nation using the Quick Dial keys To use the Quick Dial keys to specify a forwarding destination the destination must first be registered under a registration number between 001 and 032 Press the User...

Страница 21: ...ail it then prints an error report together with the fax document that could not be forwarded regardless of whether or not printing documents that could not be forwarded is prevented by a parameter se...

Страница 22: ...s and Locations Envelope lever Bypass tray One sheet bypass tray One sheet output tray Left side Guide to Components Paper guide Extender Extender Paper guide Paper guide release lever Normal Envelope...

Страница 23: ...paper guide release lever Loading the Envelope in the one sheet bypass tray p 22 1 Open the one sheet bypass tray p 22 and the one sheet output tray p 22 2 Position the paper guides and load the enve...

Страница 24: ...stem Settings using U or T and then press the OK key Select Tray Paper Settings using U or T and then press the OK key Select Paper Size 1 Sheet Bypass using U or T and then press the OK key Select Cu...

Страница 25: ...elect Paper Type 1 Sheet Bypass using U or T and then press the OK key Select Envelope from the menu using U or T and then press the OK key Press the User Tools Counter key to return to the default sc...

Страница 26: ...Properties In the Original size list on the Print Settings tab select Custom paper size enter the envelope s length and width in Long edge and Short edge respectively and then click OK In the Paper so...

Страница 27: ...Click Printers and Faxes Click the printer icon and then click Properties on the File menu On the General tab click Printing Preferences to display the specified print setting Click Printer Configura...

Страница 28: ...r Sizes dialog box appears Specify Name Long edge and Short edge and then click OK Click OK In the Original size list on the Print Settings tab you can select the registered paper size for the envelop...

Страница 29: ...en the bypass tray p 22 and then lift the release lever For details see step 3 on p 23 Printing onto Envelopes Adjust the paper guide according to the size of the custom size paper envelope carefully...

Страница 30: ...sing U or T and then press the OK key Select Envelope using U or T and then press the OK key Press Exit Load the originals and then press the Start key When the copy job is finished press the Clear Mo...

Страница 31: ...t Unusable Paper Trademarks Microsoft Windows Windows NT Windows Server and Windows VistaTM are either registered trade marks or trademarks of Microsoft Corporation in the United States and or other c...

Страница 32: ...980 Control Panel Troubleshooting Using the Basic Copier and Fax Functions Registering Fax Destinations andForwardingReceivedFaxes Printing Files and Scanned Copies On Envelopes Unusable PaperTypes an...

Отзывы: