Rice Lake Summit SD-1150-WP Скачать руководство пользователя страница 9

Installation

© Rice Lake Weighing Systems


 All Rights Reserved

5

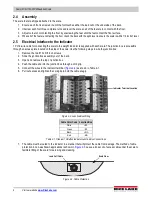
8. Complete the connections to the indicator once the cable is protected and in its final position.
9. Ensure all strain relief fittings are tight.
10. Replace the junction box cover and slide the junction box back into the scale deck.
11. Replace the access plate and secure with the screw removed in 

Step 1 on page 4

.

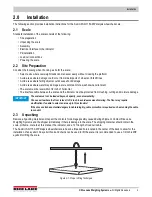
2.5.1 Insert Batteries

The six AA batteries supplied with the scale provide an average of 25 hours of continuous use.
To install the batteries: 

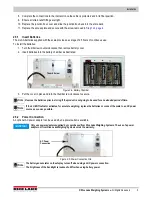
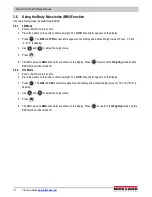
1. Turn thumbscrew counterclockwise then remove battery cover.
2. Insert batteries into the battery chamber as illustrated.

Figure 2-4. Battery Chamber

3. Put the cover in place and turn the thumbscrew clockwise to secure.

  Remove the batteries prior to storing if the product is not going to be used for an extended period of time. 

If the LO BAT indicator activates, for accurate weighing, replace the batteries or connect the scale to an AC power 

source as soon as possible.
 

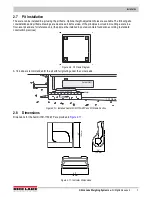
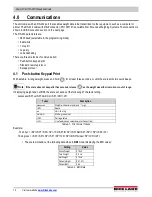
2.5.2 Power Connection

An optional AC power adapter can be used when a power outlet is available.

Only use power adapters supplied by or purchased from Rice Lake Weighing Systems. The use of a power 

adapter not from Rice Lake Weighing Systems voids the warranty.

Figure 2-5. Power Connection Site

The battery annunciator on the display turns off when using an AC power connection.
The brightness of the backlight is reduced to 60% when using battery power.

Thumb Screw

Note

Note

IMPORTANT

AC Power 

Connection

Note

Содержание Summit SD-1150-WP

Страница 1: ...Summit SD 1150 WP Dialysis Wheelchair Scale Software Version 11525 Operation Manual PN 197294 Rev A August 18 2022...

Страница 2: ...respective companies All information contained within this publication is to the best of our knowledge complete and accurate at the time of publication Rice Lake Weighing Systems reserves the right to...

Страница 3: ...ing or obtained by calling 715 234 9171 and asking for the training department Revision History This section tracks and describes the current and previous manual revisions for awareness of major updat...

Страница 4: ...4 Assembly 4 2 5 Electrical Interface to the Indicator 4 2 5 1 Insert Batteries 5 2 5 2 Power Connection 5 2 6 Load Cell Connections 6 2 7 Pit Installation 7 2 8 Dimensions 7 3 0 Operation 8 3 1 Key D...

Страница 5: ...nst harmful interference when the equipment is operated in a commercial environment This equipment generates uses and can radiate radio frequency energy and if not installed and used in accordance wit...

Страница 6: ...rt the scale while someone is on the scale Do not allow minors children or inexperienced persons to operate this scale Do not use in the presence of flammable materials Do not use this product if any...

Страница 7: ...the indicator must be protected from crushing cutting and moisture damage The scale must not be loaded beyond capacity even momentarily Choose a site where the floor is level to 1 4 inch to avoid exc...

Страница 8: ...cess plate located on the side of the scale Use the following steps to wire the junction box 1 Remove the two 10 x 3 8 inch screws 2 Slide the junction box assembly out of the deck 3 Open and remove t...

Страница 9: ...4 Battery Chamber 3 Put the cover in place and turn the thumbscrew clockwise to secure Remove the batteries prior to storing if the product is not going to be used for an extended period of time If t...

Страница 10: ...to gain access to the load cell connection Figure 2 6 Remove Tilt Stand 2 Remove the four back retaining screws to remove the back cover to the indicator Figure 2 7 Remove Back Cover 3 Plug the end o...

Страница 11: ...ale in a floor level pit and are for reference only the pit must be installed in poured concrete foundation according to standard construction practices Figure 2 9 Pit Frame Diagram A 1 24 slope is re...

Страница 12: ...MI Pressing the BMI key enables access to the BMI Body Mass Index mode defaults when scale is turned on The patient is gets on the scale weight stabilizes and press the BMI key The display then asks f...

Страница 13: ...y the patient 1 Press to turn on the scale 0 0 appears on the display along with the ZERO annunciator 2 Place additional item s on the scale 3 Press until the display returns to 0 0 and NET annunciato...

Страница 14: ...adjust the height value 5 Press 6 The BMI value and BMI annunciator are shown on the display Press to return to the Weighing mode and the BMI function will be turned off 3 6 2 KG Mode 1 Ensure that t...

Страница 15: ...high E07 AD too low E10 Overload Scale has been overloaded Remove load from scale E4L BAT Battery low but still usable one bar left on indicator display E4U Battery low and unstable no bars left on in...

Страница 16: ...ess and hold for at least three seconds or until the scale emits two quick beeps If the scale does not beep after five seconds release as the weight was either in motion or out of range If displaying...

Страница 17: ...the use of the USB driver Driver protections may need to be temporarily disabled on Windows 10 or later computers to allow for the installation of the USB driver 1 Connect the scale s indicator to a...

Страница 18: ...the overall appearance of the entire scale for any obvious signs of damage Inspect the condition of the AC power adapter cord for cracking fraying or for broken or bent prongs 5 2 Cleaning Proper car...

Страница 19: ...urs of continuous use Automatic power off can be configured Environmental Operating Temperature 50 F to 104 F 14 C to 40 C Storage Temperature 32 F to 158 F 0 C to 70 C Humidity 85 relative humidity D...

Страница 20: ...Summit SD 1150 WP Wheelchair Scale 16 Visit our website www RiceLake com...

Страница 21: ......

Страница 22: ...54868 USA U S 800 472 6703 Canada Mexico 800 321 6703 International 715 234 9171 Europe 31 0 26 472 1319 Rice Lake Weighing Systems Specifications subject to change without notice www ricelake com PN...

Отзывы: