


Page 46 MSI-9750A RF Remote Indicator • User Guide
9750A
HANDHELD RF REMOTE INDICATOR for
C
ELL
S
CALE
®
Selecting Items for Display
The custom display setup menus provide access to all the data the scale can provide. When an item is present on
the display, it will have an arrow next to its selection number. The length of some data items are fi xed, but many
have variable lengths. When an item is selected for the fi rst time, a number entry screen will appear (if it is a
®
®
variable length data item) allowing you to decide the length of the data. Beneath each item is the “Column Start”
selection which allows you to change the starting location. The 9750A adjusts the available start column range
in order to allow the whole length of the fi eld to fi t. For example, picking ID String 1 as a data allows up to 20
characters in the small font. If you leave the fi eld length at 20, the only available starting point is 1. However, if
you shorten the ID String 1 length to 10, the start column can range from 1 to 11.
NET-GROSS-TARE WT
1 Current Weight 14C
2 Start Column 1
3 Gross Weight
4 Start Column
5 Tare Weight
6 Start Column
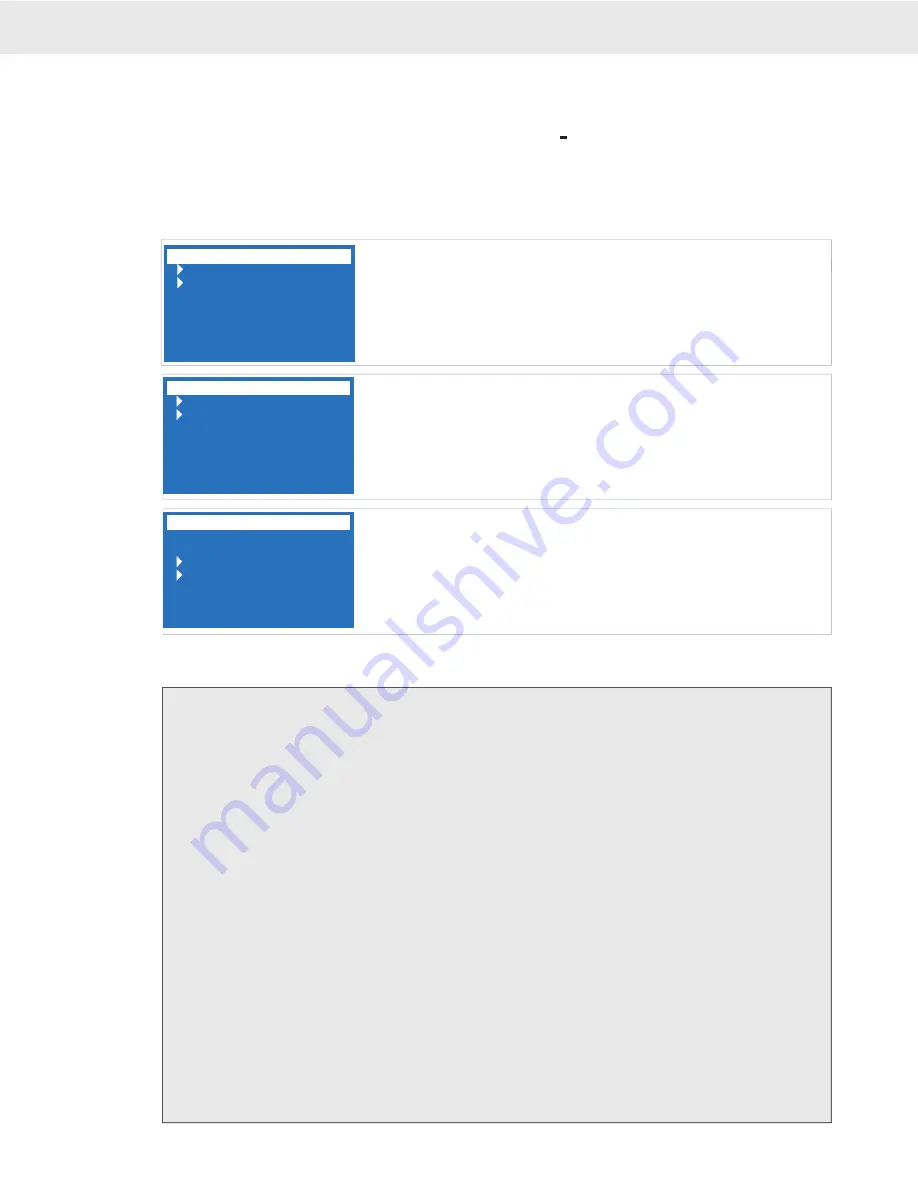
NET-GROSS-TARE WT
NET-GROSS-TARE WT
1 Current Weight 8 C
2 Start Column 1
3 Gross Weight
4 Start Column
5 Tare Weight
6 Start Column
NET-GROSS-TARE WT
This screen illustrates a typical data selection. In this case, the current weight
This screen illustrates a typical data selection. In this case, the current weight
selection. The start column line has an asterisk indicating that the current
weight is already in the display set, but not found on the line you are cur-
rently programming. You can turn off the current setting by selecting the
number, and then entering the parameters for the current line you are setting
up.
This screen illustrates that the current weight is on the line you are now set-
ting up, and it starts at column 1. Since only the large font will fi t a weight
display in 8 characters, the start column will not allow a change.
This screen illustrates a 14 character gross weight on a small font line, and it
starts at column 6. If the line you are setting up is a small font line, the start
column will range from 1 to 6. In the medium font, the start column will
range from 1-3 (weight data lines are minimum 14 characters except for a
special case large font mode which takes 8 characters.
NET-GROSS-TARE WT
1 Current Weight
2 Start Column
3 Gross Weight 14C
4 Start Column 6
5 Tare Weight
6 Start Column
NET-GROSS-TARE WT
CUSTOM SCREEN SETUP PROCEDURE
You should setup both a single channel and multiple channel custom setup (unless you only have 1 channel)
1) Press
SETUP
, then
DISPLAY
or
SETUP
, “MORE”
[7]
, then “Scale Display”
[2]
.
2) Select “Single Scale Mode”
[1]
, or “Multi Scale Mode”
[2]
.
3) Select “Custom”
[6]
.
4) Multi-channel setup only: Pick the scan list index to program (1-8). Keep in mind that you must use small
fonts if you want to see all eight scales on one screen.
5) Select the size font you want to use.
It is best to program from large font to small font so that you can see the impact of data location on other rows.
6) Select the row(s) for the data items.
7) Select the broad type of data you want to place on the selected row. Select
[1]
for product ID parameters
including total and ID Strings. Select
[2]
for all weight types. Select
[3]
for Channel Info such as channel
name, scan list index, and channel number. Select
[4]
for text and miscellaneous data such as grand totals
and bar code data. Select
[5]
for date and time data placement.
While in this menu, the line preview is displayed, use the CLR key to delete the current line setup. Use the [0 Space] key to delete only the data present
in the current size font, while leaving other size data intact.
8) Select the exact data type. If the fi eld is a variable type, a number entry screen will appear. Program the
number of characters needed. The available range appears on the number entry screen.
9) Change the start column as necessary. If the line is full, the start location cannot be changed.
10) Press the
ESC
key until you are back to the font size selection menu. Repeat steps 6-9 until the screen
is exactly how you want it. Use the Preview selections found on several menus to observe your work in
progress.
11) When fi nished press the
EXIT
(
DISPLAY
) key to return to normal operation.


