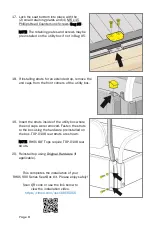
17. Lock the seat bottom into place with the
(2) small retaining plates and (4) M6 x 15
Phillips Head Countersunk Screws (Bag #5).
NOTE: The retaining plates and screws may be
pre-installed on the utility box if not in Bag #5.
18. If installing struts for an extended top, remove the
end caps from the front corners of the utility box.
19. Insert the struts inside of the utility box where
the end caps were removed. Fasten the struts
to the box using the hardware preinstalled on
the box. TOP-0108 rear struts are shown.
NOTE: RHOX 88” Tops require TOP-0108 rear
struts.
20. Reinstall top using Original Hardware (if
applicable).
This completes the installation of your
RHOX 900 Series Seat Box Kit. Please enjoy safely!
Scan QR code or use the link below to
view the installation video.
https://vimeo.com/user39935056
Page 8


