background image

Caution:

 Please read through the instructions carefully.  Installer is responsible 

for damage if instructions are not followed properly.  Look behind each drill or 
cut location BEFORE YOU DRILL OR CUT. Installer is responsible for damage 
(i.e. drilling/cutting into a wiring harness, battery, fuel tank etc.). Extra installers 
will be helpful in some parts of the installation. Refer to vehicle’s maintenance 
manual for torqueing specifications on reused hardware. 

SEAT-931 

Club Car Precedent 

RHOX 900 Series Seat Box Kit 

Installation Instructions 

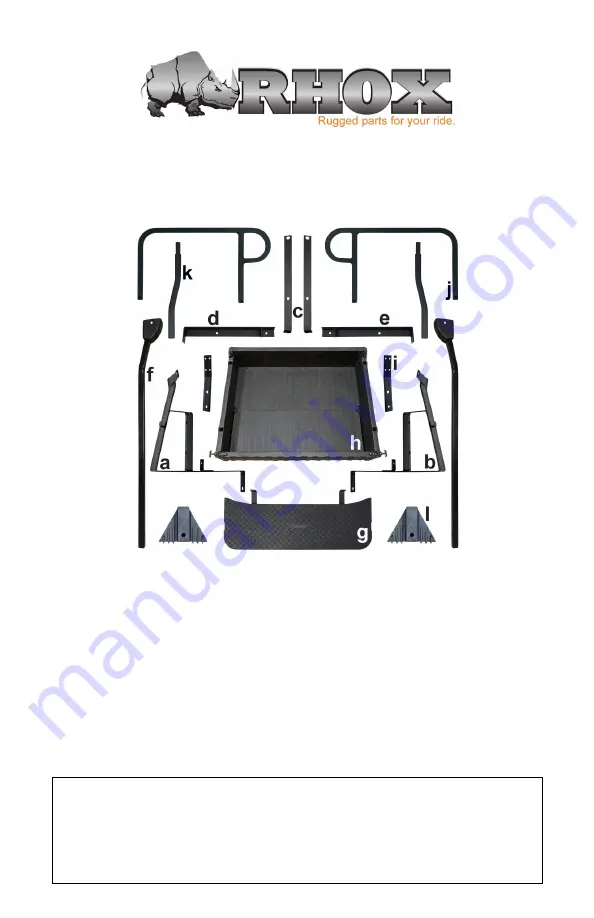
Contents of SEAT-931 Seat Box Kit: 
 

(1 ea.) Front Seat Back Support, Passenger Side 


(1 ea.) Front Seat Back Support, Driver Side 


(2 ea.) Vertical Support Brackets 


(1 ea.) Horizontal Support Bracket, Passenger Side 


(1 ea.) Horizontal Support Bracket, Driver Side 


(2 ea.) Replacement Rear Struts for OE Top  


(1 ea.) Footplate 


(1 ea.) Utility Box 


(2 ea.) Rear Seat Back Brackets 


(2 ea.) Handrails 


(2 ea.) Handrail Extensions 


(1 ea.) Footplate Support Brackets 


(1 ea.) Box of Hardware (Contents on Next Page) 

Содержание SEAT-931

Страница 1: ...rqueing specifications on reused hardware SEAT 931 Club Car Precedent RHOX 900 Series Seat Box Kit Installation Instructions Contents of SEAT 931 Seat Box Kit a 1 ea Front Seat Back Support Passenger...

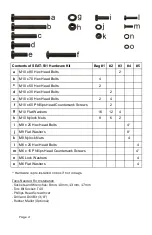
Страница 2: ...rdware Kit Bag 1 2 3 4 5 a M10 x 80 Hex Head Bolts 2 b M10 x 70 Hex Head Bolts 4 c M10 x 50 Hex Head Bolts 2 d M10 x 35 Hex Head Bolts 2 e M10 x 30 Hex Head Bolts 2 4 f M10 x 60 Phillips Head Counters...

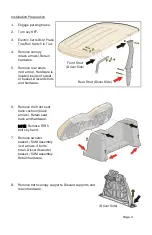
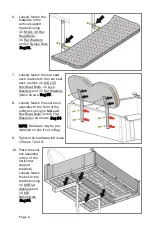
Страница 3: ...cated inside of sweat er basket Discard struts and hardware 6 Remove the front seat back cushion black arrows Retain seat back and hardware NOTE Remove TORX bolts by hand 7 Remove sweater basket SAM A...

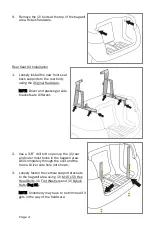
Страница 4: ...passenger side brackets are different 2 Use a 3 8 drill bit to open up the 2 rear and outer most holes in the bagwell area Drill completely through the rivet and the frame Driver side hole not shown...

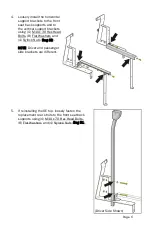
Страница 5: ...ets using 4 M10 x 30 Hex Head Bolts 8 Flat Washers and 4 Nylock Nuts Bag 2 NOTE Driver and passenger side brackets are different 5 If reinstalling the OE top loosely fasten the replacement rear struts...

Страница 6: ...hers and 4 Flat Washers black arrows Bag 5 8 Loosely fasten the seat back assembly to the front of the utility box using 4 M8 x 25 Hex Head Bolts and 4 Flat Washers red arrows Bag 4 NOTE Hardware may...

Страница 7: ...crews 2 Flat Washers and 2 Nylock Nuts blue arrow Bag 2 Do not overtighten 14 Slide the footplate support brackets over the handrail extensions until the holes align The brackets will cradle the footp...

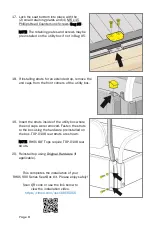
Страница 8: ...ers of the utility box 19 Insert the struts inside of the utility box where the end caps were removed Fasten the struts to the box using the hardware preinstalled on the box TOP 0108 rear struts are s...

Отзывы: