48
Weekly
For low-pressure heaters, test low-water cut-off de
-
vice. (With at least one stage of the appliance on,
depress the low water cut-off test button, appliance
should shut-off and ignition fault light should come on.
Depress reset button to reset).
Monthly
1. Check flue, vent, stack, or outlet dampers.
2. Test fan air pressure. (See “Blower Adjustment” on
page 42.)
3. Test high and low gas pressure interlocks (if
equipped). (See “Safety Inspection” on page 43.)
Semi-Annually
1. Recalibrate all indicating and recording gauges.
2. Check flame failure detection system components.
(See “Pilot Turn-Down Test Procedure,” page 43.)
3. Check firing rate control by checking the manifold
pressure. (See “Main Burner Adjustment” on page
42.)
4. Check piping and wiring of all interlocks and shut-
off valves.
Annually
1. Test flame failure detection system and pilot turn-
down. (See “Pilot Turn-Down Test Procedure,”
page 43.)
2. Test high limit and operating temperature. (See
“Post Start-Up Check,” page 44.)
3. Check flame sensors.
4. Conduct a combustion test at full fire. Carbon diox
-
ide should be 7.5 to 8.5% at full fire for natural gas,
and between 9.2 to 9.8% for propane gas (Carbon
monoxide should be < 150 ppm).
5. Check coils for 60 cycle hum or buzz. Check for
leaks at all valve fittings using a soapy water solu-
tion. Test other operating parts of all safety shut-off
and control valves and increase or decrease set-
tings (depending on the type of control) until the
safety circuit opens. Reset to original setting after
each device is tested.
6. Perform leakage test on gas valves. (See Fig. 37.)
7. Test air switch in accordance with manufacturer’s
instructions. (Turn panel switch to the “On” posi
-
tion until blower is proven, then turn the switch to
“Off”.
8. Inspect and clean burners as necessary.
As Required
1. Recondition or replace low water cut-off device (if
equipped).
2. Check drip leg and gas strainers.
3. Perform flame failure detection and pilot turn-down
tests.
4. Check igniter. (Resistance reading should be 42-
70 ohms at ambient temperature.)
5. Check flame signal strength. (Flame signal should
be greater than 1 microamp).
6. Test safety/safety relief valves in accordance with
ASME Heater and Pressure Vessel Code Sections
VI and VII.
Содержание Raypak Delta Limited 399B
Страница 23: ...23 Fig 21 2 Stage Wiring Connections Fig 22 3 Stage Wiring Connections Fig 23 4 Stage Wiring Connection...
Страница 39: ...39 Wiring Diagram Models 399B 1259B...
Страница 40: ...40 Wiring Diagram Models 1529B 2339B...
Страница 51: ...51 DIAGNOSTIC DETAIL 12 J 7 J 6 J 5 J 3 0 2 0 16 S 1 F 2 F 3 F 4 F BLOWER DETAIL...
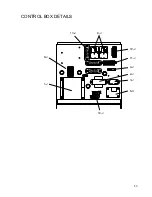
Страница 53: ...53 13 J 8 J 10 J 11 J 4 J 2 J 3 J 6 C 14 J 9 J 1 J CONTROL BOX DETAILS...
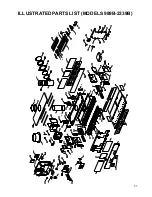
Страница 57: ...57 ILLUSTRATED PARTS LIST MODELS 989B 2339B 10 J 3 O 5 O...
Страница 58: ...58 12 H 6 H 7 H 8 H 2 H 9 H 3 H 5 H 1 H 4 H 1 P HEAT EXCHANGER DETAILS BURNER ASSEMBLY DETAILS...
Страница 59: ...59 CONTROL BOX DETAILS 9 J 8 J 23 S 13 J 10 J 3 O 10 J 3 O 5 O FRONT SWITCH DETAILS...
Страница 66: ...66...
Страница 67: ...67 Raypak Inc 2151 Eastman Avenue Oxnard CA 93030 805 278 5300 Litho in U S A NOTES...


