


Inst
allation S
teps
7
PN01805 REV00
Installation Steps
1. Extend the temperature sensor inside the space to be monitored (e.g. inside refrigerator, freezer or under raised
floor) and secure with the tie-wraps and tie-wrap mounting pads provided with the device.
2. Mount the RF transmitter using the provided adhesive pad or by optionally securing with screws or tie-wraps
(not provided). To mount the RF transmitter using the adhesive backing, remove the protective backing, posi-
tion the sensor tag where it is to be mounted and apply firm pressure for ten seconds.
Best read-range can be achieved by mounting the RF transmitter at least 4 ft. or more above the
ground.
3. Secure the temperature sensor using the provided tie-wraps so that movement of the cable is minimized.
Once the R151 Tethered Temperature Sensor has been properly installed, it can be configured within RF Code’s Sen-
sor Manager software where users can view tag details, use graphs and reports to analyze temperature trends, or create
alert policies to send notifications. For information regarding configuration of Sensor Manager, please refer to the
Sen-
sor Manager Administrator Manual and User Manual
available at:
http://www.rfcode.com/Resources/Library/User-Manuals.html
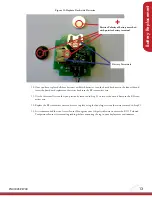
Temperature Sensor Tether Cable Connection Steps
In some installation instances the temperature sensor tether cable may need to be removed. The following steps outline
the process for removing and reattaching the temperature sensor tether cable:
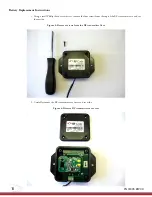
1. Remove the R151 RF Transmitter case top using a Philips head screwdriver to remove the four case screws and
set aside tag case top and screws.
Figure 1: R151 Remove RF transmitter Case Top