


Falk
®
Ultramite
®
• Installation & Maintenance Instructions
Type UJ • Sizes 302 thru 312
(Page 9 of 15)
GR3-016
866-REXNORD/866-739-6673 (Within the U.S.)
08/20 (Supersedes 01/18)
414-643-2366 (Outside the U.S.)
© Rexnord Corporation. All Rights Reserved.
SHAFT CONNECTIONS
WARNING:
Provide suitable guards in accordance with OSHA
standards.
Input and output shaft extension diameter tolerance is
+.0000"; -.0005" for shafts up to 1.750" diameter and
+.0000"; -.0010" for shafts larger than 1.750" diameter.
The fitted component must be machined to ensure proper fit. DO
NOT drive coupling hub, pinion, sprocket or pulley on the shaft.
An endwise blow on the shaft may damage gears and bearings.
Coupling hubs, pinions, sprockets or pulleys must be pushed onto
the shaft using a screw jack device fitted into the threaded hole
provided in the end of the shaft, see Table 1 below.
Table 10 — Shaft End Threaded Holes – Inches
DRIVE SIZE
Input Shaft
Output Shaft
302
0.375-16 UNC-2B
0.375-16 UNC-2B
304
0.375-16 UNC-2B
0.375-16 UNC-2B
307
0.375-16 UNC-2B
0.625-11 UNC-2B
308
0.500-13 UNC-2B
0.750-10 UNC-2B
309
0.500-13 UNC-2B
0.750-10 UNC-2B
310
0.750-10 UNC-2B
0.750-10 UNC-2B
312
0.750-10 UNC-2B
1.000-8 UNC-2B
COUPLING CONNECTIONS —
The performance and life of any
coupling depends largely upon how well the coupling is installed
and serviced. Refer to the coupling manufacturer’s manual for
specific instructions.
– CAUTION –
DO NOT HAMMER
CORRECT METHOD
Heat interference fitted coupling hubs,
pinions, sprockets or pulleys to a
maximum of 275°F (135°C) and slide
onto gear drive shaft.
INCORRECT METHOD
DO NOT drive coupling hub, pinion,
sprocket or pulley onto the shaft. An
endwise blow on the shaft/coupling may
damage gears and bearings.
FALK COUPLINGS —
Detailed installation manuals are available
from the Factory, your local Rexnord Representative or Distributor;
just provide size and type designations stamped on the coupling.
For lubricant requirements and a list of typical lubricants meeting
Rexnord specifications, refer to appropriate coupling service manual.
GAP AND ANGULAR
ALIGNMENT —
If possible, after
mounting coupling hubs, position
the driving and driven equipment
so that the distance between
shaft ends is equal to the
coupling gap. Align the shafts by
placing a spacer block, equal in
thickness to required gap,
between hub faces, as shown, and also at 90° intervals around the
hub. Check with feelers.
OFFSET ALIGNMENT —
Align
driving and driven shafts so that a
straight edge will rest squarely on
both coupling hubs as shown to
the right and also at 90° intervals.
Tighten foundation bolts of the
connected equipment and recheck
alignment and gap.
SPROCKETS, PULLEYS OR
SHEAVES —
Mount power take-offs
as close to the gear drive housing as
possible to avoid undue bearing load
and shaft deflection.
Align the output shaft of the gear drive
square and parallel with the driven
shaft by placing a straightedge across
the face of the sprockets or sheaves
as illustrated.
Check horizontal shaft alignment by placing one leg of a square
against the face of the sheave or sprocket with the spirit level on
the horizontal leg of the square.
DO NOT overtighten belts or chains. Adjust chains to
manufacturer’s specifications. Adjust belts as follows:
The ideal tension is the lowest tension at which the belt will not
slip under peak load conditions. Check the belt tension frequently
during the first 24 to 48 hours of run-in operation. Overtightening
belts shortens belt and bearing life. Keep belts free from
foreign material which may cause slippage. Inspect the V-belts
periodically; tighten the belts if they are slipping.
PINION MOUNTING —
Mount pinion as close to the drive as
possible to avoid undue bearing load and shaft deflection. Refer to
the Factory for pinion alignment instructions.
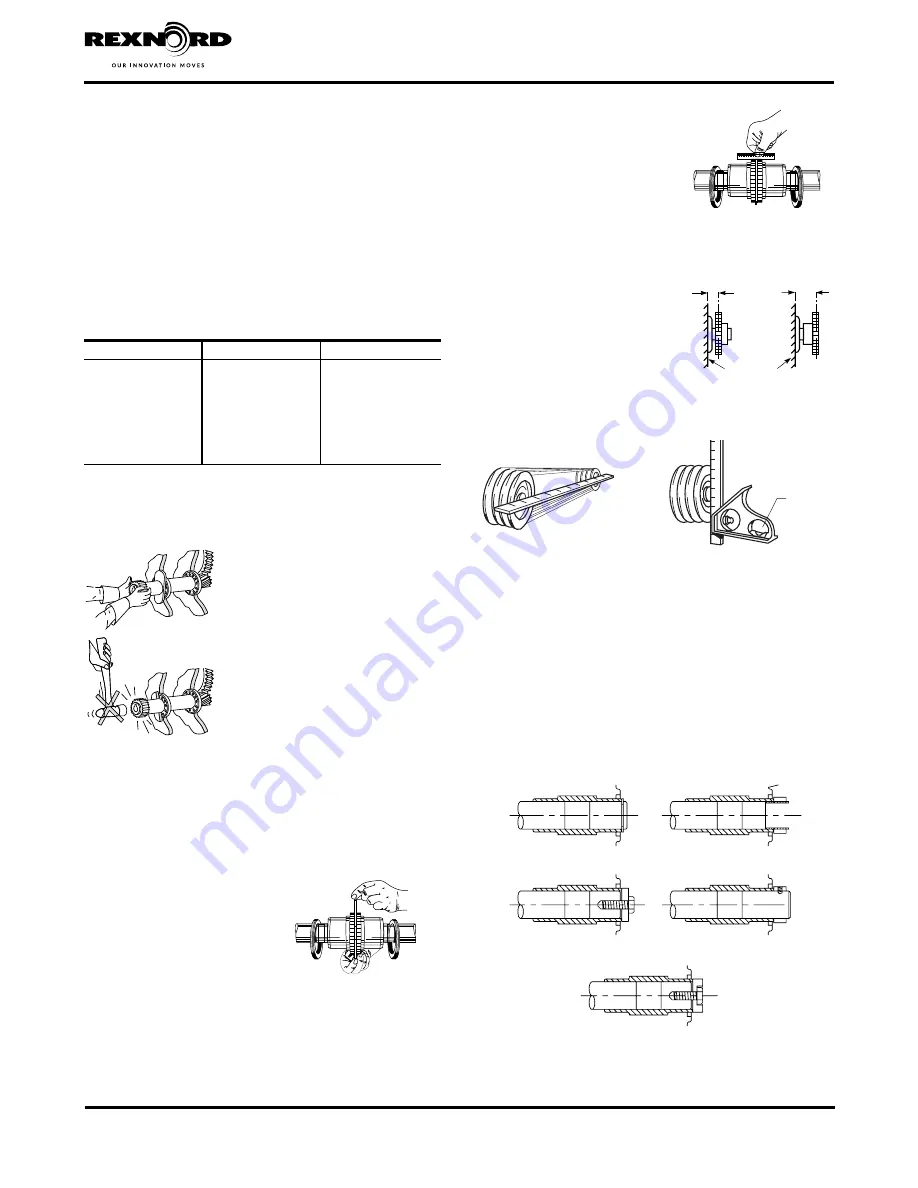
Refer to Figure 12 for methods of retaining shaft mounted drives.
DRIVE RETAINED WITH
RETAINING RING
DRIVE RETAINED
WITH LOCKNUT
DRIVE RETAINED WITH
PLATE AND FASTENER
DRIVE RETAINED WITH
COLLAR AND SETSCREW
DRIVE RETAINED WITH RECESSED PLATE AND FASTENER
Figure 12
STEELFLEX
®
ILLUSTRATED
STEELFLEX ILLUSTRATED
LEVEL
SQUARE AND
PARALLEL
RIGHT
WRONG
GEAR DRIVE WALL