background image

(Revosys X500 2DIN PC System Operations Manual) V1.2

43

A. Back to the Top
B. Virtual keyboard
C. Enter URL
D. Put the current web page to the Favorites folder
E. Reduce page text size
F. Restore website text 
G. Enlarge text on the page
H. Page Up
I. Page Down

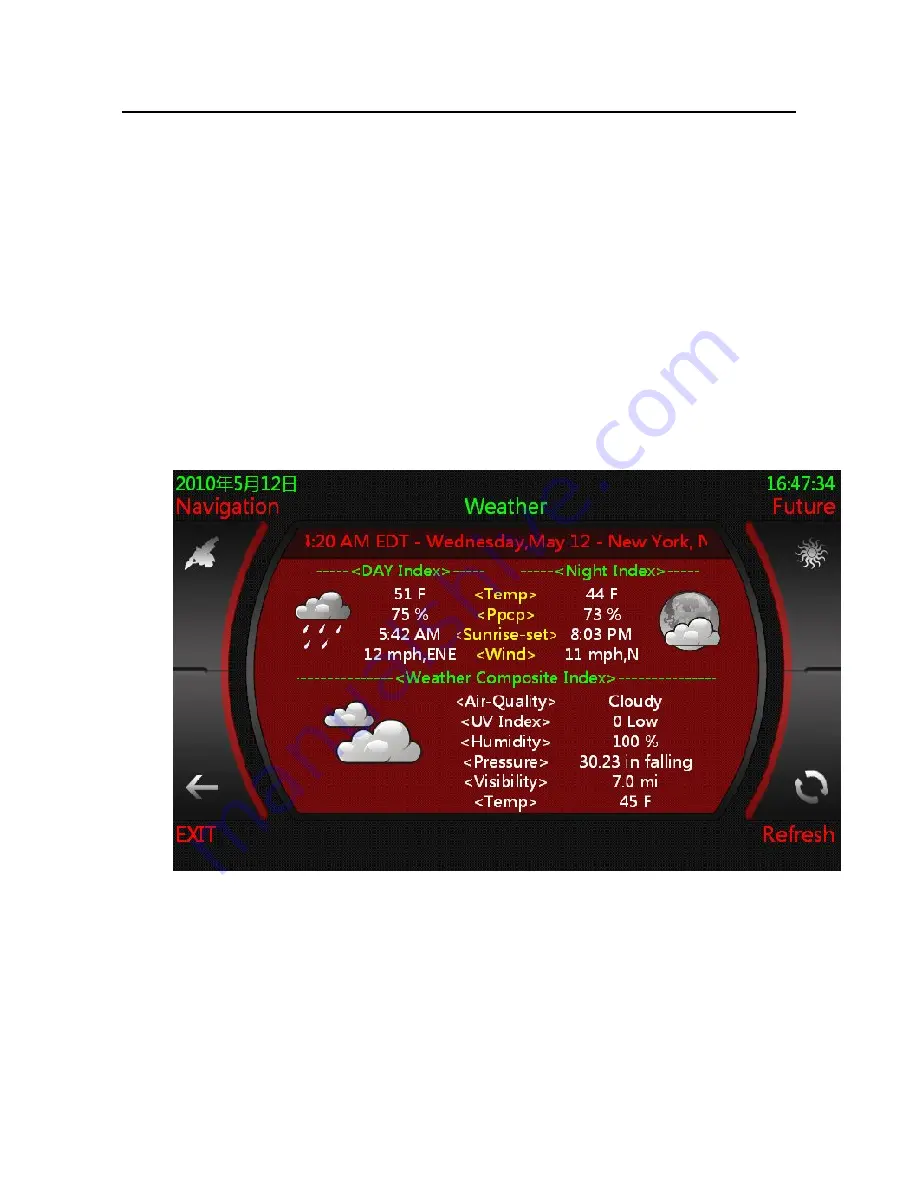
5.6 Weather features

1) Clicking the "future weather" button will display the next four days of the weather 
forecast
2) Clicking the "Refresh weather" button will immediately update weather in 
real-time
3) Set the city weather, from the main interface in the "Settings menu 3 / procedures 

Содержание Revosys X500

Страница 1: ...I...

Страница 2: ...3 1 1 Setting General Options 13 1 2 Skin Settings menu 13 1 2 1 Select Interface Language Options 13 1 2 2 Changes in the interface between the effect of 145 1 2 3 Select the interface background pic...

Страница 3: ...bration 30 3 5 Advanced settings procedures 31 C Application software interface 34 4 1 Car Video Surveillance 35 4 2 XP Explorer interface 36 4 3 Handwritten notepad 36 4 4 Calculator interface 37 E A...

Страница 4: ...Revosys X500 2DIN PC System Operations Manual V1 2 III System Restore Guide 54...

Страница 5: ...g errors and software updates to make the necessary changes at any time and incorporated into the new version of the manual Product Introduction Automobile computer and wireless communications technol...

Страница 6: ...only as a backup aid Any accidents caused while the driver is using the rearview camera are not the responsibility of the Company Operation Precautions A Product maintenance precautions 1 Do not atte...

Страница 7: ...eration of this product 6 Car battery is without adequate power The system will not work 7 Poor weather or geographical location may affect the system s wireless network GPS access signal The system s...

Страница 8: ...e touch screen the warranty does not cover this D Front panel buttons and interface description 1 Click on button 1 the video switch Click the button between the PC interface and AV2 conversion cycle...

Страница 9: ...nal display 2 GPS antenna port 3 Radio antenna port 4 POWER SUPPLY CONNECTOR interface interface definitions see box above the label then see how the back line interface the Quick Installation Guide 5...

Страница 10: ...navigation surveillance entertainment wireless Internet access games Bluetooth video conference car phone rear view camera and picture browsing all in one vehicle intelligent information system With t...

Страница 11: ...lly launch into the interface first of all disclaimers Figure shown below Click the OK to enter the main interface as shown below The first column is the system above the status bar from left to right...

Страница 12: ...shows enabled 9 Radio STEREO state stereo status green is not enabled the red enabled 10 Radio SEEK state fine tuning green is not enabled the red enabled 11 SCAN state the radio mode the icon will f...

Страница 13: ...evosys X500 2DIN PC System Operations Manual V1 2 12 B The software setup interface Hardware interface configurations are necessary before the software settings 1 Set menu 1 1 1 General Options settin...

Страница 14: ...ed The changes will take effect once the system is restarted 1 2 Skin Settings menu 1 2 1 Select Interface Language Options For now only Chinese and English are the only available languages more langu...

Страница 15: ...fter the normal full screen 1 DISABLED disable the effect 2 FADE IN fade effect 3 WIPE BOTTOM TO TOP top down change image effects 4 WIPE TOP TO BOTTOM the image changes from the bottom up effects 5 W...

Страница 16: ...11 SLIDE OUT TO BOTTOM images slide into the bottom 12 RANDOM random effect 1 2 3 Select the MMI background picture Press the left and right arrows to select the background image click the upper righ...

Страница 17: ...2DIN PC System Operations Manual V1 2 16 1 3 Music player settings 1 3 1 Set the table file path for the music player Click as shown below then enter the file path to choose items of your choice to s...

Страница 18: ...ngs before the show 1 2 3 4 1 3 3 Set the audio file format Through the use of multiple formats separated by this process can play most of the mainstream audio files This is where you can add or delet...

Страница 19: ...1 Set the radio hardware type System default 7 Silabs 1 Radiator 2 Cingery 3 HQCT 4 Radioshark 5 D Link USB 6 Blaupunkt 7 Silabs 8 HD Radio Do not change change would lead to the radio can not be used...

Страница 20: ...the changes the changes will take effect upon reboot of the MMI 1 5 Video player settings 1 5 1 Select the video playback to set the time for the automatic full screen to begin TRUE is for yes FALSE...

Страница 21: ...nual V1 2 20 2 Settings menu 2 2 1 Custom navigation map settings You can install your own maps and set up your map serial port The GPS port of the MMI is COM16 If you use your own maps the software s...

Страница 22: ...Class Name Text The map requirements are to run the resolution at0 480 32 bit If you choose to run the map in full screen you can not set the window name as shown below Set complete Click ENTER button...

Страница 23: ...2 22 2 1 3 Intelligent Navigation GPS port settings The MMI system s default port is COM16 do not change this 2 1 4 Intelligent Navigation map type settings 1 0 Destinator Destinator 2 1 Mappoint Micr...

Страница 24: ...ght corner of the Save Settings button to save the changes the changes will take effect after the next reboot of the MMI 2 2 Weather Settings Automatically updated with the following options in severa...

Страница 25: ...4 Man machine interface HMI system default path 1 The music library path in D CARPC MUSIC 2 Film library path in D CARPC VIDEO 3 Video library path in D CARPC CAMREC VIDEO 4 The background images in C...

Страница 26: ...deos please add the path to the above Finally select the upper right corner of the Save Settings button to save the changes the changes will take effect after the next reboot of the MMI 2 4 1 Vehicle...

Страница 27: ...file settings other LOGO Through a or next button select the LOGO you want Click Save Settings to return to the previous menu remember to click the Save LOGO button 2 5 Extension settings Press the Sa...

Страница 28: ...er the next reboot of the MMI 3 Settings menu 3 3 1 1 Adjust the volume settings 1 Click here to set the speed at which to control the volume 1 First enable the volume control by the speed of adjustme...

Страница 29: ...the volume adjustment of the minimum speed of termination For example you set Velocity units are KPH hour The minimum starting volume is 50 end of the maximum volume is 100 Volume automatically adjus...

Страница 30: ...s Manual V1 2 29 Finally press the Save Settings button to save the changes the changes will take effect after the next reboot of the MMI 3 2 Man machine interface version of the introduction Through...

Страница 31: ...ch screen calibration please use a stylus pen Do not use your nails or other sharp objects to make the calibration Click the button on the touch screen calibration option for a 4 pointq calibration Fo...

Страница 32: ...e of the Company then please click the Save To abandon the modified content please click the Back button Introduction to this software set is completed once the software settings are done click Exit S...

Страница 33: ...ct YES to restart the MMI select NO to return to the main interface the changes will take effect the next time you start the MMI C Software setup interface C Application software interface In the main...

Страница 34: ...nce 1 Click on video recording button video recording recorded video is saved in D CARPC CAMREC VIDEO directory the longest period of time is every 30 minutes 2 Click Full Screen button for full scree...

Страница 35: ...e the Save button click the Save handwriting 2 Undo Undo button and click Undo handwriting 3 Redo Redo button click Empty the contents of the current page 4 Delete Delete button click Delete Save the...

Страница 36: ...Revosys X500 2DIN PC System Operations Manual V1 2 35 4 4 Calculator interface E The main applications menu...

Страница 37: ...ft to right are A Loop B Shuffle C Stop D Single Repeat E Play Pause F next track G Volume reduction H Volume increase I Mute 2 Click Media Library button and enter the album selection as shown in 5 1...

Страница 38: ...w to enter the selected album documents 3 Pgup and Pgdn arrows moves selection a single line up or down 4 If you want to hear the songs directly click on the upper left corner Add Music button the sel...

Страница 39: ...orner of the preview song button the MMI will only play the first 10 seconds of each track 5 2 Video playback interface Here is a row of control buttons from left to right is A Rewind B Fast Forward C...

Страница 40: ...Revosys X500 2DIN PC System Operations Manual V1 2 39 D 4 3 E 2 35 1 F Cut Click the upper right corner of the Media Library button to enter the video media library as shown below...

Страница 41: ...utton will permanently delete the selected files or song files from the MMI 5 3 DVD player interface 1 Click on the button 1 for karaoke PLAY switch 2 Click on the button 2 language switch 3 Click on...

Страница 42: ...l buttons from left to right is A Browse the radio listen to 10 seconds for each channel B Auto Search a signal to all stations C manually enter the frequency of the station you want to find D SEEK fe...

Страница 43: ...button to delete those stations with no signal to retain only the most useful stations 3 AF function RDS automatic frequency adjustment when the signal falls below a certain level AF feature automatic...

Страница 44: ...page text size F Restore website text G Enlarge text on the page H Page Up I Page Down 5 6 Weather features 1 Clicking the future weather button will display the next four days of the weather forecast...

Страница 45: ...yweather boston weatherunits WORLD weatherdegress localdatacaptureinterval 30 For example your city of Boston please amend the text above into the red part of the boston Save the changes and restart t...

Страница 46: ...ees Celsius 0 60 Fahrenheit 32 140 Storage temperature Degrees Celsius 40 80 Fahrenheit 4 176 Relative humidity 10 90 40 No condensation Vibration frequency 5 17Hz 0 1 Double amplitude displacement En...

Страница 47: ...esistive touch screen Diffusion Interface USB Front panel USB rear panel USB DVB T Format optional European standard Interface Module USB External CMMB Format optional China Radio and TV standards Int...

Страница 48: ...e to send the unit back for repair under warranty please contact the Company or distributor Problem Failure Possible Cause Countermeasure LCD screen does not show By pressing the AV button the video s...

Страница 49: ...the system detects that the host power supply for 10 seconds is less than 10 8V the system will think the battery is drained and the system is issued a shutdown signal the system will automatically sh...

Страница 50: ...gnal is weak or has no signal GPS navigation signal is weak cannot navigate Satellite receiver connection failure Make sure receiver is connected Notes 1 The host of the terminal voltage 10 8V is the...

Страница 51: ...store Guide When used over a long time the system will gradually slow down or you may have problems arise within the Operating system which may require you to restore the system to the default state R...

Страница 52: ...e process is automatic The system restore is completed within about five minutes Do not power off the system during this time System Restore is only for C drive system tray System Restore for you save...

Отзывы: