background image

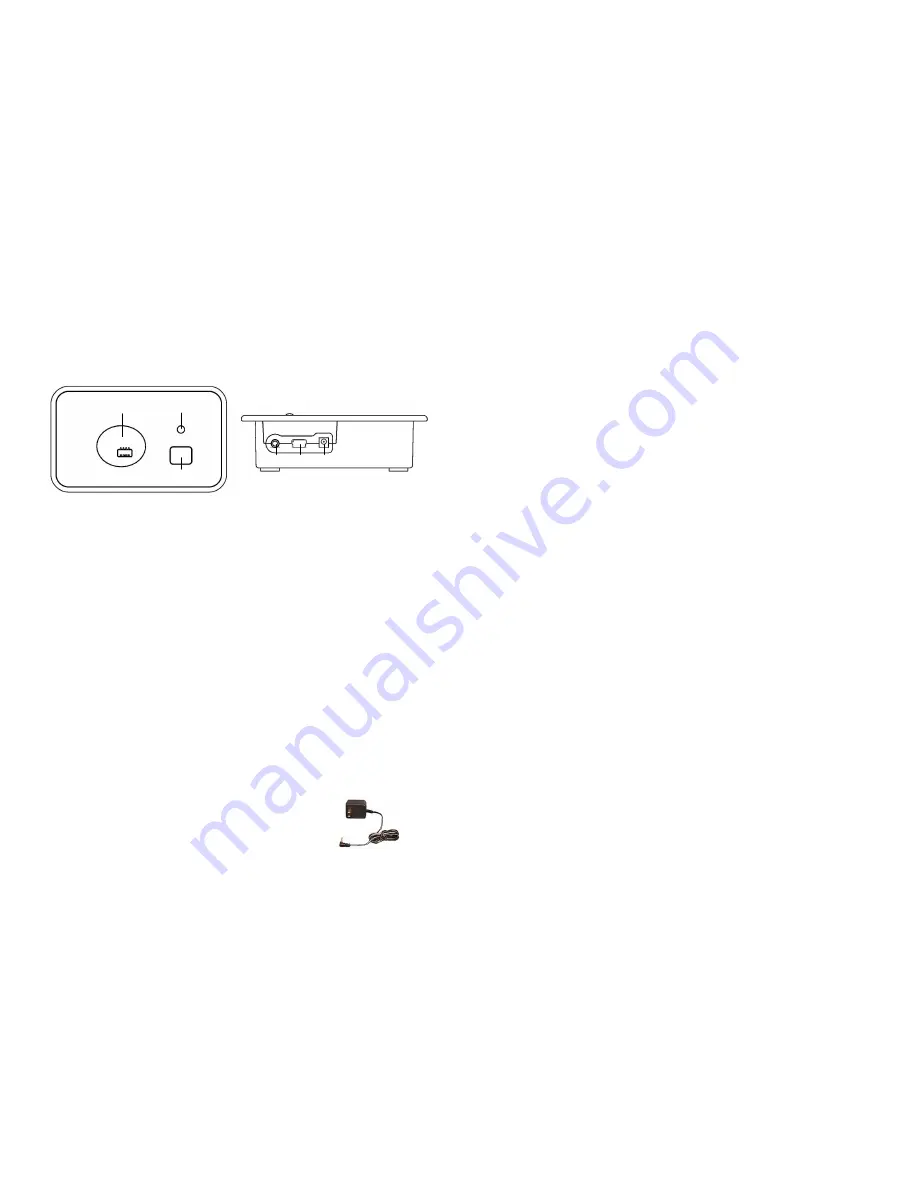
solo Desktop Charger Base   

The Charger Base is used for storing and charging the Microphone 
when not in use. The Microphone must be properly inserted into 
the base and seated flush for charging to occur.  


1.  Charger Bay — charges Microphone 
2.  LED indicator — mute and pairing status indicator 
3. 

MUTE

 button — duplicates the Microphone mute function 

4. 

AUDIO

 port — 2.5mm analog in/out headset connection or 

external audio connection  

5.  Mini 

USB

 connector — computer audio connection 

6. 

POWER

 connector — power supply input 


Mute Button 

 
Pressing the 

MUTE

 button toggles between muting (flashing RED 

LED status) and un-muting (flashing GREEN LED status) the 
Wireless Microphone. 

Note:

  Pressing the 

MUTE

 button on a 

Microphone will similarly toggle between mute and un-mute and 
show on both status LEDs. 


Power Module 

 
The Charger Base requires 5VDC power. Plug the supplied AC 
adapter into a convenient 110-240VAC, 50-60Hz 
power outlet and the adapter into the power 
connector. The power LED on the Charger Base 
will flash RED for a few seconds then turn off. 
 

4  5  6 

11 

10 seconds, it means that the Microphone needs to be paired to 
the system.  

Microphone Pairing Instructions 
 

1.  Make sure the Microphone is turned OFF (no LED activity). If 

the unit is ON, press and hold the 

MUTE

 button for 10 seconds 

until the LED turns solid RED (do not release when you hear 
two beeps), to turn the unit off, if needed.  An alternative 
method of turning off is to place the Microphone in the Charger 
Base for less than 2 seconds. 

2.  Place the Microphone into pairing mode by holding the 

Microphone’s 

MUTE

 button down for ten seconds. The LED will 

turn solid GREEN and then solid RED. Release the 

MUTE


button. The Microphone unit is now in pairing mode. 

3.  Within 5 seconds, push and hold the Charger Base’s 

MUTE


button for six seconds to enter into pairing mode. The LED will 
be solid RED until pairing is confirmed, as indicated by a short 
GREEN flash followed by flashing RED on both the 
Microphone and the Charger Base.  If pairing fails on either 
unit, the LED will flash alternately GREEN and RED for a few 
seconds. 

Содержание REVOLABS SOLO 02-DSKSYS

Страница 1: ...K M A N P A P 1 1 M f g P a r t 9 1 8 6 0 1 1 0 N 0 0 S e p t e m b e r 2 0 0 6 R e v 1 7 Revolabs Inc Revolabs Inc Revolabs Inc Revolabs Inc Installation and Operation Manual SOLO Desktop Wireless Mi...

Страница 2: ...68 kg Radio Frequency 02 DSKSYS 1 92 to 1 93 GHz UPCS North America 04 DSKSYSEU 1 88 to 1 90 GHz DECT EU Connectors Desktop Charger Base Power 5VDC proprietary 0 7mm connector Mini USB 5 pin connecto...

Страница 3: ...equipment damaged by negligence accident or Acts of God voids this warranty The Seller shall not be liable for any consequential damage resulting from the malfunction of this product Should the user e...

Страница 4: ...or battery charging GREEN flash every 1 5 seconds Microphone connected and un muted Two RED flashes every 1 5 seconds Microphone connected and muted YELLOW flash alternating with either GREEN or two R...

Страница 5: ...button for about 3 seconds until the LED shows solid GREEN Or Dock the Microphone into the Charge Base for at least 4 seconds 1 Safety and General Information IMPORTANT INFORMATION ON SAFE AND EFFICIE...

Страница 6: ...ician may be able to assist you in obtaining this information Export Law Assurances This product is controlled under the export regulations of the United States of America and Canada The Governments o...

Страница 7: ...ware is running To prevent the built in microphone audio feeding through to the speakers check the Mute box on the Input Monitor on the laptop audio program Input Monitor as shown below 3 04 DSKSYSEU...

Страница 8: ...phones and eliminates buzzing in the audio from cell phones 13 To modify the default microphone earpiece audio output settings open the control panel and then open Sounds and Audio Devices The solo De...

Страница 9: ...e to configure your computer settings to playback audio through the earpiece attached to the microphone default settings or through the computer speakers internal or desktop The examples shown below a...

Страница 10: ...he power connector The power LED on the Charger Base will flash RED for a few seconds then turn off 4 5 6 2 3 1 11 10 seconds it means that the Microphone needs to be paired to the system Microphone P...

Страница 11: ...be manually paired If a Microphone is lifted from the Charger Base and the Microphone LED slowly flashes alternating RED and GREEN for 7 USB Connection Use the supplied cable to connect the mini USB...

Страница 12: ...crophone LED turns off Recharging when the Microphone LED begins flashing alternating YELLOW and RED or YELLOW and GREEN the battery needs recharging Over time years batteries gradually wear down and...

Отзывы: