background image

12

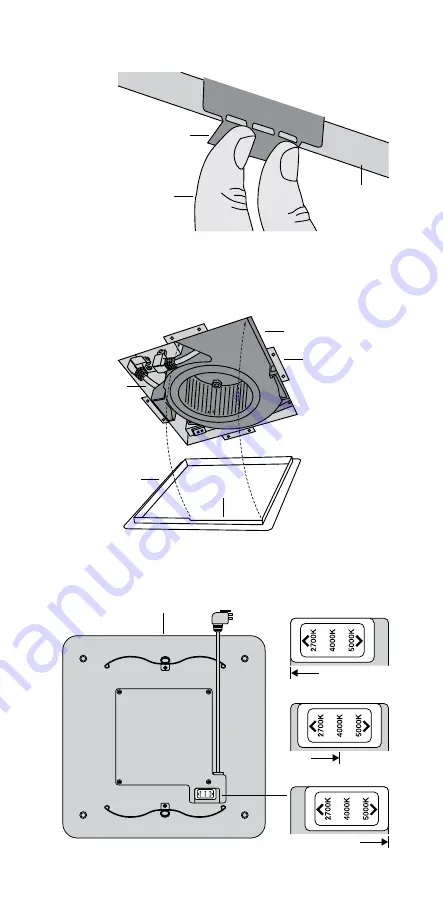
12) Presione y doble las presillas de fijación definitiva contra el techo, de manera 

que queden planas, para bloquear el VENTILADOR en su lugar.

presillas de fijación definitiva

13) Alinee la muesca del ANILLO DE AJUSTE a la posición de ventilación 

(REGULADOR). Fije el ANILLO DE AJUSTE al VENTILADOR. El ANILLO DE 

AJUSTE se fija al cuerpo del VENTILADOR y hace clic al encajar en el lugar 

correcto.

cartón yeso

(techo)

aplique una presión

uniforme a cada lado

de la presilla de

seguridad

techo

ANILLO DE AJUSTE

VENTILADOR

presillas de 

fijación definitiva

muesca

14) 

Seleccione la temperatura de color del LED deseada deslizando el interruptor 

selector en la parte posterior de el ESCUDO.

luz de día (5000K)

blanco brillante (4000K)

blanco caliente (2700K)

ESCUDO

Содержание RVLH80

Страница 1: ...Installation Guide Read and Save These Instructions Watch the installation video at reventfans com Questions Call 1 877 543 8698 English or 1 800 615 5439 French model RVLH80 Need Help English ...

Страница 2: ...ssary page 1 page 1 page 2 page 3 page 4 page 5 page 6 page 7 13 page 13 18 page 18 page 19 21 page 22 23 page 23 page 23 24 page 24 26 page 27 Table of Contents Specifications What s Inside The Box Safety Information Planning Your Installation Connecting The Duct Removing Your Old Fan SheetLock Easy Roomside Installation Installation For New Construction Framing Care And Cleaning Installing The C...

Страница 3: ...ROUNDHEAD WOOD SCREW Qty 6 8 x 3 8 BRACKET SECURING SCREW Qty 3 USED FOR NEW CONSTRUCTION ONLY WIRE NUT Qty 4 FAN Qty 1 SHIELD Qty 1 Installation Guide Read and Save These Instructions Watch the installation video at reventfans com Questions Call 1 877 543 8698 English or 1 800 615 5439 French model RVL80 Need Help English ...

Страница 4: ... in a straight line with minimal bends 6 Use 120 V 60 Hz for the electrical supply and properly ground the unit Follow all local safety and electrical codes 7 Do not use this fan with any solid state control device such as a dimmer switch Solid state controls may cause harmonic distortion which can cause a motor humming noise as well as increase risk of fire or electric shock 8 To reduce the risk ...

Страница 5: ...ELD should be installed after the finished ceiling is in place When installing in existing construction use the provided cutout TEMPLATE for the ceiling SHIELD edge should overlap finished ceiling Not for use in cooking area see diagram below Do not install ventilation fan in areas where the duct work will require configuration as shown There are multiple installation configurations possible for t...

Страница 6: ...nstalled with existing ducts may not achieve their rated airflow 4 in 10 16 cm round is recommended for best performance Ensure duct joints and exterior penetrations are sealed with caulk or other similar material to create an air tight path to minimize building heat loss and gain and to reduce the potential for condensation Place wrap insulation around duct and or FAN in order to minimize possibl...

Страница 7: ...ngs from the motor plate slots 3 Your existing fan may be attached in several ways Look for attachment screws in the ceiling and remove Your fan may also be attached on the attic side which will require you to access it from the attic Locate attic attachment screws and remove Fan removal can be the most difficult step please watch this video reventfans com how to remove an old bath fan 4 Remove th...

Страница 8: ... pencil and remove the TEMPLATE Use a sheetrock jab saw to cut your fan opening in the ceiling SheetLock Easy Roomside Installation Watch the video reventfans com WARNING Disconnect all AC Power Breakers or Fuses before attempting to cut into your ceiling 2 Use a flathead screwdriver to raise the DAMPER away from the notch in the FAN body then slide the DAMPER up half way until the notch in the si...

Страница 9: ...1 3 cm holding tab 5 Reattach DAMPER to FAN inside the ceiling damper should click into place securely ducting conduit DAMPER FAN 3 Attach DAMPER to ducting Tape DAMPER to ducting with duct tape Set the connected DAMPER and ducting in the ceiling opening then set the FAN in the ceiling opening as well ceiling ducting Connect DAMPER and ducting with duct tape Place FAN and DAMPER inside CEILING ope...

Страница 10: ...icensed electrician WARNING Copper to copper only Do not use aluminum wire WARNING Follow all local electrical and safety codes and NEC National Electrical Codes CAUTION If your house wires do not match these colors determine what each house wire represents before connecting You may need to consult a qualified licensed electrician to determine this safely 8 Set FAN into place in the opening using ...

Страница 11: ...ne in light light line in FAN FAN Wire connection for fan and light on separate switches WIRE NUT Qty 4 10 Connect wiring using the provided WIRE NUTS Wire connection for fan and light on one switch line ground FAN ground housing ground line neutral FAN neutral light neutral line in FAN WIRE NUT Qty 3 light ...

Страница 12: ...lectrical ratings ReVent fan light switch purchased separately 120V line AC black white white ground light fan black ReVent switch black red The FAN wires cannot be connected to a dimmer switch ReVent FS 350 W6 product of GTR Technologies Inc USA Patent No US 9 360 228 B2 Other USA and international patents pending Electrical Input 120 volts 60Hz Maximum Fan Load 6 Amps Must Be Mounted Inside A Co...

Страница 13: ... LED color temperature by sliding the selector switch on the back of the SHIELD ceiling TRIM RING final securing tabs notch 12 Press and bend the final securing tabs flat against ceiling to lock the FAN in place final securing tabs sheetrock ceiling apply even pressure to each side of securing tab FAN daylight 5000K bright white 4000K warm white 2700K SHIELD ...

Страница 14: ...uses before attempting to cut into your ceiling 1 Select a set of holding tabs depending on the thickness of your sheetrock 2 Bend the holding tabs you selected outward 5 8 in 1 6 cm holding tab 1 2 in 1 3 cm holding tab final securing tab 5 8 in 1 6 cm holding tab 1 2 in 1 3 cm holding tab 15 Connect LED wire to LED plug Attach the SHIELD by squeezing the mounting springs together and inserting t...

Страница 15: ...ng joist framing joist FAN SHORT BRACKET can be cut down framing joist framing joist SHORT BRACKET LONG BRACKET conduit 3 Attach FAN to ceiling joists with BRACKETS using ROUNDHEAD WOOD SCREWS then install the sheetrock for your ceiling ducting ducting 8 x 3 8 BRACKET SECURING SCREW Qty 3 conduit ROUNDHEAD WOOD SCREW Qty 6 use 2 per bracket ...

Страница 16: ... may need to consult a qualified licensed electrician to determine this safely 6 Disconnect FAN motor from electrical enclosure Remove the electrical cover set screw and slide open the electrical enclosure remove set screw unplug fan connectors slide line ground line ground FAN ground housing ground line neutral line neutral FAN neutral light neutral line in light light line in FAN FAN Wire connec...

Страница 17: ...ectrical ratings ReVent fan light switch purchased separately 120V line AC black white white ground light fan black ReVent switch black red The FAN wires cannot be connected to a dimmer switch ReVent FS 350 W6 product of GTR Technologies Inc USA Patent No US 9 360 228 B2 Other USA and international patents pending Electrical Input 120 volts 60Hz Maximum Fan Load 6 Amps Must Be Mounted Inside A Cod...

Страница 18: ...de of securing tab 10 Align TRIM RING notch to vent DAMPER position Attach TRIM RING to FAN TRIM RING attaches to FAN body and clicks into place when secure ceiling TRIM RING final securing tabs notch FAN 11 Select desired LED color temperature by sliding the selector switch on the back of the SHIELD daylight 5000K bright white 4000K warm white 2700K SHIELD ...

Страница 19: ... cleaning the unit 1 Remove the SHIELD by squeezing the springs and pulling down 2 Remove dust and dirt from the FAN with a vacuum cleaner 3 Dampen cloth with dish detergent Wipe the FAN and dry with a cloth 4 Replace the SHIELD 12 Connect LED wire to LED plug Attach the SHIELD by squeezing the mounting springs together and inserting the springs into the spring guides in the FAN mounting springs s...

Страница 20: ...anently installed 120V AC powered fans only Use only 14 or 12 copper wire connections IMPORTANT Read each step carefully and perform in sequence The CONTROL will not work or will become damaged if wires are connected incorrectly To prevent damage connect the CONTROL exactly as shown in the installation diagrams otherwise warranty will be voided Prior to wiring straighten or clip ends of wire such ...

Страница 21: ...ure connect same power to light if fan and light work together MOUNTING SCREW Qty 2 WIRE NUT Qty 4 ReVent FS 350 W6 product of GTR Technologies Inc USA Patent No US 9 360 228 B2 Other USA and international patents pending Electrical Input 120 volts 60Hz Maximum Fan Load 6 Amps Must Be Mounted Inside A Code Approved Electrical Outlet Box LISTED 3PF2 Made In China ...

Страница 22: ...21 5 Attach the wall plate Wall plates that fit this control can be purchased at any hardware store This control can be used with any decora style wall plate examples below ...

Страница 23: ...ATION SENSOR can be set at low average or high sensitivity Once you change a setting the changes will take effect after the next on off cycle so it s recommended that you turn your fan on then off after you make a change to the settings SETTINGS TOOL use to remove cover and adjust settings dials Using The Control BLUE LED LIGHT Lets you know when your fan is on especially useful for fans with low ...

Страница 24: ... desired sensitivity level is reached Testing The Control 1 After you have completely installed the CONTROL you can turn on the breaker to apply power WARNING If the breaker trips or the fuse blows Stop and call a qualified licensed electrician to investigate the problem Turn the breaker off until the problem has been corrected 2 Press the FAN ON OFF button to see the fan turn on press the button ...

Страница 25: ...must be rated for over a shower bath installation all ReVent models are and must be on a GFCI protected circuit Consult a qualified licensed electrician about ground fault protected safety circuits Q Do I have to vent my FAN to the outside A Yes All spot ventilation fans must be vented to the outside Follow your local code and consult it for advice See PAGE 5 for national venting installation sugg...

Страница 26: ...ch one goes to the fan The black wire on the CONTROL connects to the wire that is tested to be the incoming power The red wire on the CONTROL connects to the wire that is tested and confirmed to connect to the FAN You will need a neutral and a ground Please refer to PAGES 19 21 for instructions on how to properly wire the CONTROL If you have any concerns we suggest consulting a licensed electricia...

Страница 27: ...lly it will still sense the condensation and turn on again after 1 minute to finish drying the room Q What is an MPH Timer A MPH means Minutes Per Hour This allows you to set how many minutes the fan will run and refresh air in the room every hour Set the timer at 10 minutes and then every hour the fan will come ON and run for 10 minutes then turn back OFF The timer setting range is 0 60 minutes Q...

Страница 28: ...r or replace at GTR s option shall be the purchaser s sole and exclusive remedy under this warranty GTR shall not be liable for incidental consequential or special damages arising out of or in connection with product use or performance Some areas do not allow the exclusion or limitation of incidental or consequential damages so the above limitation may not apply to you This warranty gives you spec...

Страница 29: ...ire ces instructions et les conserver Regardez la vidéo d installation à reventfans com Avez vous des questions Téléphonez au 1 800 615 5439 français ou au 1 877 543 8698 anglais Avez vous besoin d aide Français MD Modèles nos RVLH80 ...

Страница 30: ...ans la boîte de jonction Foire aux questions Garantie limitée de 3 ans Fiche technique Tension Fréquence Puissance des DEL Luminosité des DEL Température de couleur des DEL Poids du ventilateur Dimensions de la déflecteur Longueur du boîtier Largeur du boîtier Profondeur du boîtier 120 V 60 Hz 13 W 900 1 000 ou 1 000 lumens 2 700 4 000 ou 5 000 kelvins 5 25 lb 2 4 kg 11 x 11 po 27 9 x 27 9 cm 8 3 ...

Страница 31: ...E RONDE Qté 6 VIS DE FIXATION DE SUPPORT 3 8 PO N 8 Qté 3 POUR UNE NOUVELLE CONSTRUCTION SEULEMENT CAPUCHON DE CONNEXION Qté 4 VENTILATEUR Qté 1 DÉFLECTEUR Qté 1 Installation Guide Read and Save These Instructions Watch the installation video at reventfans com Questions Call 1 877 543 8698 English or 1 800 615 5439 French model RVL80 Need Help English ...

Страница 32: ...ent aux fins prévues par le fabricant Pour toute question communiquez avec le fabricant 3 Avant d entretenir ou de nettoyer ce dispositif coupez le courant au panneau d alimentation et verrouillez le dispositif de débranchement pour éviter que le courant soit remis accidentellement Si le dispositif de débranchement ne peut pas être verrouillé apposez bien en vue un avertissement à cet effet au pan...

Страница 33: ...ifié à propos du câblage du ventilateur d aération AVERTISSEMENT Afin de réduire les risques de décharge électrique débranchez l alimentation électrique avant de faire l entretien ATTENTION Cet article doit être mis à la terre adéquatement Allez à reventfans com pour obtenir une copie de ce guide Planification de l installation Pour installer le ventilateur d aération dans une nouvelle constructio...

Страница 34: ...nt scellés avec du mastic ou un autre matériau semblable afin de créer une voie étanche de minimiser la perte ou le gain de chaleur dans le bâtiment et de réduire le potentiel de condensation Isolez le conduit ou le VENTILATEUR afin de minimiser l accumulation de condensation à l intérieur du conduit ainsi que la perte ou le gain de chaleur dans le bâtiment Plusieurs configurations d installation ...

Страница 35: ...e diverses façons Repérez les vis de fixation dans le plafond et enlevez les Le ventilateur pourrait aussi être fixé à partir du grenier ce qui exige que vous accédiez au grenier Repérez les vis de fixation dans le grenier et enlevez les La suppression du ventilateur peut être l étape la plus difficile veuillez regarder cette vidéo reventfans com how to remove an old bath fan 4 Enlevez l ancien ve...

Страница 36: ... vous d une scie pour plaque de plâtre pour découper l ouverture du ventilateur dans le plafond Installation facile à même la pièce SheetLock MC Regardez la vidéo reventfans com AVERTISSEMENT Débranchez tout disjoncteur ou fusible de l alimenta tion CA avant d entreprendre le découpage du plafond 2 Servez vous d un tournevis à lame plate pour écarter le REGISTRE de l encoche pratiquée dans le boît...

Страница 37: ...afond puis placez le VENTILATEUR dans l ouverture au plafond conduit Fixer le REGISTRE et le conduit avec du ruban à conduits Placer le VENTILATEUR et le REGISTRE dans l ouverture au PLAFOND plafond VENTILATEUR REGISTRE plafond plafond 6 Sélectionnez un ensemble de languettes de retenue correspondant au format de la plaque de plâtre languette de retenue de 5 8 po 1 6 cm languette de retenue de 1 2...

Страница 38: ...VERTISSEMENT Effectuez des branchements cuivre sur cuivre seulement N utilisez pas de fil en aluminium AVERTISSEMENT Respectez tous les codes locaux d électricité et de sécurité ainsi que le code national de l électricité ATTENTION Si les fils du bâtiment n ont pas les mêmes couleurs que ceux du ventilateur identifiez chacun d eux avant d effectuer les branchements Vous pourriez devoir faire appel...

Страница 39: ...R Connexion des fils du ventilateur et de l éclairage sur des interrupteurs distincts CAPUCHON DE CONNEXION Qté 4 10 Branchez les fils en utilisant les CAPUCHONS DE CONNEXION fournis Connexion des fils du ventilateur et de l éclairage sur le même interrupteur alimentation mise à la terre VENTILATEUR mise à la terre boîtier mise à la terre alimentation neutre VENTILATEUR neutre éclairage neutre ali...

Страница 40: ...acité électrique nominale ventilateur ReVentMD interrupteur de l éclairage vendu séparément alimentation CA 120 V noir blanc blanc mise à la terre éclairage ventilateur noir interrupteur ReVentMD noir rouge L ÉCLAIRAGE À DEL peut être branché à un gradateur ReVent FS 350 W6 product of GTR Technologies Inc USA Patent No US 9 360 228 B2 Other USA and international patents pending Electrical Input 12...

Страница 41: ...TIVE se fixe au boîtier du VENTILATEUR en émettant un clic en fois en place plaque de plâtre plafond Appliquer une pression égale de chaque côté de la languette de fixation plafond GARNITURE DÉCORATIVE languettes de fixation finale 14 Choisissez la température de couleur voulue de l éclairage à DEL en faisant coulisser le sélecteur se trouvant à l arrière du DÉFLECTEUR lumière du jour 5 000 K blan...

Страница 42: ...kMC Le ventilateur ReVentMC peut néanmoins être installé en utilisant une méthode plus connue des constructeurs de résidences comme le montre cette section AVERTISSEMENT Débranchez tout disjoncteur ou fusible de l alimentation CA avant d entreprendre le découpage du plafond 1 Sélectionnez un ensemble de languettes de retenue en fonction de l épaisseur de la plaque de plâtre languette de retenue de...

Страница 43: ...conduit REGISTRE VENTILATEUR conduit REGISTRE VENTILATEUR 5 Fixez le REGISTRE au conduit Fixez le REGISTRE au conduit avec du ruban à conduits solive de charpente solive de charpente conduit AVERTISSEMENT Débranchez l alimentation électrique CA avant d entreprendre toute procédure au circuit sur lequel le ventilateur ReVent est relié Si vous ne comprenez pas bien cet avertissement consultez un éle...

Страница 44: ...imentation mise à la terre alimentation mise à la terre VENTILATEUR mise à la terre boîtier mise à la terre alimentation neutre alimentation neutre VENTILATEUR neutre éclairage neutre alimentation éclairage éclairage alimentation VENTILATEUR VENTILATEUR Connexion des fils du ventilateur et de l éclairage sur des interrupteurs distincts CAPUCHON DE CONNEXION Qté 4 7 Branchez les fils en utilisant l...

Страница 45: ...acité électrique nominale ventilateur ReVentMD interrupteur de l éclairage vendu séparément alimentation CA 120 V noir blanc blanc mise à la terre éclairage ventilateur noir interrupteur ReVentMD noir rouge L ÉCLAIRAGE À DEL peut être branché à un gradateur ReVent FS 350 W6 product of GTR Technologies Inc USA Patent No US 9 360 228 B2 Other USA and international patents pending Electrical Input 12...

Страница 46: ...TILATEUR en émettant un clic en fois en place languettes de fixation finale plaque de plâtre plafond Appliquer une pression égale de chaque côté de la languette de fixation plafond GARNITURE DÉCORATIVE VENTILATEUR languettes de fixation finale encoche 11 Choisissez la température de couleur voulue de l éclairage à DEL en faisant coulisser le sélecteur se trouvant à l arrière du DÉFLECTEUR lumière ...

Страница 47: ...ressorts et en tirant sur le déflecteur 2 Utilisez un aspirateur pour enlever la saleté et la poussière du VENTILATEUR 3 À l aide d un chiffon imbibé d une solution d eau et de savon à vaisselle frottez le VENTILATEUR puis essuyez le avec une serviette 4 Replacez le DÉFLECTEUR 12 Branchez le fil de l éclairage à DEL dans la prise correspondante Pour fixer le DÉFLECTEUR pressez les ressorts de mont...

Страница 48: ... un ventilateur CA de 120 V raccordé en permanence Utilisez uniquement des connexions avec fil de cuivre de calibre 14 ou 12 IMPORTANT Lisez attentivement chacune des étapes et suivez les dans l ordre La COMMANDE ne fonctionnera pas ou subira des dommages si les fils ne sont pas bien branchés Pour éviter les dommages branchez la COMMANDE exactement comme le montrent les schémas d installation sino...

Страница 49: ...connexion Utilisez un capuchon de connexion approprié pour les fils de calibre 14 ou de calibre 12 Assurez vous de dénuder l extrémité du fil de cuivre sur une section de 1 6 cm 5 8 po et d y poser un capuchon de connexion en le faisant tourner dans le sens horaire ReVent FS 350 W6 product of GTR Technologies Inc USA Patent No US 9 360 228 B2 Other USA and international patents pending Electrical ...

Страница 50: ...21 5 Fixez la plaque murale On peut trouver une plaque murale pour cette commande dans toute quincaillerie Cette commande convient à toute plaque murale de type Decora voir les exemples ci dessous ...

Страница 51: ... réglages Par défaut la COMMANDE a un réglage de sensibilité à la condensation humidité de niveau moyen et un réglage de 0 minute pour la minuterie min h Pour changer les réglages enlevez le couvercle des RÉGLAGES DE LA MINUTERIE ET DU CAPTEUR en retirant la plaque murale puis en insérant l extrémité de l OUTIL DE RÉGLAGE ou un autre outil non métallique dans les deux trous pratiqués de chaque côt...

Страница 52: ...glage de la sensibilité Le cadran ressemble à celui d une horloge La sensibilité à la condensation humidité est réglée à l usine à la position midi Si vous estimez que ce réglage à l usine met trop de temps avant d allumer le ventilateur faites tourner le cadran vers la droite une heure à la fois Si vous estimez que ce réglage à l usine allume trop rapidement le ventilateur faites tourner le cadra...

Страница 53: ...e pourtour découpes accès des fils trous d aération Exemple Le type de boîte de jonction peut varier Scellez toutes les ouvertures Appliquez du mastic à ces endroits Foire aux questions Ventilateur Q Comment peut on nettoyer le VENTILATEUR R Il est important de nettoyer le DÉFLECTEUR à l occasion Des particules de poussière peuvent s accumuler sur le DÉFLECTEUR Consultez la PAGE 18 pour l entretie...

Страница 54: ... R Si de l eau s égoutte c est habituellement qu il y a de la condensation en raison du froid dans les conduits L isolation des conduits et du boîtier du VENTILATEUR peut aider à régler les problèmes de condensation En faisant fonctionner longtemps le VENTILATEUR l humidité sera éliminée complètement des conduits Il pourrait aussi s agir de la pluie qui arrive à entrer dans le tuyau d évent par l ...

Страница 55: ...plus tôt vous pouvez faire tourner le cadran de sensibilité dans le sens horaire pour rendre la COMMA NDE plus sensible Faites tourner le cadran progressivement jusqu à ce que vous trouviez le bon réglage Consultez les PAGES 22 ET 23 pour en savoir plus Q Est il possible de désactiver le capteur d humidité R Oui Pour désactiver le capteur d humidité assurez vous d abord que le VENTILATEUR est étei...

Страница 56: ...inutes à chaque heure puis s éteint Cette minuterie peut être réglée entre 0 et 60 minutes Q Pourquoi utiliser une minuterie min h minutes à l heure R La minuterie min h est très utile Les domiciles ont besoin d air frais Lorsque le ventilateur fonctionne il expulse de l air vicié et laisse entrer de l air frais un peu comme si on ouvrait la porte avant ou arrière d une maison pour laisser entrer ...

Страница 57: ...placer à sa discrétion constitue le seul et unique recours de l acheteur dans le cadre de cette garantie GTR ne peut être tenue responsable des dommages accessoires indirects ou particuliers découlant de l utilisation ou des performances de l article ou y étant associés Certaines régions ne permettant pas d exclure ou de limiter les dommages accessoires ou indirects la limite ci dessus pourrait ne...

Страница 58: ......

Страница 59: ...alación Lea y guarde estas instrucciones Mire el video de instalación en reventfans com Tiene alguna pregunta Llame al 1 877 543 8698 inglés o al 1 800 615 5439 francés Necesita ayuda Español N º de modelos RVLH80 ...

Страница 60: ...ntrol Corrientes de aire en la caja de pared Preguntas frecuentes Garantía limitada de 3 años Especificaciones Tensión Frecuencia Potencia del LED Flujo luminoso del LED Temperatura del color del LED Peso del ventilador Tamaño de el escudo Longitud de la carcasa Ancho de la carcasa Profundidad de la carcasa 120 V 60 Hz 13 W 900 1000 o 1000 lúmenes 2700 4000 o 5000 Kelvin 5 25 libras 2 4 kg 11 x 11...

Страница 61: ...A DE CABEZA REDONDA Cantidad 6 TORNILLO PARA ASEGURAR EL SOPORTE N º 8 DE 3 8 Cantidad 3 USADO SOLO PARA CONSTRUCCIONES NUEVAS CONECTOR DE TORSIÓN Cantidad 4 VENTILADOR Cantidad 1 ESCUDO Cantidad 1 Installation Guide Read and Save These Instructions Watch the installation video at reventfans com Questions Call 1 877 543 8698 English or 1 800 615 5439 French model RVL80 Need Help English ...

Страница 62: ... protegido por GFCI No utilice sobre una bañera o ducha ventiladores que no estén aprobados para ese uso 5 Instale los conductos en línea recta con curvas mínimas 6 Utilice 120 V 60 Hz para la alimentación eléctrica y conecte a tierra la unidad correctamente Siga todos los códigos locales de seguridad y electricidad 7 No use este ventilador con ningún relé de estado sólido como por ejemplo un inte...

Страница 63: ...ortada proporcionada para el techo El borde de el ESCUDO debe solapar el techo acabado No debe usarse en áreas de cocción Consulte el diagrama siguiente No instale el ventilador en áreas donde el conducto requiera la configuración que se muestra Existen múltiples configuraciones de instalación posibles para este ventilador No se muestran todas las configuraciones Si su instalación requiere una var...

Страница 64: ...l Se recomienda una circunferencia de 4 10 16 cm para obtener el mejor rendimiento Asegúrese de que las uniones de los conductos y las penetraciones en el exterior se sellen con masilla u otro material similar para crear un trayecto hermético minimizar la pérdida y acumulación de calor en el edificio y para reducir la posibilidad de condensación Coloque envuelva el aislamiento alrededor del conduc...

Страница 65: ...as de la placa del motor 3 Su ventilador actual podría estar conectado de varias maneras Busque si hay tornillos de fijación en el techo y quítelos Su ventilador también podría estar colocado del lado del ático lo que requerirá que acceda a él desde el ático Localice los tornillos de fijación del ático y quítelos La eliminación del ventilador puede ser el paso más difícil mire este video reventfan...

Страница 66: ...ora para cartón yeso corte la abertura del ventilador en el techo Instalación sencilla de SheetLock en el interior de la habitación Mire el video reventfans com ADVERTENCIA desconecte todos los disyuntores o fusibles de alimentación de corriente alterna antes de intentar cortar el techo 2 Use un destornillador de punta plana para levantar el REGULADOR de la muesca del cuerpo del VENTILADOR luego d...

Страница 67: ...cm 5 Vuelva a colocar el REGULADOR en el VENTILADOR dentro del techo el regulador debe encajar en su lugar de manera segura conductos conducto REGULADOR VENTILADOR 3 Sujete el REGULADOR al conducto Fije el REGULADOR al conducto con cinta para ductos Coloque el REGULADOR y los conductos conectados en la abertura del techo y luego coloque el VENTILADOR en la abertura del techo también techo conducto...

Страница 68: ...s servicios de un electricista calificado y con licencia ADVERTENCIA cobre a cobre solamente No utilice alambre de aluminio ADVERTENCIA siga todas las normas de electricidad y de seguridad locales y el Código Eléctrico Nacional NEC por sus siglas en inglés PRECAUCIÓN si los cables de su casa no coinciden con estos colores determine qué representa cada uno de ellos antes de conectarlos Es posible q...

Страница 69: ...Conexión de cable para ventilador y luz en interruptores separados CONECTOR DE TORSIÓN Cantidad 4 10 Conecte el cableado utilizando las CONCECTORES DE TORSIÓN Conexión de cable para ventilador y luz en un interruptor línea puesta a tierra VENTILADOR puesta a tierra housing puesta a tierra línea neutro VENTILADOR neutro luz neutro entrada VENTILADOR CONECTOR DE TORSIÓN Cantidad 3 luz ...

Страница 70: ...e seguridad incluidas con el interruptor que compre No supere los valores eléctricos nominales extractor ReVent Interruptor de luz comprado por separado línea de 120 V de AC negro blanco blanco puesta a tierra luz extractor negro interruptor ReVent negro rojo ReVent FS 350 W6 product of GTR Technologies Inc USA Patent No US 9 360 228 B2 Other USA and international patents pending Electrical Input ...

Страница 71: ...DE AJUSTE al VENTILADOR El ANILLO DE AJUSTE se fija al cuerpo del VENTILADOR y hace clic al encajar en el lugar correcto cartón yeso techo aplique una presión uniforme a cada lado de la presilla de seguridad techo ANILLO DE AJUSTE VENTILADOR presillas de fijación definitiva muesca 14 Seleccione la temperatura de color del LED deseada deslizando el interruptor selector en la parte posterior de el E...

Страница 72: ...entar cortar el techo 1 Seleccione un conjunto de presillas de sujeción según el espesor del cartón yeso 2 Doble hacia fuera las presillas de sujeción que seleccionó Presilla de sujeción de 5 8 pulgada 1 6 cm Presilla de sujeción de 1 2 pulgada 1 3 cm Presilla de seguridad final Presilla de sujeción de 5 8 pulgada 1 6 cm Presilla de sujeción de 1 2 pulgada 1 3 cm 15 Conecte el cable del LED al enc...

Страница 73: ...o REGULADOR VENTILADOR conducto REGULADOR VENTILADOR 5 Sujete el REGULADOR al conducto Fije el REGULADOR a los conductos con cinta para ductos viga de armazón viga de armazón conductos ADVERTENCIA desconecte la alimentación de corriente alterna antes de realizar cualquier trabajo en cualquier parte del circuito al que está conectado el ventilador ReVent Si no comprende esta advertencia solicite lo...

Страница 74: ...fe los ventilador conectores diapositiva línea puesta a tierra línea puesta a tierra VENTILADOR housing puesta a tierra línea neutro línea neutro VENTILADOR neutro luz neutro entrada luz luz entrada VENTILADOR VENTILADOR Conexión de cable para ventilador y luz en interruptores separados CONECTOR DE TORSIÓN Cantidad 4 7 Conecte el cableado utilizando las CONCECTORES DE TORSIÓN Conexión de cable par...

Страница 75: ...e seguridad incluidas con el interruptor que compre No supere los valores eléctricos nominales extractor ReVent Interruptor de luz comprado por separado línea de 120 V de AC negro blanco blanco puesta a tierra luz extractor negro interruptor ReVent negro rojo ReVent FS 350 W6 product of GTR Technologies Inc USA Patent No US 9 360 228 B2 Other USA and international patents pending Electrical Input ...

Страница 76: ...fijación definitiva muesca VENTILADOR 11 Seleccione la temperatura de color del LED deseada deslizando el interruptor selector en la parte posterior de el ESCUDO luz de día 5000K blanco brillante 4000K blanco caliente 2700K ESCUDO 9 De manera que queden planas para bloquear el VENTILADOR en su lugar presillas de fijación definitiva cartón yeso techo aplique una presión uniforme a cada lado de la p...

Страница 77: ...mentación eléctrica 1 Apriete los resortes y jale hacia abajo para quitar el ESCUDO 2 Quite el polvo y la suciedad del VENTILADOR con una aspiradora 3 Humedezca el paño con detergente para platos Limpie el VENTILADOR y séquelo con un paño 4 Vuelva a colocar el ESCUDO 12 Conecte el cable del LED al enchufe del LED Fije el ESCUDO para ello apriete los resortes de sujeción e insértelos en las guías p...

Страница 78: ... la caja de pared comuníquese con un electricista calificado con licencia para la instalación Únicamente para uso con ventiladores de 120 V de corriente alterna instalados de forma permanente Solo utilice conexiones de cable de cobre n º 14 o n º 12 IMPORTANTE lea cada paso con cuidado y realícelos en orden El CONTROL no funcionará o se dañará si los cables están conectados incorrectamente Para ev...

Страница 79: ... conectados a tierra correctamente Asegúrese de que el cable a tierra esté bien sujeto Ajuste con firmeza todos los tornillos de puesta a tierra o conectores de torsión Use el conector de torsión del tamaño adecuado para el cable n º 14 o n º 12 Asegúrese de pelar el extremo del cable de cobre 1 6 cm 5 8 de pulgada y gire el cable y el conector en el sentido de las agujas del reloj ReVent FS 350 W...

Страница 80: ...5 Coloque la placa de pared Las placas de pared aptas para este control se pueden comprar en cualquier ferretería Este control puede usarse con cualquier placa de pared de estilo decorativo ejemplos abajo ...

Страница 81: ...puede configurar en sensibilidad baja promedio o alta Una vez que haya cambiado una configuración los cambios tendrán efecto después del próximo ciclo de encendido apagado por lo que se recomienda encender el ventilador y apagarlo luego de realizar los cambios HERRAMIENTA DE AJUSTES Se usa para quitar la cubierta y ajustar los diales de configuración Uso del control LED AZUL le permite saber cuánd...

Страница 82: ...loj El ajuste de fábrica del dial de sensibilidad a la condensación humedad es en la posición de mediodía Si cree que con el ajuste de fábrica se tarda demasiado en encender su ventilador gire el dial hacia la derecha de a una hora por vez O si cree que con el ajuste de fábrica su ventilador se enciende demasiado rápido gire el dial hacia la izquierda de a una hora por vez hasta que se alcance el ...

Страница 83: ...das las aberturas que encuentre aplique masilla para calafateo en este tipo de zonas Corrientes de aire en la caja de pared En las casas que tengan cierta antigüedad es posible que circule aire corrientes de aire desde el hueco de la pared interior hacia la caja de pared o hacia fuera de ella según como sea esta corriente Si su CONTROL tiene problemas para detectar la condensación será necesario s...

Страница 84: ...pueden tener conductos de 3 pulgadas de diámetro y cambiar la tubería del conducto a 4 pulgadas de diámetro puede aumentar considerablemente el flujo de aire P Por qué gotea agua de mi VENTILADOR R El agua que gotea es típicamente condensación de una tubería de ventilación fría Aislar el conducto y la carcasa del VENTILADOR puede ayudar a resolver los problemas de condensación Hacer funcionar el V...

Страница 85: ...uedo solucionar esto R Si desea que el CONTROL se active más rápido puede girar el dial de sensibilidad hacia la derecha para hacer que el CONTROL sea más sensible Mueva el dial en pequeños incrementos hasta encontrar la configuración correcta Consulte de las PÁGINAS 22 a 23 para obtener más detalles P Es posible desactivar la detección de humedad R Sí Para desactivar la detección de humedad prime...

Страница 86: ...s P Por qué debería usar un temporizador MPH minutos por hora R El temporizador MPH es muy útil Los hogares necesitan aire fresco cuando el ventilador está encendido expulsa el aire viciado para que entre aire fresco en el hogar Es como abrir y cerrar la puerta principal o trasera de su casa para dejar que entre aire fresco El temporizador MPH también le permite cumplir con los nuevos códigos que ...

Страница 87: ...recurso del comprador en virtud de esta garantía GTR no será responsable por daños incidentales emergentes o especiales que surjan del uso o el rendimiento del producto o se relacionen con ellos En algunas zonas no se permite la exclusión o limitación de daños incidentales o emergentes por lo cual es posible que la limitación anterior no se aplique en su caso Esta garantía le otorga derechos legal...

Страница 88: ......

Отзывы: