91
1. Actions in Position mode -- select one of the Actions to edit it.
2. Actions in Wheel mode -- select one of the Actions to edit it.
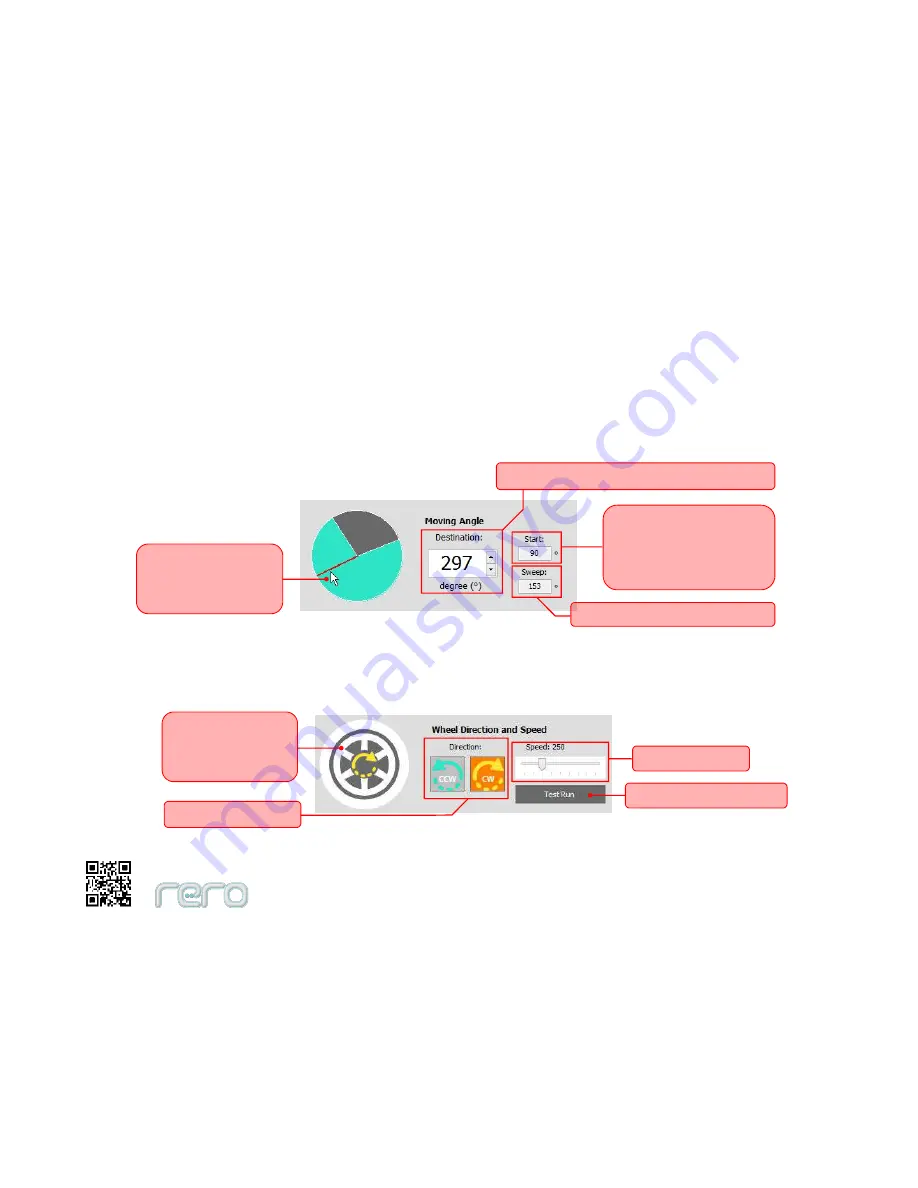
3. Moving Angle -- This appears when an Action in Position mode is selected. It sets the Action’s destination in degree. You can
edit the value in Destination box or directly click on the pie diagram to set the destination. When rero Controller and the servo
with correct ID are connected, the servo will move simultaneously.
Edit Moving Angle
4. Wheel Direction & Speed -- This appears when an Action in Wheel mode is selected. You may use it to change Servo’s
direction and speed at that time frame. Click on ‘Test Run’ to test the direction and speed.
Edit Wheel Direction & Speed
Left click & drag on
the moving path to
change destination
Destination (End position of the Action)
Start position of the
selected Action
= Destination of previous
Action.
Sweep = Destination - Start
Left click on the
diagram to change
direction
Change direction
Change speed
Test Run / Stop button
Содержание rero2.0
Страница 1: ...User s Manual Robot Construction Kit rero2 0 Cytron R D MSC Sdn Bhd ...
Страница 25: ...22 Step 4 Close the cover and lock back the controller cover by turning the thumb screw clockwise ...
Страница 54: ...51 Follow the direction marking when connecting Cube Servo to joints Direction Mark ...
Страница 56: ...53 ...
Страница 58: ...55 ...
Страница 61: ...58 Figure below shows example of using Adaptor Joint to connect a Cube Servo to rero controller ...
Страница 65: ...62 Release rero Cube joint from Interconnect Release rero Interconnect from Cube Joint slot ...
Страница 66: ...63 Release rero claw from Cube Servo ...
Страница 68: ...65 rero Daisy Chained Connection ...
Страница 69: ...66 Wrong or Broken Daisy Connection ...
Страница 99: ...96 rero remote Bluetooth Connection rero Remote main screen Battery Status Bluetooth Status ...


