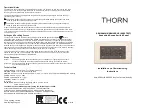
Operating elements
1
2
3
5 4
4
14
13
12
6
4
4
8
10
4
4
7
9
11
1 Mounting tabs (right/left)
2 Power supply port
3 Power supply connection socket
4 Screw hole (thread)
5 HOST input socket
6 PWR LED
7 Type-C USB output (Port 4)
8 Operating LED (port 3)
9 USB A output (port 3)
10 Power LED (port 1)
11 Type-C USB output (Port 1)
12 Power LED (port 2)
13 USB A output (port 2)
14 Power LED (port 4)
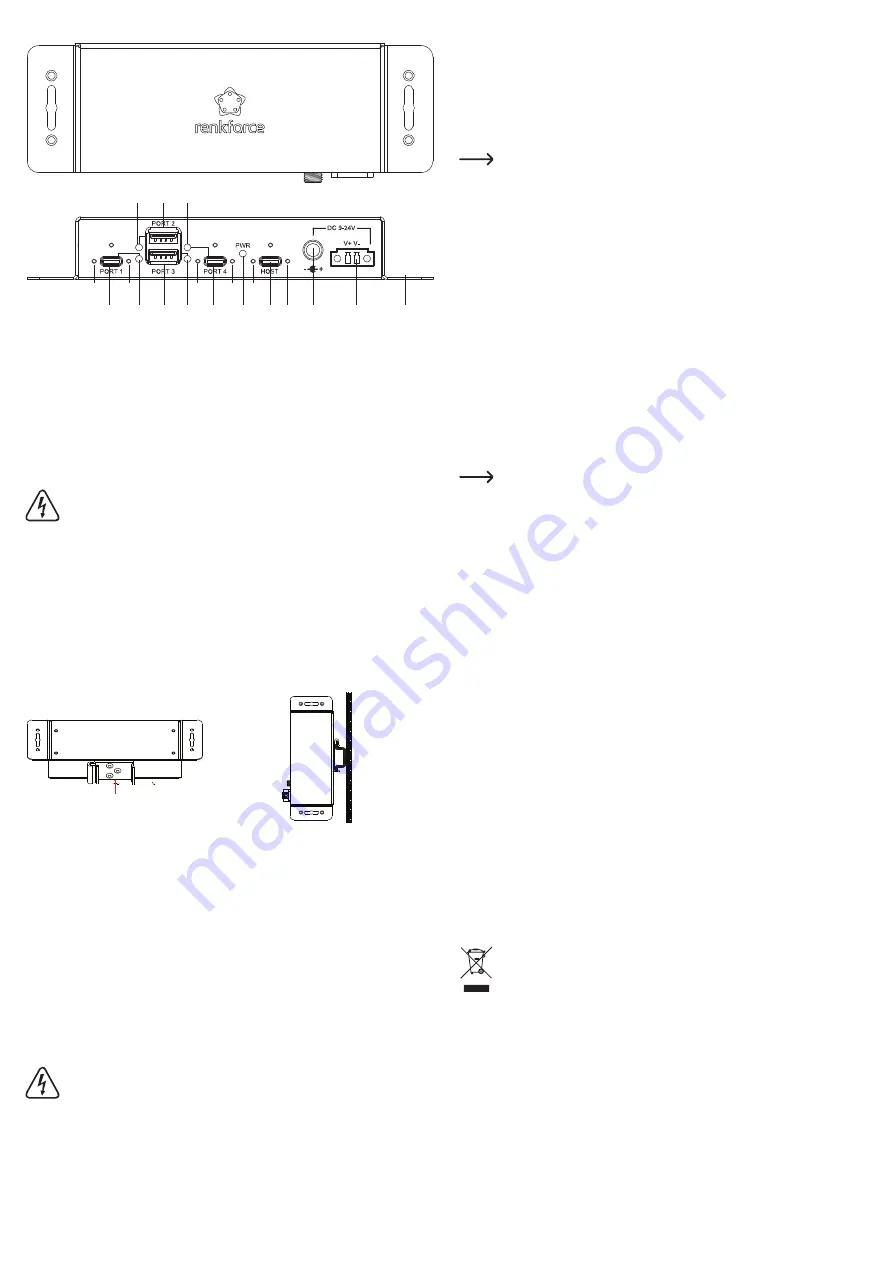
Connection and installation
Ensure that no existing cables or pipes (including water pipes) are damaged when
drilling mounting holes or securing screws.
a) Direct installation on surfaces
• Place the hub on a level, horizontal surface or mount it on a suitable, stable surface using
the mounting brackets
(1)
and four screws (not included). The hub can be mounted in
different orientations (horizontally or vertically).
• When mounting on stone or brick surfaces, use dowels and suitable screws (not included).
b) Mounting on a DIN rail
• Use the supplied mounting kit if you want to mount the product on a DIN installation rail (not
included). First, screw the holder to the hub with the three screws provided. Use a suitable
screwdriver to tighten the screws. Then click the unit into the pre-installed DIN rail to mount
the hub.
c) Electrical connection
• Use the supplied power adapter to power the hub in "self-powered mode".
• Connect the low voltage plug on the power adapter to the power supply connection socket
(3)
. If necessary, secure the connection via the screw holes
(4)
. The PWR LED
(6)
will turn
on to indicate that the unit is supplied with power.
• To use an external power supply other than the supplied power unit, connect the power
supply
(2)
of the hub to a DC source with a permissible operating voltage, observing the
correct polarity. The voltage and polarity specifications are printed next to the power input
socket; compare the technical data.
• Connect the connecting wires of your external power supply to the terminal block provided
for this purpose (included with the product), ensuring that you observe the polarity and
earth connection.
• Then insert this terminal block into the DC 9-24 V input on the hub. The terminal block only
fits into the power supply port
(2)
in the correct orientation.
Do not use an AC power source to operate the hub. This may destroy the hub.
• The USB hub operates with an external voltage of 9–24 V/DC. The power supply must be
dimensioned according to the connected devices.
• For a USB 3.2 port, the USB standard provides a maximum current of 900 mA at 5 V/DC.
This means that up to 4.5 W must/can be delivered.
• Using an external power source to power the USB hub ("self-powered mode") provides a
higher current to each of the USB ports. If you notice that a device which is connected to the
USB hub does not work correctly, or is not recognised, operate the USB hub via an external
power supply that conforms to the product's “Technical data”.
Operation
• If necessary, switch on the external voltage/power supply. The green PWR LED
(6)
on the
hub will turn on.
The USB hub can be used without an external power supply. In this case, the hub
operates in "bus-powered mode". This means that the current provided by the
computer via USB (900 mA for USB 3.1) is divided between all of the ports. This
is sufficient for most USB memory sticks, mouses or keyboards, but many other
devices may not work properly (e.g. external 6.35 cm/2.5" hard drives, card readers
and USB cameras). If no external power supply is used, the PWR LED
(6)
will only
light up when the USB cable is connected to a powered-on computer and the HOST
(5)
input socket on the hub. The LED indicates that the hub is supplied with power
and is ready for use.
• Connect the USB Type-C plug to an available USB port on your computer, and then insert
the USB Type-C plug on the other end of the USB cable into the HOST USB Type-C input
port
(5)
on the hub. You do not need to switch the computer off. The operating system of
your computer will detect the new hardware, and automatically install the required drivers;
they are already present in the operating system. The detected devices will appear in the
Windows
®
Device Manager.
• Connect your USB devices to the USB ports 1 to 4 on the USB hub. If a device is recognized,
the LED
(8, 10, 12, 14)
for the corresponding USB port will light up. Depending on
the USB device, the operating system will recognise the new hardware and install the
necessary drivers. Please refer to the operating instructions of the USB device to learn how
to do this. For many devices, Windows uses its own drivers, e.g. for USB sticks and USB
mice. You can connect 2 devices via USB-A and 2 devices via USB Type-C.
This only applies to the Windows
®
8/10 operating systems. When connecting to
other operating systems, e.g. MacOS or Linux, you must install the necessary
drivers (host drivers) yourself.
• The LED indicators (8, 10, 12, 14) for the USB outputs will turn green as soon as a device
connected to the corresponding output is detected. The LED indicator will stay illuminated
for the duration of the USB connection between the hub and the connected device,
regardless of whether data is transferred.
Tips & important information
• The hub is USB1.1 compatible. This means that standard USB1.1 devices can be connected
to the hub. However, this does not increase the data transmission speed.
• In order to transfer data at the highest speeds (theoretically 5/10 GBit/s), all devices must
support USB3.2 Gen 1 / USB3.2 Gen 2 - the USB device (e.g. an external CD burner), the
USB hub and the USB controller in the PC.
• In practice, however, 5/10 GBit/s will not be reached. Hardly any device (e.g. hard disk,
burner etc.) is capable of transferring data so quickly. Other causes (e.g. simultaneous
operation of other USB devices, protocol information etc.) also reduce the transmission
rate.
• Normally, USB operation is not possible in DOS or in Windows Safe Mode. USB keyboards
and a USB mouse do not normally work. The BIOS/setup of your PC may have appropriate
support (could be called e.g. “Legacy USB support“). It is possible, however, that the USB
keyboard/mouse must be connected directly on the mainboard and not on a USB hub.
Care and cleaning
• Remove the product from the power supply and the connected devices before cleaning.
• Do not use any aggressive cleaning agents, rubbing alcohol or other chemical solutions, as
these may damage the housing or impair the functioning of the device.
• Use a dry, lint-free cloth to clean the product. Do not allow water to get inside the housing.
Disposal
Electronic devices are recyclable waste and must not be disposed of in household
waste. At the end of its service life, dispose of the product in accordance with
applicable regulatory guidelines.
You thus fulfil your statutory obligations and contribute to environmental protection.