background image

4

INSTALLING THE  EVERGREEN

®

 VS USER INTERFACE (UI)

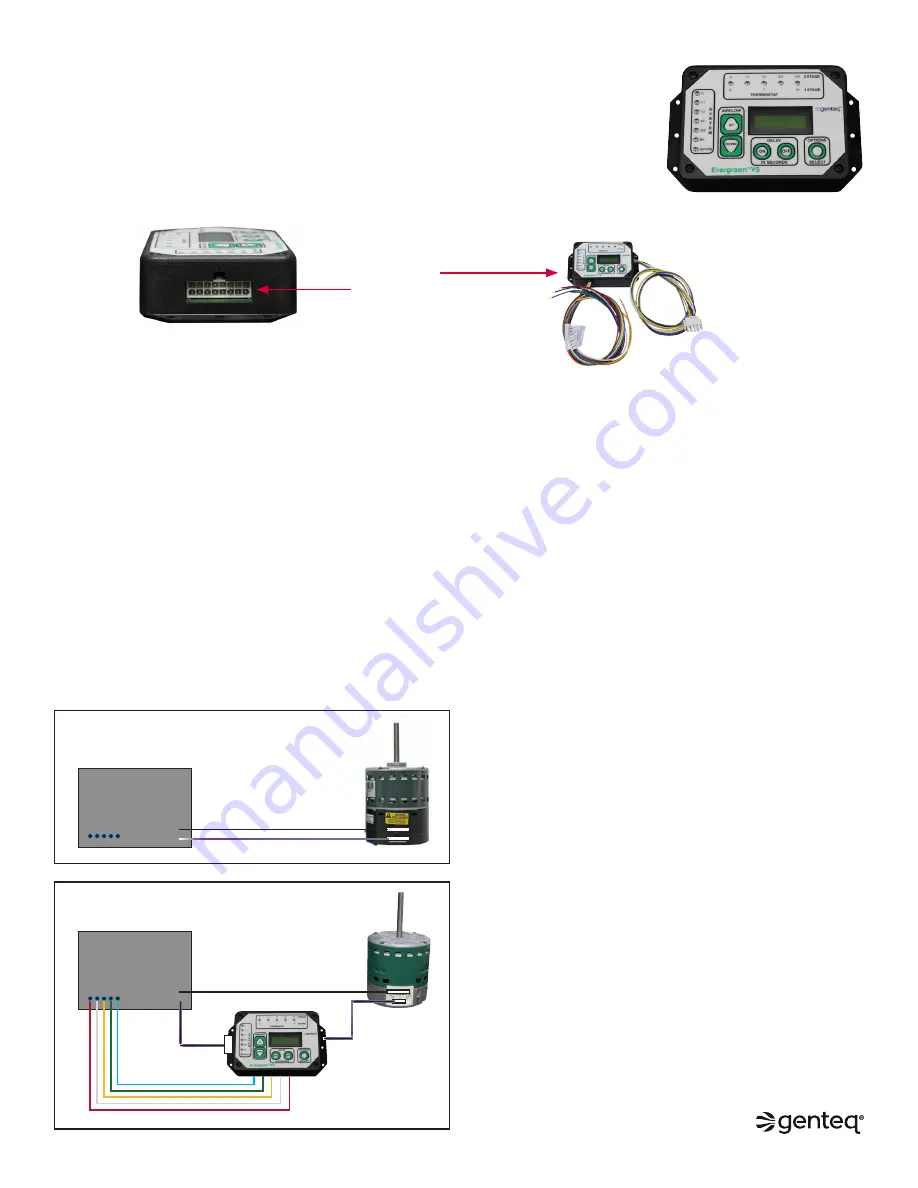
Install the UI so that the screen and buttons are accessible and visible. Orient the UI so that the 

thermostat wires face down in the HVAC system. There are three holes in each side wing for 

mounting, and there is two-sided tape on the back. It must also be located to allow the following 

connections:


The 16-pin harness from the old motor to the user interface


The thermostat wires from the user interface to the HVAC system thermostat connections


The 4-pin harness from the user interface to the new motor

16- pin input

Thermostat 
Wires

4-pin plug

Connecting the user interface (UI) to the new motor and the HVAC system

WARNING! Disconnect and lock out the main power from the unit being serviced before installing the Evergreen VS 
user interface and motor. It is also a good practice to confirm that the power is disconnected with a voltmeter.


Connect the 4-pin plug from the UI to the new motor. 


Connect the 5-pin line voltage plug (disconnected from the old motor) to the new motor.


Connect the 16-pin communication plug (disconnected from the old motor) to the UI.


Connect the thermostat wires from the UI to the HVAC system thermostat connections as follows:


o

Connect the RED wire to the thermostat (R) 24 VAC connection


o

Connect the BLUE wire to the thermostat (C) 24 VAC Common connection


o

Connect the GREEN wire to the thermostat (G) Continuous Fan connection


o

Connect  W and Y per the diagrams on the next page related to single stage or two stage systems

NOTE:  HVAC manufacturers use different nomenclature (letters and/or numbers) to identify their thermostat 
terminals (example W, W1, W2). On two stage systems it is important to identify the thermostat terminals used for 1st 
and 2nd stage. 

OEM Control Board

R W Y G C

OEM Control Board

R W Y G C

Model 2.0, Genteq

®

 models 2.3 and Eon

®

 motors

Genteq

®

 Evergreen VS motor and UI

Genteq

®


Evergreen VS 

User Interface

5-pin line voltage plug

5-pin line voltage plug

16-pin communication plug

16-pin  

communication plug

4-pin communication plug

Failed model 2.0, Genteq

®

 ECM models 2.3 and Eon

®

 motor 

connections

Installed Evergreen VS user interface and motor connections

©2019, 2020 Regal Beloit Corporation, All Rights Reserved. MCIM20008E • Form# G0075E

Содержание Genteq Evergreen VS

Страница 1: ...ation or assistance The qualified installer or agency must use the supplied or recommended parts when installing or servicing this product After installing the Evergreen VS user interface and motor it...

Страница 2: ...d ECM Motors Model 2 5 motor Note The model 2 5 motor has the same physical appearance as the model 2 3 motor Always confirm model name on motor use ID guide information below if needed The Genteq 16...

Страница 3: ...in the system as connected by the HVAC OEM Install the new Evergreen VS motor 1 Install the new motor in the existing belly band mount so that the motor plugs are facing down between the 4 and 8 o clo...

Страница 4: ...e new motor Connect the 16 pin communication plug disconnected from the old motor to the UI Connect the thermostat wires from the UI to the HVAC system thermostat connections as follows o Connect the...

Страница 5: ...onnected to aTwo StageThermostat Single Stage HVAC Systems with a Single StageThermostat The thermostat wire designations and connections legend are provided on either side of the thermostat wire harn...

Страница 6: ...demand will appear on the display screen Press the up button to increase airflow the down button to decrease airflow This information is only present when there is a thermostat demand Airflow can only...

Страница 7: ...stat No Operation from the UI 2nd Stage Demand Recognition and Operation If the UI is receiving a 1st stage thermostat demand it will transition to 2nd stage operation in the respective demand if one...

Страница 8: ...f delay values A thermostat demand for 2nd stage cool or heat pump should turn on the Y2 LED thermostat indicator on the UI The display screen on the UI should display Y2 the airflow value and the on...

Страница 9: ...pump demand o W1 and Y1 1st stage airflow values are locked They will increase and decrease incrementally with changes to the W2 and Y2 airflow values Continuous fan Operate the thermostat in continuo...

Страница 10: ...ion of the motor to the operation of the HVAC system To enter the options menu press and hold the OPTIONS button for 10 seconds The UI must be unlocked The display will give instructions for using the...

Страница 11: ...hen turn off You can exit the DIAGNOSTICS screen at any time by pressing the up down AIRFLOW arrows This will return you to the options menu o The information on this screen is simply a place for us t...

Страница 12: ...pm CST Monday Friday at 866 503 8566 Option 3 Scan this code with your smart phone or go to www EvergreenVS motors com Terms Conditions of Sale Limited Warranty Sales of the products described in this...

Отзывы: