background image

29

14. Return-Funktion

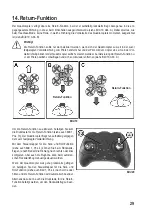
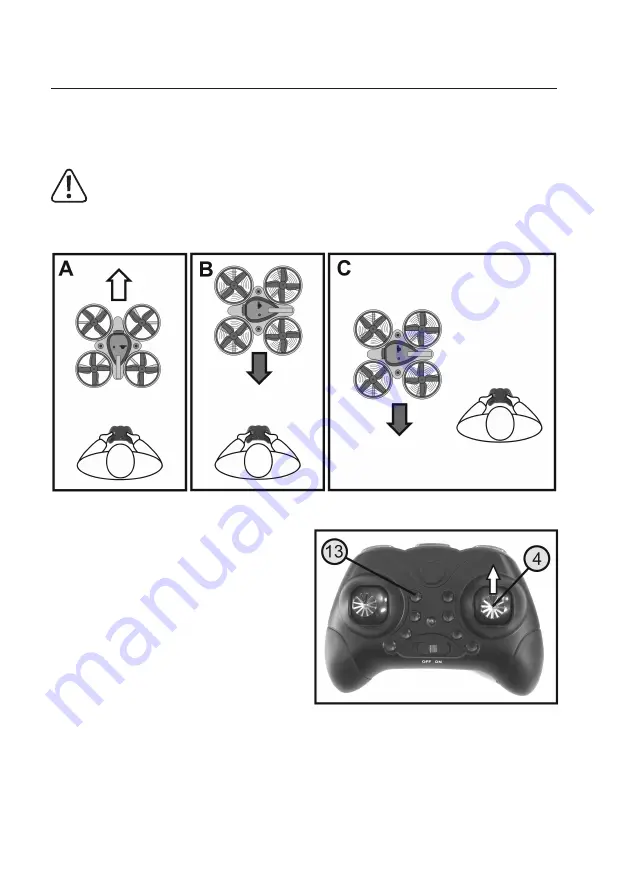
Der Quadrocopter verfügt über eine Return-Funktion, bei der er selbsttätig rückwärts fliegt. Also genau in die ent

-

gegengesetzte Richtung, in die er beim Einschalten ausgerichtet wurde (siehe Bild 19, Abb. A). Dabei spielt es, wie 

beim Headless-Mode, keine Rolle, in welche Richtung die Vorderseite des Quadrocopters momentan ausgerichtet 

ist (siehe Bild 19, Abb. B).


Wichtig!


Die Return-Funktion sollte nur dann aktiviert werden, wenn sich der Quadrocopter zu weit in der zuvor 

festgelegten Vorwärtsrichtung vom Piloten entfernt hat und der Pilot mit dem Copter eine Linie in der Vor-

wärtsrichtung bildet. Ist der Quadrocopter seitlich versetzt, würde er bei Aktivierung der Return-Funktion u. 

U. am Piloten seitlich vorbeifliegen und sich somit wieder entfernen (siehe Bild 19, Abb. C).

Bild 19 

Um die Return-Funktion zu aktivieren, betätigen Sie kurz 

die Drucktaste für die Return-Funktion (siehe auch Bild 1, 

Pos. 13). Der Quadrocopter fliegt nun selbsttätig entgegen 

der zuvor festgelegte Vorwärtsrichtung.
Mit dem Steuerknüppel für die Nick- und Roll-Funktion 

(siehe auch Bild 1, Pos. 4) können Sie beim Rückwärts-

fliegen je nach Bedarf die Richtung nach rechts oder links 

korrigieren. Aber auch die Flughöhe kann beim automati-

schen Rückwärtsflug manuell gesteuert werden.
Wenn  der  Quadrocopter  weit  genug  rückwärts  geflogen 

ist, betätigen Sie den Steuerknüppel für die Nick- und 

Roll-Funktion (siehe auch Bild 1, Pos. 4) nach vorne oder 

hinten und die Return-Funktion wird automatisch beendet.
Alternativ dazu kann auch die Drucktaste für die Return-

Funktion betätigt werden, um den Rückwärtsflug zu been

-

den.

Bild 20

Return-Funktion

Return-Funktion

Содержание Small Pepper Drone

Страница 1: ...Bedienungsanleitung Elektro Quadrocopter Small Pepper Drone RtF Best Nr 1628711 Seite 2 41 Operating Instructions Electric Quadrocopter Small Pepper Drone RtF Item No 1628711 Page 42 80 ...

Страница 2: ...2 b Einschalten des Senders 13 10 Inbetriebnahme des Quadrocopters 14 a Laden des Flugakkus 14 b Überprüfen des Antriebs 15 c Einsetzen des Flugakkus 15 d Einschalten des Quadrocopters 16 e Grundsätzliche Informationen zum Steuern von Quadrocoptern 17 f Praktische Flugtipps für den ersten Start 20 g Starten des Quadrocopters 21 h Landen des Quadrocopters 22 i Trimmen des Quadrocopters 23 11 Beginn...

Страница 3: ...nz an der FPV Brille 34 f Einstellfunktionen an der FPV Brille 35 g Umschalten der Video Übertragungsfrequenz 36 h Umschalten des Video Systems 37 17 Wartung und Pflege 38 18 Beheben von Störungen 39 19 Entsorgung 40 a Produkt 40 b Batterien Akkus 40 20 Konformitätserklärung DOC 40 21 Technische Daten 41 a Sender 41 b Quadrocopter 41 c Weitwinkel Kamera 41 d Videosender 41 e FPV Brille 41 Seite ...

Страница 4: ... wenn Sie dieses Produkt an Dritte weitergeben Heben Sie deshalb diese Bedienungsanleitung zum Nachlesen auf Alle enthaltenen Firmennamen und Produktbezeichnungen sind Warenzeichen der jeweiligen Inhaber Alle Rechte vorbehalten Bei technischen Fragen wenden Sie sich bitte an Deutschland www conrad de kontakt Österreich www conrad at www business conrad at Schweiz www conrad ch www biz conrad ch 2 ...

Страница 5: ...zur Beschädigung des Produktes mit den damit verbundenen Gefahren wie z B Kurzschluss Brand elektrischer Schlag etc führen Das Produkt darf nicht feucht oder nass werden Das Produkt ist nicht für Kinder unter 14 Jahren geeignet Beachten Sie alle Sicherheitshinweise dieser Bedienungsanleitung Diese enthalten wichtige Informatio nen zum Umgang mit dem Produkt Sie allein sind für den gefahrlosen Betr...

Страница 6: ...gruppen zueinander rechtsdrehende Propeller drehen etwas schneller und linksdrehende Propeller drehen etwas langsamer oder auch umgekehrt ist es möglich dass sich der Quadrocopter in gleichbleibender Flughöhe und an gleicher Stelle um die Hochachse drehen gieren kann Um die Ausrichtung des Modells im Flug besser erkennen zu können ist am Heck des Quadrocopters eine rote LED angebracht die gleichze...

Страница 7: ...nd z B über eine Haftpflichtversicherung Falls Sie bereits eine Haftpflichtversicherung besitzen so informieren Sie sich vor Inbetriebnahme des Modells bei Ihrer Versicherung ob der Betrieb des Modells mitversichert ist Beachten Sie In verschiedenen Ländern besteht eine Versicherungspflicht für alle Flugmodelle Informieren Sie sich auch über die lokalen gesetzlichen Vorschriften zum Betrieb von Fl...

Страница 8: ...odell müssen leichtgängig funktionieren dürfen jedoch kein Spiel in der Lagerung aufweisen Überprüfen Sie vor jeder Inbetriebnahme den korrekten und festen Sitz der Rotoren Der zum Betrieb erforderliche Flugakku muss vor dem Einsatz geladen werden Achten Sie bei den Batterien im Sender auf eine noch ausreichende Restkapazität siehe Sender LED Sollten die Batterien leer sein so tauschen Sie immer d...

Страница 9: ... schweren Absturz zum Beispiel aus großer Höhe können die elektronischen Gyro Sensoren beschädigt werden Vor einem erneuten Flug ist daher unbedingt die volle Funktion zu prüfen Bei einem Absturz müssen Sie sofort die Rotor Motoren ausschalten Drehende Rotoren können bei Kontakt mit Hindernissen bzw beim Aufschlag beschädigt werden Vor einem erneuten Flug sind diese unbedingt auf eventuelle Risse ...

Страница 10: ... das Flugmodell und die Akkus beschädigt Es besteht zudem Brand und Explosionsgefahr Wechseln Sie immer den ganzen Satz Batterien aus Mischen Sie nicht volle mit halbvollen Batterien Verwenden Sie immer Batterien des gleichen Typs und Herstellers Mischen Sie niemals Batterien mit Akkus Verwenden Sie für den Fernsteuersender ausschließlich Bat terien Bei längerem Nichtgebrauch z B bei Lagerung entn...

Страница 11: ...aste für die Nick Funktion rückwärts 6 Trimmtaste für die Roll Funktion rechts 7 Trimmtaste für die Roll Funktion links 8 Ein Aus Schalter 9 Drucktaste für die Start und Lande Funktion 10 Drucktaste für die Motor Not Aus Funktion 11 Drucktaste für den Headless Mode 12 Steuerknüppel für die Pitch und Gier Funktion 13 Drucktaste für die Return Funktion 14 Drucktaste für den Beginner Sport und Expert...

Страница 12: ...V Zelle für die Stromversor gung des Senders Zum Einlegen der Batterien gehen Sie wie folgt vor Lösen Sie an der Senderrückseite mit einem geeigneten Schraubendreher die Halteschraube 1 des Batteriefach deckels 2 Drücken Sie die Rastnase 3 der Deckel Verriegelung nach unten und heben Sie den Batteriefachdeckel ab Legen Sie 3 Batterien vom Typ AAA Micro entsprechend den Vorgaben am Boden des Batter...

Страница 13: ...gnalton ab Bewegen Sie den Steuerknüppel nun ganz nach unten Der Sender gibt erneut einen kurzen Signalton ab und die LED Anzeige leuchtet jetzt dauerhaft Schalten Sie danach den Sender mit dem Ein Aus Schal ter wieder aus Sollte die Stromversorgung für den vorschriftsmäßigen Betrieb des Senders nicht mehr ausreichend sein geht die Anzeigen LED siehe Bild 3 Pos 15 alle 3 Sekunden an und aus Im gle...

Страница 14: ...evorgang abgeschlossen und der Flugakku vollständig geladen ist leuchtet die rote LED im USB Stecker wieder auf Trennen Sie unmittelbar nach dem Ladevorgang den Flug akku vom Ladekabel und ziehen Sie den USB Stecker des Ladekabels aus dem Computer Notebook bzw Steckerla der Achtung Schließen Sie das USB Kabel nicht an einem USB Hub ohne eigenes Netzteil an z B ein USB Port in einer Tastatur o ä da...

Страница 15: ...eller dre hen sich im Uhrzeigersinn B c Einsetzen des Flugakkus Der Schacht für den Flugakku befindet sich an der Unter seite des Quadrocopters Der Flugakku 1 wird entspre chend der nebenstehenden Abbildung von hinten in den Akkuschacht eingeschoben Das Anschlusskabel des Flugakkus 2 muss dabei nach hinten ausgerichtet sein damit der Flugakku später mit der Anschlussbuchse des Quadrocopters 3 verb...

Страница 16: ... Unter grund Schalten Sie danach den Sender mit dem Ein Aus Schal ter siehe auch Bild 1 Pos 8 ein Schieben Sie danach den Steuerknüppel für die Pitch und Gier Funktion siehe auch Bild 1 Pos 12 ganz nach oben Der Sender gibt einen kurzen Signalton ab Bewegen Sie den Steuerknüppel nun ganz nach unten Der Sender gibt erneut einen kurzen Signalton ab und die LED Anzeige im Sender siehe auch Bild 1 Pos...

Страница 17: ...ird die Flughöhe eines Quadrocopters beeinflusst siehe Bild 8 Die Steuerung erfolgt mit dem linken Steuerknüppel siehe auch Bild 1 Pos 12 Wenn die Motoren per Fernsteuerbefehl gestartet wurden laufen sie im Leerlauf Wird nun der Steuerknüppel aus seiner Mittelposition nach vorne geschoben erhöhen die Propeller die Drehzahlen und der Quadrocopter hebt ab Ist die gewünschte Flughöhe erreicht kann de...

Страница 18: ...n oben gesehen um die Hoch achse nach links dreht Wird der Steuerknüppel nach rechts bewegt fallen die Drehzahländerungen der Propeller genau umgekehrt aus und das Modell dreht sich nach rechts siehe Pfeile in Bild 9 Bild 9 Roll Funktion Mit Hilfe der Roll Funktion können Sie den Quadrocopter seitlich nach rechts und links bewegen siehe Bild 10 Die Steuerung erfolgt mit dem rechten Steuerknüppel s...

Страница 19: ...iehe auch Bild 1 Pos 4 Wird der Knüppel leicht nach vorne gedrückt werden von der Elektronik im Quadrocopter die Propellerdrehzahlen so verändert dass sich das Modell leicht nach vorne neigt und somit auch nach vorne fliegt Steuern Sie am Sender nach hinten fallen die Drehzahländerungen der Propeller genau umgekehrt aus und das Modell fliegt nach hinten siehe Pfeile in Bild 11 Bild 11 ...

Страница 20: ...ch Funktion nicht schlagartig nach unten da sonst der Quadro copter sehr schnell die Flughöhe reduziert und bei einer harten Landung Schaden nehmen könnte Ziehen Sie den Steuerknüppel langsam zurück und reduzieren Sie dadurch gefühlvoll die Flughöhe Sollten die Propeller an Gegenständen anstoßen und blockiert werden so betätigen Sie unverzüglich den Taster für die Motor Not Aus Funktion siehe Bild...

Страница 21: ...d der Quadrocopter die Propellerdreh zahlen deutlich erhöhen und abheben Die rote LED am Quadrocopter leuchtet nun dauerhaft Mit dem rechten Steuerknüppel können Sie ein eventuelles Abdriften nach vorne oder hinten bzw zur Seite leicht korrigieren Ist die gewünschte Flughöhe erreicht bewegen Sie den linken Steuerknüppel wieder in die Mittelstellung Der Quadrocopter kann nun selbsttätig auf gleichb...

Страница 22: ...ommen sind Alternativ dazu kann auch der Taster für die Motor Aus Funktion siehe Bild 12 Pos 10 genutzt werden um die Motoren schnell abzuschalten Stecken Sie danach den Flugakku vom Quadrocopter ab und schalten Sie den Sender aus 2 Automatische Landung Betätigen Sie im Schwebeflug die Drucktaste für die Start und Lande Funktion siehe Bild 12 Pos 9 Der Quadrocopter wird selbsttätig die Flughöhe re...

Страница 23: ...mung erreicht werden vom Sender keine Signaltöne mehr abgegeben Die Mittelstellung der Trimmung wird mit einem höheren Signalton angezeigt Roll Trimmung Will der Quadrocopter seitlich nach rechts driften bzw kippen so reduzieren Sie langsam die Flughöhe bis der Quadrocopter wieder sicher auf den Landefüßen steht Betätigen Sie mehrmals den linken Trimmtaster für die Roll Funktion siehe auch Bild 1 ...

Страница 24: ...vorne zu driften Will der Quadrocopter nach hinten driften betätigen Sie den oberen Trimmtaster für die Nick Funktion siehe auch Bild 1 Pos 3 Bild 14 Die Trimmung für die Nick und Rollfunktion wird nicht gespeichert Nach dem Aus und Einschalten des Senders steht die Trimmung wieder in der Mittelstellung Wenn Sie den Quadrocopter beim Fliegen sicher im Griff haben können Sie die Trimmung auch im Fl...

Страница 25: ... diesem Grund eignet sich dieser Modus ideal für fortgeschrittene Anwender Experten Modus Im Experten Modus steht Ihnen die max Steuerempfindlichkeit zur Verfügung Diese Einstellung ist für erfahrene Anwender und für den Einsatz des Quadrocopters im Außenbereich vorgesehen Aktivierung der unterschiedlichen Flug Modi Nach dem Einschalten befindet sich der Sender automa tisch im Beginner Modus Um vo...

Страница 26: ... in den Flip Modus geschaltet hat gibt er kontinuierlich kurze Signaltöne ab Bewegen Sie nun den Steuerknüppel für die Nick und Roll Funktion schnell bis zum Anschlag in die Richtung in die der Quadrocopter flipen soll und führen Sie den Steu erhebel unverzüglich zurück in die Mittelstellung Der Quadrocopter wird den Überschlag in die gewünsch te Richtung durchführen und der Sender beendet danach ...

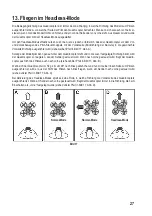
Страница 27: ...ange der Modellpilot dann genau hinter dem Quadrocopter steht und in die zuvor festgelegte Richtung blickt wird der Quadrocopter so reagieren wie am Sender gesteuert wird Wenn nach vorne gesteuert wird fliegt der Quadro copter aus Sicht des Piloten auch nach vorne siehe dunkler Pfeil in Bild 17 Abb B Wenn sich der Quadrocopter im Flug z B um 90 nach links gedreht hat und nun mit seiner linken Seit...

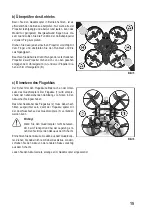
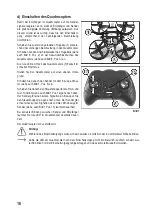
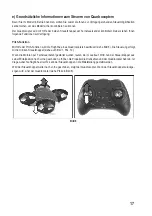
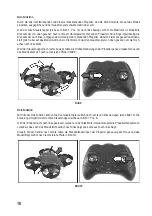
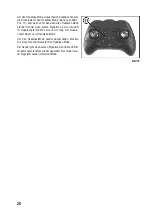
Страница 28: ... einen kurzen Signalton ab Die rote LED im Quadrocopter blinkt 2x kurz und 1x lang Der Quadro copter fliegt nun im Headless Mode Um den Headless Mode wieder abzuschalten drücken Sie erneut die Drucktaste für den Headless Mode Der Sender gibt einen kurzen Signalton ab und die LED im Quadrocopter leuchtet wieder dauerhaft Der Quadrocop ter fliegt jetzt wieder im Normal Mode Bild 18 ...

Страница 29: ...ich vorbeifliegen und sich somit wieder entfernen siehe Bild 19 Abb C Bild 19 Um die Return Funktion zu aktivieren betätigen Sie kurz die Drucktaste für die Return Funktion siehe auch Bild 1 Pos 13 Der Quadrocopter fliegt nun selbsttätig entgegen der zuvor festgelegte Vorwärtsrichtung Mit dem Steuerknüppel für die Nick und Roll Funktion siehe auch Bild 1 Pos 4 können Sie beim Rückwärts fliegen je ...

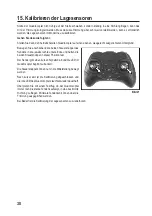
Страница 30: ...d die beiden Steuerknüppel des Senders in die jeweils rechte untere Ecke und halten die beiden Steuerknüppel in dieser Position fest Der Sender gibt einen kurzen Signalton ab und die LED im Quadrocopter beginnt zu flackern Die Steuerknüppel können nun in die Mittelstellung bewegt werden Nach kurzer Zeit ist die Kalibrierung abgeschlossen und die rote LED des Quadrocopters leuchtet wieder dauerhaft...

Страница 31: ...Betrieb grundsätzlich durch einen Co Piloten beobachtet werden damit dieser rechtzeitig vor Gefahren warnen kann Auch bedarf es viel Übung das Modell per FPV Betrieb zu fliegen Achten Sie zudem speziell in der Lernphase darauf dass das gewählte Flugfeld frei von Hindernissen und weitab von Menschen Tieren Gebäuden und Straßen ist Für eine störungsfreie Übertragung der Videosignale dürfen keine wei...

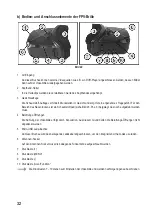
Страница 32: ... des Nasenrückens ist ein Schaumstoffpad siehe Bild 23 Pos 3 beigelegt das noch aufgeklebt werden muss 4 Belüftungs Öffnungen Die Kühlung der Videobrille erfolgt durch Konvektion Aus diesem Grund dürfen die Belüftungs Öffnungen nicht abgedeckt werden 5 Micro USB Lade Buchse An dieser Buchse wird das beiliegende Ladekabel angeschlossen um den integrierten Lithium Akku zu laden 6 Antennen Sockel Auf...

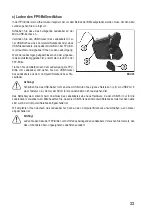
Страница 33: ...ille vom Ladekabel und ziehen Sie den USB Stecker des Ladekabels aus dem Computer Notebook bzw Ste ckerlader Achtung Schließen Sie das USB Kabel nicht an einem USB Hub ohne eigenes Netzteil an z B ein USB Port in einer Tastatur o ä da hier der Strom für die Ladefunktion nicht ausreichend ist Das Betriebssystem erkennt beim Anschluss des Ladekabels keine neue Hardware da der USB Port nur für die La...

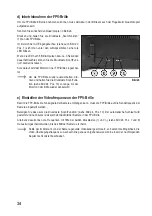
Страница 34: ...taste Scan Funk tion siehe Bild 24 Pos 10 so lange bis der Monitor in der Brille wieder dunkel wird e Einstellen der Videofrequenz an der FPV Brille Damit die FPV Brille die Funksignale der Kamera empfangen kann muss die FPV Brille auf die Sendefrequenz der Kamera eingestellt werden Betätigen Sie dazu kurz die Drucktaste Scan Funktion siehe Bild 24 Pos 10 Der automatische Suchlauf wird gestartet u...

Страница 35: ...z 2 angezeigt Wenn Sie einmal kurz die Drucktaste MENU betätigen wird das OSD Menü aktiviert und der aktuelle Wert der Hintergrundbeleuchtung BACKLIGHT als Dezimalzahl 3 und als Balkendiagramm 4 angezeigt Mit Hilfe der Drucktasten und können Sie den Wert zwischen 0 und 60 entsprechend Ihrer persönlichen Vor stellungen einstellen Bild 25 Durch erneutes Betätigen der Drucktaste MENU gelangen Sie zum...

Страница 36: ...r aufgebogenen Büroklammer durch die Öffnung in der Abdeckung betätigen Um die Übertragungsfrequenz umzuschalten gehen Sie wie folgt vor Nehmen Sie den Quadrocopter in Betrieb Bei jeder kurzen Tastenbetätigung wechselt der Video sender die Sender Frequenz z B 2 auf 3 oder 4 auf 5 innerhalb eines Frequenzbandes Am Ende der Tabelle wechselt der Videosender von Frequenz 8 wieder auf Fre quenz 1 Die U...

Страница 37: ...Pos 3 für ca 5 Sekunden Die blaue LED siehe Bild 26 Pos 5 wird nach 2 Sekunden flackern und nach weiteren 3 Sekunden erlöschen Wenn Sie nun den Einstell Drucktaster loslassen wird vom PAL System auf das NTSC System oder vom NTSC System auf das PAL System umgeschaltet Bei aktiviertem PAL System sieht man beim Betrieb des Quadrocopters im Bereich der 5 8 GHz Funkan tenne eine blaue LED 7 blinken Ist...

Страница 38: ...d können gefühlvoll nach oben von der Welle abgezogen werden Achten Sie beim Abziehen darauf dass die Motorwelle nicht verbogen wird Bei der Auswahl des neuen Propellers ist in jedem Fall auf die Drehrichtung zu achten Die Propeller sind mit entspre chenden KennbuchstabenAoder B gekennzeichnet siehe auch Bild 5 Der neue Propeller wird gerade von oben auf die Motorwel le gesetzt und gefühlvoll bis ...

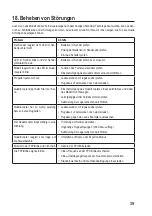
Страница 39: ...u Testzwecken noch einmal laden Quadrocopter kippt beim Start zur Sei te Einschaltvorgang des Quadrocopters erneut durchführen und dabei das Modell nicht bewegen Leichtgängigkeit der Antriebsmotoren prüfen Kalibrierung der Lagersensoren durchführen Quadrocopter hat zu wenig Leistung bzw zu kurze Flugzeiten Ladezustand vom Flugakku überprüfen Flugakku zu Testzwecken noch einmal laden Flugakku gegen...

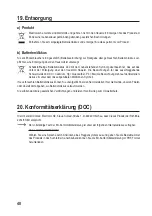
Страница 40: ...m Hg Quecksilber Pb Blei die Bezeichnung steht auf den Batterien Akkus z B unter dem links abgebildeten Mülltonnen Symbol Ihre verbrauchten Batterien Akkus können Sie unentgeltlich bei den Sammelstellen Ihrer Gemeinde unseren Filialen oder überall dort abgeben wo Batterien Akkus verkauft werden Sie erfüllen damit die gesetzlichen Verpflichtungen und leisten Ihren Beitrag zum Umweltschutz 20 Konfor...

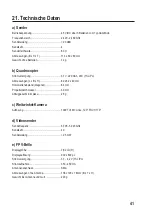
Страница 41: ...o Abmessungen L x B x H 82 x 82 x 40 mm Rotorwellenabstand diagonal 64 mm Propellerdurchmesser 30 mm Abfluggewicht inkl Akku 26 g c Weitwinkel Kamera Auflösung 1000 TVL M7 Linse 120 FOV H170 d Videosender Sendefrequenz 5 705 5 945 GHz Kanalzahl 40 Sendeleistung 25 mW e FPV Brille Displaygröße 7 62 cm 3 Displayauflösung 900 x 600 px Stromversorgung 3 7 4 2 V 1S LiPo Stromaufnahme 350 450 mA Antenne...

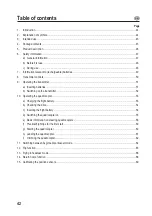
Страница 42: ...es 51 b Switching on the transmitter 52 10 Operating the quadrocopter 53 a Charging the flight battery 53 b Checking the drive 54 c Inserting the flight battery 54 d Switching the quadrocopter on 55 e Basic information on steering quadrocopters 56 f Practical flight tips for the first start 59 g Starting the quadrocopter 60 h Landing the quadrocopter 61 i Trimming the quadrocopter 62 11 Switching ...

Страница 43: ...equency on the FPV goggles 73 f Setting functions on the FPV goggles 74 g Switching the video transmission frequency 75 h Switching the video system 76 17 Maintenance and cleaning 77 18 Troubleshooting 78 19 Disposal 79 a Product 79 b Batteries 79 20 Declaration of Conformity DOC 79 21 Technical data 80 a Transmitter 80 b Quadrocopter 80 c Wide angle camera 80 d Video transmitter 80 e FPV goggles ...

Страница 44: ...t to a third party without the operating instructions Therefore retain these operating instructions for reference All company and product names are trademarks of their respective owners All rights reserved If there are any technical questions please contact International www conrad com contact United Kingdom www conrad electronic co uk contact 2 Explanation of symbols The symbol with an exclamatio...

Страница 45: ...olve additional risks such as short circuits fire electric shocks etc The product must not become damp or wet The product is not suitable for children under 14 years of age Always follow the safety information in these operating instructions It contains important information on how to handle the product safely You are responsible for the safe operation of this model 4 Package contents Ready to fly...

Страница 46: ...s turning to the right turn somewhat faster and propellers turning to the left turn somewhat slower or vice versa it is possible to turn yaw the quadrocopter around the vertical axis while keeping the altitude the same and keeping the quadrocopter in the same spot In order to be able to better recognise the model s alignment in flight the rear of the quadrocopter is equipped with a red LED which a...

Страница 47: ... by law to have insurance for all model aircraft You should also check the local statutory regulations for using model aircraft In Germany for example the regulations for operators of model aircraft of all types are established in the German Air Traffic Ordinance Any breaches of the statutory regulations established could lead to severe penalties as well as restrictions to your insurance cover The...

Страница 48: ... safe distance away from people animals and objects Never try to grab the flying model with your hand Fly your model only if your ability to respond is unrestricted Fatigue alcohol and medication can affect your ability to respond When the rotors are running ensure that there are no objects or body parts in the rotors turning range or intake area Do not direct your model towards spectators or towa...

Страница 49: ...ot mix full batteries with half full batteries Always use batteries of the same type and manufacturer Never mix disposable batteries with rechargeable batteries Use only standard disposable batteries for the remote control transmitter If the device is not to be used for a longer period of time e g storage take the batteries out of the remote control to avoid damage from leaking batteries Switch th...

Страница 50: ...ob function backwards 6 Trim button for the roll function right 7 Trim button for the roll function left 8 On Off switch 9 Push button for the start and land function 10 Push button for the motor emergency off function 11 Push button for headless mode 12 Joystick for the pitch and yaw function 13 Push button for the return home function 14 Push button to switch between beginner sport and expert mo...

Страница 51: ...er supply for the transmitter To insert the batteries proceed as follows Loosen the retaining screw 1 on the battery compart ment cover 2 on the back of the transmitter with a suit able screwdriver Press the latch 3 of the lid locking mechanism down and remove the battery compartment cover Insert 3 AAA Micro type batteries with correct polarity fol lowing the instructions on the bottom of the batt...

Страница 52: ...tter emits a short beep Now move the joystick all the way down The transmitter emits another beep and the LED indicator lights up con tinuously Then switch off the transmitter again using the on off switch If the power supply is no longer sufficient for correct operation of the transmitter the indicator LED see Figure 3 no 15 flashes on and off every 3 seconds The transmitter emits a short beep wi...

Страница 53: ...as been completed and the flight battery is fully charged the red LED in the USB plug lights up again Disconnect the flight battery from the charging cable im mediately after charging and unplug the USB plug on the charging cable from the computer laptop or charger plug Warning Do not connect the USB cable to a USB hub without its own power supply e g a USB port on a keyboard etc as the current is...

Страница 54: ... clockwise B c Inserting the flight battery The compartment for the flight battery is on the base of the quadrocopter The flight battery 1 is slid into the bat tery compartment from behind as shown in the adjacent photograph The connection cable of the flight battery 2 must be aligned towards the rear so that the flight battery can be connected to the connection socket of the quadrocopter 3 at a l...

Страница 55: ... switch the transmitter on using the on off switch see also Figure 1 no 8 Then push the joystick for the pitch and yaw function see also Figure 1 no 12 all the way up The transmitter emits a short beep Now move the joystick all the way down The transmitter emits two short beeps again and the LED indicator on the transmitter see Figure 1 no 15 lights up continuously When the transmitter and receive...

Страница 56: ...itude of the quadrocopter see Figure 8 Steering is carried out with the left joystick see also Figure 1 no 12 When the motors are started by remote control they run at idle speed If the joystick is now pushed forwards from its central position the rotational speeds of the propellers increase and the quadrocopter lifts off Once the desired flight altitude has been reached the joystick can be return...

Страница 57: ...vertical axis to the left as seen from above If the joystick is moved to the right the speed changes of the propellers come out exactly the opposite and the model turns to the right see arrow in Figure 9 Figure 9 Roll function The roll function allows you to move the quadrocopter sideways to the right and to the left see Figure 10 The control is effected with the right joystick see Figure 1 no 4 I...

Страница 58: ...t joystick see also Figure 1 no 4 If you push the stick forwards slightly the electronics in the quadrocopter change the propeller speeds so that the model tilts slightly forwards and thus also flies forwards If you steer backwards on the transmitter the opposite propeller speed changes occur and the model flies backwards see arrows in Figure 11 Figure 11 ...

Страница 59: ...ortant Do not pull the joystick for the pitch function downwards suddenly as this will cause the quadrocopter to reduce flight altitude very quickly and in the event of a hard landing could sustain damage Pull the joystick back slowly and reduce flight altitude carefully Should the propellers run into objects and become blocked press the motor emergency off function button see Figure 1 no 10 immed...

Страница 60: ...rds carefully the quadrocopter will significantly increase propeller speed and take off The red LED on the quadrocopter will light up continuously With the right joystick you can easily correct any drift forwards or backwards or to the side Once the desired flight altitude is reached move the left joystick back to the centre position The quadrocopter can now hover at a steady flight altitude The f...

Страница 61: ...tively you can also use the button for the motor emergency off function see Figure 12 no 10 to quickly turn off the motors Disconnect the flight battery from the quadrocopter and switch off the transmitter 2 Automatic landing In hover flight mode quickly press the push button for the start and land function see Figure 12 no 9 The quadrocopter automatically reduces flight altitude until it is safel...

Страница 62: ...m s end position is reached no more beeps are emitted by the transmitter The trim s centre position is indicated by a higher beep Roll trimming If the quadrocopter drifts or tips sideways to the right slowly reduce the flight altitude until the quadrocopter is safely back on its landing feet Press the left trim button for the roll function see also Figure 1 no 7 several times Then carefully push t...

Страница 63: ...show any tendency to drift forwards If the quadrocopter wants to drift backwards press the upper trim button for the bob function see also Figure 1 no 3 Figure 14 The trim for the bob and roll functions is not saved After you switch the transmitter on and off the trim returns to the centre position When you have the quadrocopter securely under control again you can adjust the trim to the required ...

Страница 64: ...ore sharply to the transmitter s steering commands For this reason this mode is ideal for advanced users Expert mode Expert mode gives you maximum control sensitivity This setting is intended for experienced users and for use of the quadrocopter in outdoor areas Activating the different flight modes When it is switched on the transmitter is automatically in beginner mode To switch from beginner mo...

Страница 65: ...e that the transmitter has switched to flip mode it emits short beeps continuously Now move the joystick for the bob and roll function quickly as far as it will go in the direction in which the quadrocopter should flip and immediately bring the joystick back to the centre position The quadrocopter executes the roll over in the desired di rection The transmitter then deactivates flip mode To be abl...

Страница 66: ...orwards As long as the model pilot is then directly behind the quadrocopter and looking in the desired forwards direction the quadrocopter will react as the pilot commands it on the transmitter When the command is forwards the quadrocopter flies forwards from the pilot s perspective see dark arrow in Figure 17 Diagram B If the quadrocopter has for example turned 90 to the left in flight and its le...

Страница 67: ... a short beep The red LED on the quadrocopter flashes 2x short flashes and 1x long flash The quadrocopter is now flying in headless mode To switch headless mode off briefly press the push button for headless mode again The transmitter emits another short beep and the LED on the quadrocopter lights up continuously The quadrocopter is flying in normal mode again Figure 18 ...

Страница 68: ...on is activated and therefore end up farther away see Figure 19 Diagram C Figure 19 To activate the return home function briefly press the push button for the return home function see also Figure 1 no 13 The quadrocopter now flies against the previously de fined forwards direction You can correct the right or left direction when the quad rocopter is flying backwards with the joystick for the bob a...

Страница 69: ...ks on the transmitter to the lower right position and hold the two joysticks in this position The transmitter emits a short beep and the LED on the quadrocopter begins to flash The joysticks can now be moved to the centre position The calibration is completed after a short time and the red LED on the quadrocopter lights up continuously again Check with a test flight whether the quadrocopter is sti...

Страница 70: ...e As a general rule FPV operation must always be moni tored by a co pilot who can warn of dangers in good time It therefore requires a lot of practice to fly in FPV operation During the learning phase in particular ensure that the selected flight area is free of obstacles and far away from people animals buildings and roads To ensure the interference free transmission of video signals there should...

Страница 71: ...experience A foam pad see Figure 23 no 3 is provided for the bridge of the nose which must be attached 4 Ventilation openings The video goggles are cooled by convection The ventilation openings must not therefore be covered 5 Micro USB charging socket This socket is used for connecting the enclosed charging cable to allow the integrated rechargeable lithium battery to be recharged 6 Antenna base T...

Страница 72: ...from the charging cable im mediately after charging and unplug the USB plug on the charging cable from the computer laptop or charger plug Warning Do not connect the USB cable to a USB hub without its own power supply e g a USB port on a keyboard etc as the current is not high enough for the charge function The operating system does not detect any new hardware when connecting the charging cable as...

Страница 73: ...n function push button see Fig ure 24 no 10 until the monitor in the goggles goes dark e Setting the video frequency on the FPV goggles So that the FPV goggles can receive the radio signals from the camera the FPV goggles must be adjusted to the transmission frequency of the camera To this end briefly press the Scan function push button see Figure 24 no 10 The automatic search is started and after...

Страница 74: ...he FPV goggles and if activated the current receiving frequency 2 Briefly pressing the MENU push button activates the OSD menu and displays the current backlight value as a decimal 3 and bar diagram 4 The and push buttons can be used to adjust the value between 0 and 60 according to your personal prefer ences Figure 25 Press the MENU push button again to go to the next menu item The set values can...

Страница 75: ... hole This button can be pressed easily by inserting a straightened paper clip through the opening in the cover To change the transmission frequency proceed as follows Start up the quadrocopter Each time the button is pressed the video transmitter adjusts the transmitter frequency e g 2 to 3 or 4 to 5 within a frequency band At the end of the table the video transmitter switches from frequency 8 b...

Страница 76: ...e blue LED see Figure 26 no 5 will flash after 2 seconds and go out after a further 3 seconds If you now release the setting push button the PAL system switches to the NTSC system or from the NTSC system to the PAL system When the PAL system is activated a flashing blue LED 7 close to the 5 8 GHz radio antenna will be visible when the quadrocopter is operational When the NTSC system is activated t...

Страница 77: ...afts When removing the propellers ensure not to bend the mo tor shafts When selecting the new propeller always note the direc tion of rotation The propellers are labelled with the letter A or B as appropriate see also Figure 5 The new propeller should be positioned on the motor shaft straight from above and pushed carefully down as far as it will go Important Do not use any unnecessary force or un...

Страница 78: ... flight battery again for testing purposes The quadrocopter tilts to the side on start up Repeat the switch on sequence of the quadrocopter and do not move the model while doing so Check the ease of movement of the drive motor Calibrate the position sensors The quadrocopter has too low a perfor mance or too short a flight time Check the charge state of the flight battery Charge the flight battery ...

Страница 79: ... batteries are Cd Cadmium Hg Mercury Pb Lead indicated on the battery e g below the waste bin icon on the left Used batteries can be returned to local collection points our stores or battery retailers You thus fulfil your statutory obligations and contribute to protection of the environment 20 Declaration of Conformity DOC Conrad Electronic SE Klaus Conrad Straße 1 D 92240 Hirschau hereby declares...

Страница 80: ... L x W x H 82 x 82 x 40 mm Distance between rotor shafts diagonal 64 mm Propeller diameter 30 mm Take off weight incl battery 26 g c Wide angle camera Resolution 1000 TVL M7 lens 120 FOV H170 d Video transmitter Frequency range 5 705 5 945 GHz Number of channels 40 Transmission power 25 mW e FPV goggles Display size 7 62 cm 3 Display resolution 900 x 600 px Power supply 3 7 4 2 V 1S LiPo Power con...

Страница 81: ...81 ...

Страница 82: ...82 ...

Страница 83: ...83 ...

Страница 84: ...blikation entspricht dem technischen Stand bei Drucklegung Copyright 2018 by Conrad Electronic SE This is a publication by Conrad Electronic SE Klaus Conrad Str 1 D 92240 Hirschau www conrad com All rights including translation reserved Reproduction by any method e g photocopy microfilming or the capture in electronic data processing systems require the prior written approval by the editor Reprint...

Отзывы: