background image

GB

I POD VOL DOWN Button 

Press the button to reduce the volume 

Metric (KM) to English (ML) conversion   


The computer display can show both English and Metric information, if you want to change from the Me tric to English, Please 

follow the below procedure: When the computer is in the POWER ON status. Press hold Motion UP/DOWN button and then hold 

the “STOP” button at the same time about 3 seconds. The LCD will display ENGINEERING MODE. Press START button, the LCD 

will display En1, press theRESISTANCE UP/DOWN button to En3 (CONTROL MODE), and then press START button, the LCD 

will  show  M8(ELLIPTICAL-LEVEL-MPH)  or  M7  (ELLIPTICAL-LEVEL-KPH).  Select  set  M8(ELLIPTICAL-LEVEL-MPH)  or 

M7(ELLIPTICAL-LEVEL-KPH) by pressing the RESISTANCE UP/DOWN button. Press START button to confirm, and then press 

STOP/ENTER button to reset. 


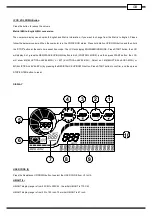
DISPLAY


5

6

4

3

2

1

10

9

8

7


USER CODE (8) 

Press the Resistance UP/DOWN button to select the USER CODE from U1 to U9. 

HEIGHT (8) 

HEIGHT display range is from 50 CM to 250CM    the initial HEIGHT is 170 CM   

HEIGHT display range is from 20 to 100 inch. The initial HEIGHT is 67 inch.   

Содержание DMT9.5e

Страница 1: ...DMT 9 5e Computer Manual Computer Manual Reebok DMT9 5e 20100513 GB...

Страница 2: ...GB A B C D E F FSLCD DISALY A B INTENSITY UP DOWN BUTTON STOP ENTER BUTTON C D START BUTTON MOTION UP DOWN BUTTON E F FAN CONTROL BUTTON...

Страница 3: ...console will enter the PAUSE MODE During the PAUSE MODE if you start pedaling the machine or press the START button the console will return to the PROGRAM MODE and continue the original program Press...

Страница 4: ...RT button the LCD will display En1 press theRESISTANCE UP DOWN button to En3 CONTROL MODE and then press START button the LCD will show M8 ELLIPTICAL LEVEL MPH or M7 ELLIPTICAL LEVEL KPH Select set M8...

Страница 5: ...ps RESISTANCE LEVEL 8 The range of the RESISTANCE LEVEL is from L1 to L16 MOTION LEVEL 9 The range of the MOTION LEVEL is from M1 to M12 RPM DIAGRAM 5 The range of the RPMs are from 0 to150 SPEED 3 Th...

Страница 6: ...5 P1 P12 Program Selecting Procedure After the age has been set up press the ENTER button to confirm the LCD will display and flash PROGRAM1 press RESISTANCE UP DOWN to select Then press the ENTER but...

Страница 7: ...the end of the program when the preset target has been achieved the computer will beep P4 Fat burning program After the user has selected P4 Fat burning program the TIME display will show the workout...

Страница 8: ...unt up Dot Matrix display shows the pre set INTENSITY and MOTION pro le Press RESISTANCE UP DOWN to adjust the RESISTANCE and press MOTION UP DOWN to adjust the MOTION LEVEL 1 2 3 4 5 6 7 8 9 10 11 12...

Страница 9: ...me counts down to 0 Distance and Calories count up Dot Matrix display shows the pre set INTENSITY and MOTION pro le Press RESISTANCE UP DOWN to adjust the RESISTANCE and press MOTION UP DOWN to adjust...

Страница 10: ...wn the DISTANCE CALORIES display will count up from 0 TIME 1 2 3 4 5 6 7 8 9 10 11 12 13 14 15 16 RESISTANCE St1 1 1 2 2 2 4 4 4 5 5 5 6 6 6 2 2 RESISTANCE St2 2 2 4 4 4 5 5 5 6 6 6 7 7 7 4 4 RESISTAN...

Страница 11: ...main program and the time will count down from the pre set time During the main program the computer will detect the user pulse rate every 15 seconds The RESISTANCE DISTANCE CALORIES will continue to...

Страница 12: ...ress the STOP button twice and the program will return to POWER ON P10 C1 C5 Individual custom program When the user selects P10 CUSTOM program and press s the ENTER button C 1 will display and flash...

Страница 13: ...form the preset time and DISTANCE CALORIES will count up from zero When start the program press the STOP button to pause the program the program will come in POWER ON mode when the user presses the S...

Страница 14: ...has been achieved the LCD display will stop the program along with a beep TIME WATT 1 2 3 4 5 6 7 8 9 10 11 12 13 14 15 RESISTANCE St1 50 55 60 65 70 100 110 120 130 140 140 140 140 130 120 RESISTANC...

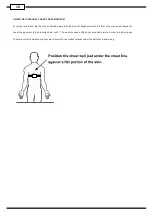
Страница 15: ...h the monitor strapped across the front of your body just above the chest line as shown in the drawing on the right The monitor needs a little body heat and moisture in order to work properly To ensur...

Страница 16: ......

Отзывы: