


17
5. Rip Fence Assembly
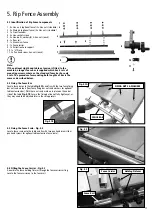
5.1 Identification of Rip Fence Components
1. 4 x Hex. nuts (optional fence) / 2x Hex nuts (standard)
2. 8 x Washers (optional fence) / 4x Hex nuts (standard)
3. 1 x Front fence bar
4. 2 x Hex. socket screws
5. 2 x Hex. bolts, washers(4) & hex. nuts (each)
6. 1 x Rear rail
7. 1 x Aluminium fence
8. 1 x Fence carrier
9. 1 x Extraction hose support
10. 1 x 'U' Piece
11. 2 x Pan head screw, hex. nuts (each)
1
2
3
4
5
6
7
8
9
10
11
Note:
If the optional right hand table extension is fitted to the
machine, a longer fence bar is supplied which has 4 sets of
mounting screws, where as the standard fence bar has only
2 sets. The procedure for mounting both lengths of bar is the
same as described below.
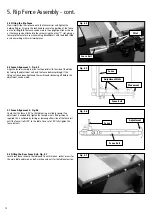
5.3 Fixing the Fence Scale - Fig. 5.2
Locate fence scale onto the table and fix with two pan head screws (four
pan head screws for optional table extension fence scale).
Fig. 5.2
5.2 Fixing the Fence Bar
Locate fence bar onto the table
Fig. 5.1A
and fix with the two fence fixing
bar nuts and washers (four fence fixing bar nuts and washers for optional
table extension bar). With those nuts and washers in place on the under
side of the table
Fig. 5.1B
Secure the fixing but do not fully tighten yet as
they may need to be adjusted later in the setup process.
FENCE BAR
FIXING NUTS & WASHERS
Fig. 5.1A
Fig. 5.1B
5.4 Fitting the Fence Carrier - Fig. 5.3
Assemble the fence holding fixtures through the fence carrier casting.
Locate the fence carrier on to the fence rail.
Fence Carrier
Holding Fixtures
Fig. 5.3
Fence Rail
i
Kg
Содержание TS250C
Страница 28: ...28 11 Parts Lists Diagrams ...
Страница 29: ...29 11 Parts Lists Diagrams cont ...
Страница 30: ...30 11 Parts Lists Diagrams cont ...
Страница 31: ...31 11 Parts Lists Diagrams cont ...


