background image

HandPunch 2000 Installation and Operations Manual

8


ENTER ID

    (TIME)     (DATE)        

CLEAR  +  ENTER

   ENTER PASSWORD

4    #

   ADD EMPLOYEE 

     *NO            YES #          *

    ADD SUPERVISOR

#

      *NO         YES  #

         ENTER  ID

                             1   2   3   #

     PLACE HAND  
  1/3

  REMOVE HAND

       PLACE HAND

   2/3


REMOVE HAND

    PLACE HAND  
3/3

  123

 USER ENROLLED

 ADD SUPERVISOR          #  add another
         * NO     YES #


*   next menu

5   exit

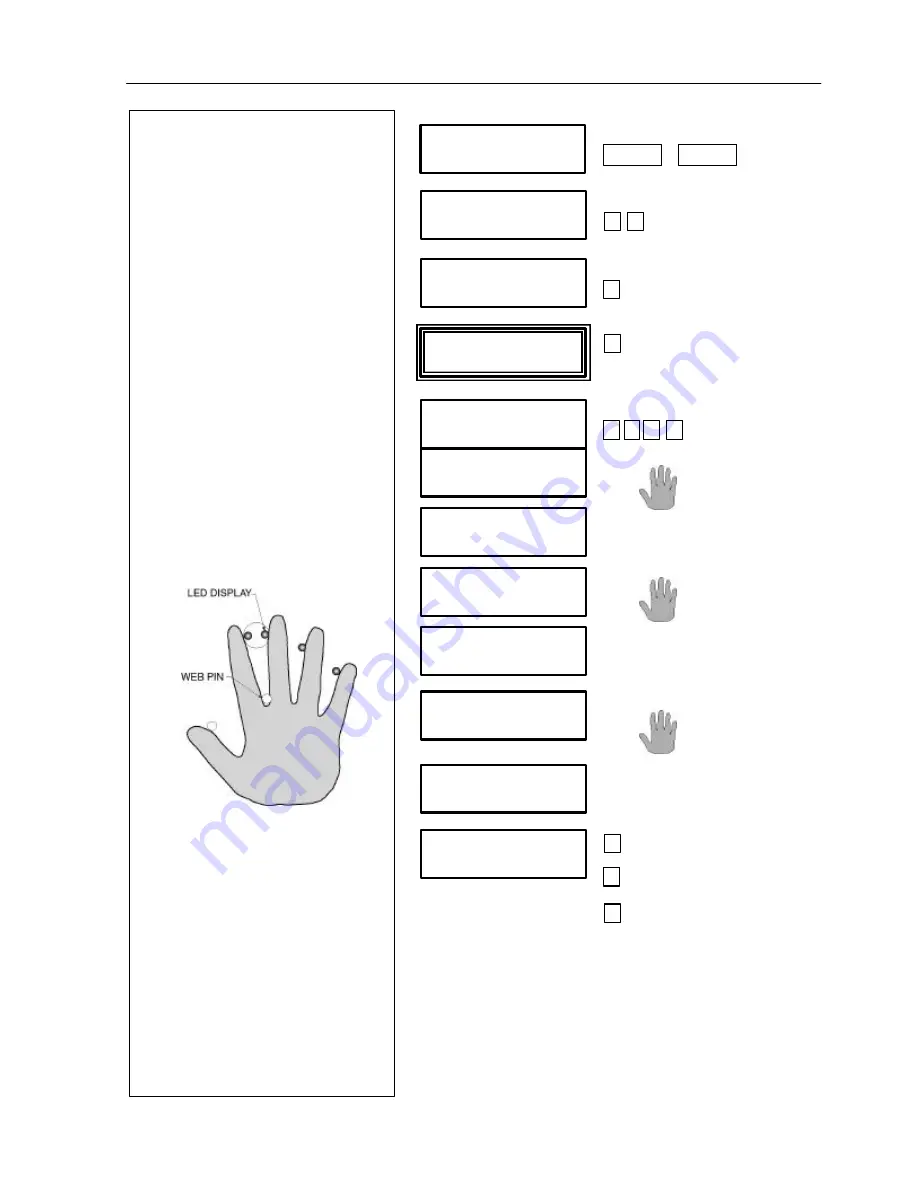
First enrollment (supervisor)

Example:
Enroll with ID number 123.

During enrollment, the display
will ask for at least three hand
placements.  To place the hand
properly, rest the four fingers of
the right hand on the front of the
platen.  Keeping the hand flat,
slide it forward until the web pin
between the index and middle
fingers stops further movement.
Squeeze the fingers against the
finger pins and watch the light
display and hand diagram on the
top panel.  The lights go out
when you have placed your
fingers properly.  If a light
remains on, move your finger
until it contacts the pin shown on
the display.

The first person enrolled is the
only person who has access to
the command menus until others
are enrolled

Important! 

 After the first

person is enrolled, you must
press CLEAR and ENTER, enter
your ID number, place your
hand and verify identity
before you can enroll others.

Содержание HandPunch 2000

Страница 1: ...HandPunch 2000 Installation and Operations Manual Recognition Systems Inc 1520 Dell Ave Campbell CA 95008 Tel 408 364 6960 Fax 408 370 3679 Email sales recogsys com ...

Страница 2: ...and administrators guide command mode 6 Entering and exiting the command mode 7 Supervisor enrollment 8 General setup 9 Set language and date 10 Set address 11 Employee enrollment and removal 12 User reject threshold 15 Employee operating guide 16 Programmers guide 18 Punch menus 19 Configuration 22 Maintenance 23 Warranty 26 Specifications 28 Index 29 ...

Страница 3: ...amera to capture a three dimensional image of the hand Using advanced microprocessor technology the terminal converts the image to a template It stores the template in database with the employee s ID number To punch in the employee enters his or her ID number at the terminal HandPunch 2000 prompts the employee to place his or her hand The terminal compares the hand on the platen with employee s un...

Страница 4: ...urface should be 40 inches above the floor The wire run between the terminal and computer must not exceed 50 feet 15 meters The terminal must be within 5 feet 1 5 meters of a 120VAC duplex outlet An 8 foot 2 4 meter cable is included with modem units The telephone connection must be within 8 feet of the terminal to use this cable Hand reader placement The reader should be in a convenient location ...

Страница 5: ...he wall Use 2 furnished auger style fasteners for the upper bolts and 3 toggle bolts for the lower locations Drill the three lower bolt locations using a inch drill Install the auger style fasteners in the two upper holes using a screwdriver The auger will bore into the wallboard DO NOT OVERTIGHTEN Install the toggle bolts into the three lower bolt locations Tighten the bolt until you feel a stron...

Страница 6: ...lts Swing the terminal to the upright position while holding the cables in place Lock the unit to the wall plate with the key provided Turn the key COUNTER CLOCKWISE to lock Plug the power supply into the wall outlet and check the display to verify the unit is working After a few seconds you should see ENTER ID If the unit does not power up unlock the terminal and recheck the power connection Chec...

Страница 7: ...lled by an individual password COMMAND MODE STRUCTURE SECURITY DEFAULT PASSWORD 5 ENROLLMENT DEFAULT PASSWORD 4 MANAGEMENT DEFAULT PASSWORD 3 SETUP DEFAULT PASSWORD 2 SERVICE DEFAULT PASSWORD 1 SPECIAL ENROLL ADD EMPLOYEE LIST EMPLOYEES SET LANGUAGE CALIBRATE ADD SUPERVISOR SET EMPLOYEE DATA SET DATE FORMAT STATUS DISPLAY REMOVE EMPLOYEE SET TIME DATE SET ADDRESS SET ID LENGTH SET SERIAL Passwords...

Страница 8: ...he top line The second line will show the prompt NO YES Pressing the yes key will select the displayed command Sub menu prompts will appear Pressing the no key will bring up command on the display Repeatedly pressing the key will bring the display back to the first command When the NO YES prompt is shown on the display pressing any number key will exit the Command Mode and return to the ENTER ID p...

Страница 9: ...f the right hand on the front of the platen Keeping the hand flat slide it forward until the web pin between the index and middle fingers stops further movement Squeeze the fingers against the finger pins and watch the light display and hand diagram on the top panel The lights go out when you have placed your fingers properly If a light remains on move your finger until it contacts the pin shown o...

Страница 10: ...te For units not networked to a PC it is important to set the time and date Units networked to a PC typically receive the time and date from the PC Set ID Length Setting the ID length can reduce the number of keystrokes needed to enter the ID number by eliminating the use of the or ENTER key to complete ID number entry Set Address The default setting 1 is typical for this application Change only i...

Страница 11: ...o change NO YES 5 to exit to next menu Continued on the next page Set language Once you are enrolled in the hand reader you must press CLEAR and ENTER at the same time enter you ID number and verify before ENTER PASSWORD will appear in the display The default language is English The alternate language choice is Spanish Set date format The U S format MM DD YY is default AVAILABLE DATE FORMATS mm dd...

Страница 12: ...hoose to select choice SET SERIAL to change NO YES to top menu 5 to exit You may now complete the set up in the host computer or enroll employees The next group of menus is for employee enrollment Set address The default address 1 is used for most applications However if it is necessary to change it you can set the address from 2 to 255 The ID length is typically be set at the host computer When s...

Страница 13: ...rtant To enter the command mode you must press CLEAR and ENTER your ID and place your hand to enter the command mode Example Enroll user 321 Show the employee the hand placement techniques used in the FIRST ENROLLMENT The hand reader may ask for another hand placement If the LCD displays SORRY CAN T ADD another employee is likely enrolled with the same number Also check for improper hand placement...

Страница 14: ...YES next menu 5 exit Special enrollment ID numbers placed in the database from the SPECIAL ENROLLMENT menu will work with anyone s hand A user must place a hand or prosthetic in the reader to punch Example Enter ID 987 as a special enrollment List users The LIST USERS function allows you to view or print user information ID number Authority level 0 and 5 There are two authority levels 0 Employees ...

Страница 15: ...ER NO YES REMOVE ID enter employee ID USER REMOVED REMOVE ID enter next ID or CLEAR to end REMOVE USER next menu NO YES 5 exit Remove a user With this menu supervisors can remove a user at the reader The removal remains in effect until the host computer polls the reader To permanently remove a user he or she must be deleted from the host computer database ...

Страница 16: ... 5 to exit SET USER DATA to next menu NO YES 5 to exit Set user reject threshold Use this group of menus to set the a user reject threshold The reject threshold is the sensitivity of the hand reader Some users with physical disabilities may have difficulty using the reader This menu allows you to adjust the threshold for individual users without affecting the threshold of others Note Host computer...

Страница 17: ...the four finger position indicator lamps will turn on When PLACE HAND appears in the display land your hand on the platen as you did when you were enrolled Using the Data Management Keys There are two data management keys on the HandPunch 2000 marked F1 and F2 If your time and attendance system uses the function keys press F1 or F2 to start the data collection as instructed by your supervisor Typi...

Страница 18: ...ingers are in the proper position Remember to close all fingers on their guide pins You must hold your hand on the platen briefly until the message PLACE HAND disappears The display will show the results of the verification attempt If the verification was successful it will display OKAY XXX XXX is the ID number If it was not it will display TRY AGAIN If it displays TRY AGAIN and you are authorized...

Страница 19: ...that comes with the 3rd party software for configuration options that the software supports When using PunchNet G software refer to the manual for how HandPunch configuration data is entered into the system Punch Menus The HandPunch can be configured to operate in several different data entry modes to meet the requirements of different applications No T A menu Explicit Punch menu Request Departmen...

Страница 20: ... before entering his or her ID number A employee defined explicit punch menu can function like any of the data management keys See below for a general overview Please refer to RSI s Function Key Compiler Employees Manual for the details on creating this menu Data Management Keys You can define the two data management keys on the HandPunch 2000 to meet a variety of data collection tasks For the det...

Страница 21: ...a entry For example you can link the entry of a department and job code to a single data management key ENTER DEPT After the department code entry the display shows ENTER JOB CODE Display a menu You can define menus that allow employees to select from a set of choices You can link any of the choices to further operations or simply terminate You can offer up to 4 choices per menu and define text of...

Страница 22: ... of a 1 or 2 will generate transactions with employee defined TA codes You can link menus and collection together For example one could display 1 IN 3 DEPT 2 OUT Menu choice 3 is linked to a collection ENTER DEPT You can define the type of data to be collected This allows a display format that is that is helpful to the employee For example if collecting information that involves money the decimal ...

Страница 23: ...ifies off and 1 specifies on The default is ON ID NUMBER LENGTH Can also be set at reader Specifies the ID number length Permitted values are 1 through 10 digits Shorter ID s require the key after ID entry Set the ID length to the longest ID number ACCESS TRIES Specifies the number of times a employee is permitted to retry hand readings without lockout The default is 6 DAYLIGHT SAVINGS TIME Specif...

Страница 24: ...ion of poor performance If scores average over 30 clean the reader and check again If scores remain high or if users are experiencing frequent rejections run the CALIBRATION mode By setting STATUS you can view the last employee s score and the status of the tamper switch Memory reset The memory reset dip switches 4 and 5 are factory set in the off position The reader maintains setup and user memor...

Страница 25: ...ration function that realigns the camera after you have serviced or cleaned the terminal It is not necessary to recalibrate the terminal as regular maintenance However If the reader frequently rejects authorized users check the calibration values Thoroughly clean the platen side mirror and window with window cleaner on a cloth Run RECAL to electronically recalibrate the hand reader Normal operatin...

Страница 26: ...K STATUS DISPLAY CCCCC LLLL 43 Last hand reading score These codes are not used Set status display Setting the status display allows you to check the status of The tamper switch The door monitor switch Auxiliary input s Request to exit switch The score of the last person that used the hand reader To turn off the status display press when the panel displays STATUS DISPLAY OFF See network status dis...

Страница 27: ...n 5 years via a standard internal lithium battery Transaction buffer 5187 Transactions ID number length 1 to 10 digits Baud rate 300 28 8K bps Communications RS 232 User capacity 512 Users Recommended European Power Supply Ault Inc 7300 Boone Ave North Minneapolis MN 55428 USA 612 493 1900 Email info aultinc com Part number D48 121000 A040G 230VAC Input 12VDC 1 Amp output unregulated CE approved A...

Страница 28: ...osion earthquakes tornadoes acts of aggression war or similar phenomenon and 5 Accessories used as integral to the Product have been approved by the Company The company shall at its option either repair or replace free of charge the Product found upon the Company s inspection to be so defective or if agreed upon refund the purchase price less a reasonable allowance for depreciation in exchange for...

Страница 29: ...d can radiate radio frequency energy and if not installed and used in accordance with the instruction manual may cause harmful interference to radio communications Operation of this equipment in a residential area is likely to cause harmful interference in which case the user will be required to correct the interference at his own expense This Class A digital apparatus meets all requirements of th...

Страница 30: ...Punch 22 F Finger pin lights 17 G General Setup 9 H Hand placement 17 Hand reader location 3 HandPunch technology overview 2 I ID number length 22 Installation 4 J Job code 20 M Maintenance 23 Memory reset 23 P Passwords 6 22 Programmers guide 18 Punch Menus 18 Punch mode 22 R Reject threshold 22 S Settings Date format 10 Language 10 User reject 15 Special enrollment 13 Specifications 26 Status di...

Отзывы: