background image

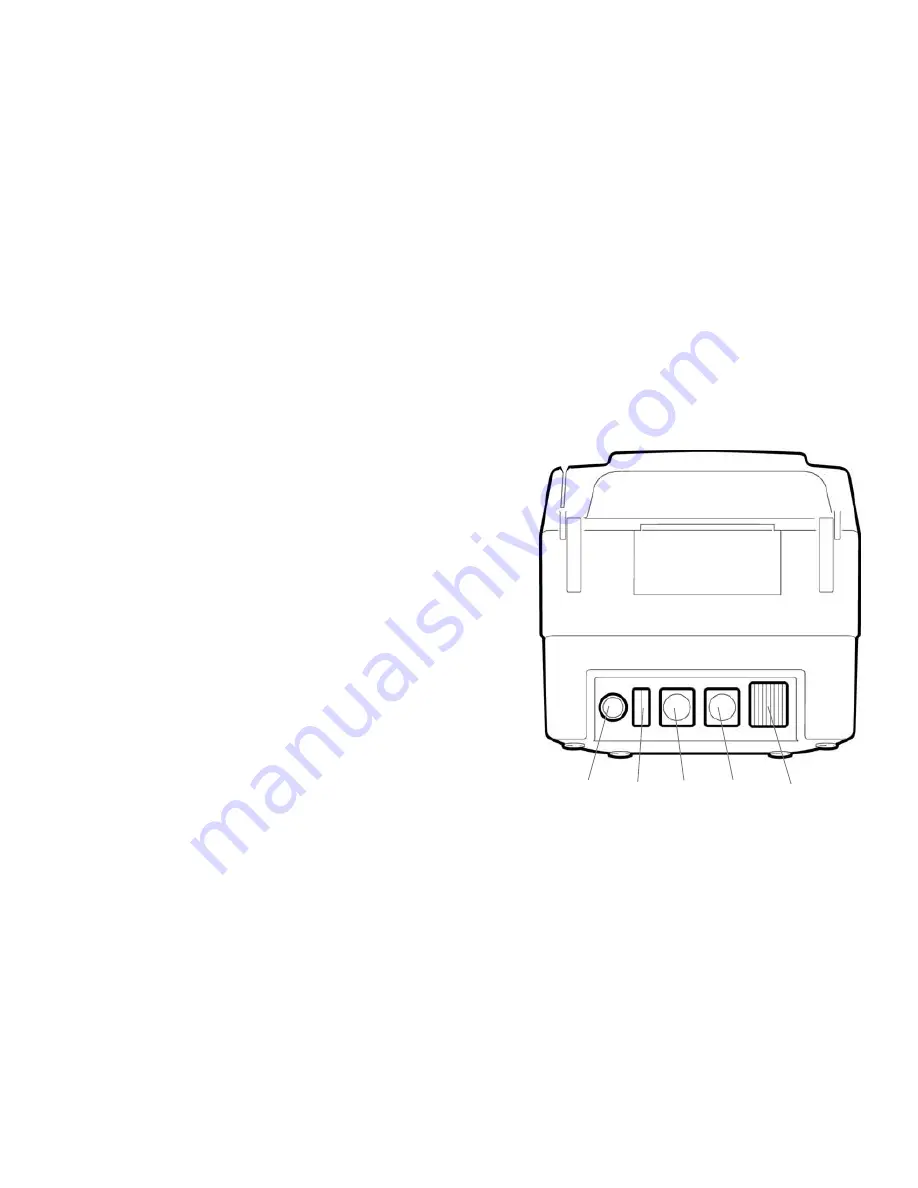
Connection Ports: 

RDM’s EC6000i Gen2 and EC7000i can be installed in different configurations. These configurations are set and 
programmed by the distributor (reseller) to suit your unique needs.  
Follow instructions provided by your distributor (reseller).  


Power: 

Red. Connect the power adaptor to this port.  
 

USB: 

Orange. Use this port to connect to a PC. 
 

AUX: 

Yellow. Use this port to connect optional 
peripheral devices such as a pass through 
printer 
 

COM: 

Green. Use this port to connect to a PC or 
terminal 
 

TEL: 

Purple. This port offers an optional modem, 
to be connected to a telephone line. Some 
scanners may not contain a TEL Port. 


Power 

USB 

AUX 

COM 

TEL 

Содержание EC6000i Gen2

Страница 1: ...EC6000i Gen2 and EC7000i Series Installation Guide ...

Страница 2: ...ark of RDM Corporation EC7000i ITMS RDM and the RDM logo are all trademarks of RDM Corporation All other brand names and trademarks appearing in this guide are the property of their respective holders Copyright RDM Corporation 2005 All rights reserved No part of this document may be reproduced in any form without the written consent of RDM Corporation Part Number 302665 Revision Number A ...

Страница 3: ...ntents Compliance Statements 2 Introduction 3 Requirements 4 Setting Up the EC6000i Gen2 or EC7000i 5 Maintaining the EC6000i Gen2 or EC7000i 16 Troubleshooting 18 Specifications 21 Warranty Information 24 ...

Страница 4: ... equipment operations or procedures If these changes might affect your services or the operation of your equipment the telephone company will give you notice in writing to allow you to make any changes necessary to maintain uninterrupted service In certain circumstances it may be necessary for the telephone company to request information from you concerning the equipment that you have connected to...

Страница 5: ...re cost effective feature rich imaging solutions Utilizing RDM s industry leading progressive MICR method and imaging technology the EC6000i Gen2 and the EC7000i are ideal for Check Electronification Check Cashing and Walk in Bill Payment applications ...

Страница 6: ...fied in this guide will void the warranty Recommendations This unit may be installed and programmed by a distributor reseller other than the original manufacturer Record all distributor contact information for future reference Save the original box and packing material Re use them if the unit must be shipped to a new location Position the unit so that the operator has easy access to the check path...

Страница 7: ...on depending on your unit and power connections B Unpack the Shipping Box 1 Open the top of the box 2 Remove and unwrap the items 3 Save the box and wrapping for future use NOTE Before unpacking the box examine it for damage received during shipping If the scanner or any component appears damaged do not use it File a claim with the shipping company and contact your distributor Your EC6000i Gen2 or...

Страница 8: ... B below does not include an MSR Scanner Model A will be graphically represented throughout this manual for consistency All other features of the EC6000i Gen2 and EC7000i are available as standard or optional on either model Check Insertion Slot Terminal Status LED Light Magnetic Stripe Reader Check Insertion Slot Terminal Status LED Light Model A Model B ...

Страница 9: ...nts Cover Latch Outside Cover in raised position Image Frame in raised position Image Sensor Document Feed Plate comes out to reveal the optional Franking Acknowledgement Printer Assembly EC7000i shown Document Sensors ...

Страница 10: ...ded by your distributor reseller Power Red Connect the power adaptor to this port USB Orange Use this port to connect to a PC AUX Yellow Use this port to connect optional peripheral devices such as a pass through printer COM Green Use this port to connect to a PC or terminal TEL Purple This port offers an optional modem to be connected to a telephone line Some scanners may not contain a TEL Port P...

Страница 11: ...dge into the unit I Access the Printer Assembly 1 Press the latch and lift the cover to access the imaging frame 2 Lift the imaging frame to access the feed plate 3 Locate the blue tab on the side of the unit a With your thumb on the outside of the unit apply enough pressure to pull the blue tab towards the outside of the unit and hold it there b While holding the blue tab lift the document feed p...

Страница 12: ...rmly until it clicks into place 4 Close the imaging frame 5 Close the outside cover CAUTION Avoid contact with the main drive roller to prevent ink transfer to documents See Cleaning the Imager for details Ink may be harmful if swallowed Avoid contact with eyes Damage to the unit or the cartridge resulting from modifying the cartridge is not the responsibility of RDM The ink cartridge is intended ...

Страница 13: ...elephone line into the telephone company wall jack Test the Telephone Line and Third Party Line 1 Call the third party line to ensure that it is working properly 2 If the third party line is not working contact your local telephone company for repair 3 If the telephone line works contact your distributor to have the EC6000i Gen2 or the EC7000i serviced CAUTION Plug the telephone line into an outsi...

Страница 14: ...to power the LED will light up Your unit is now turned on CAUTION Disconnecting the power source while the terminal is processing a transaction may cause data files stored in the unit s memory to be lost NOTE The EC6000i Gen2 and EC7000i power adaptor contains a locking mechanism that securely connects the power cord to the scanner To prevent cord damage do not pull on the cord Firmly slide back t...

Страница 15: ... unit is ready to accept checks when the LED is green As shown on the right insert the check Flush to the right side of the EC6000i Gen2 or the EC7000i Information side facing up MICR line to the inside right Swiping Magnetic Stripe Cards Optional Swipe the credit card with the black magnetic stripe facing downward and to the left CAUTION Do not open the cover or otherwise try to access the inside...

Страница 16: ...e next job with a command from the terminal Amber Flashing The unit is sending or receiving information from the terminal wait Red Green Amber Flashing The unit is starting up or performing diagnostics wait Red Solid The unit failed during a self test check the terminal display for instructions refer to your local procedures call you distributor reseller Red Flashing An error occurred during proce...

Страница 17: ...sful in reading the MICR line One long beep LED is flashing red An error occurred during processing or storing of the captured image A Typical Check Processing LED Cycle 1 The unit is on and idle the LED is Solid Amber 2 The LED turns to Solid Green when the scanner is ready to accept a check 3 A check is run through the unit the LED turns OFF 3 4 seconds then Flashes Green The unit emits a short ...

Страница 18: ... Press the latch and lift the cover to access the imaging frame 2 Lift the imaging frame to access the document feed plate 3 Locate the blue tab on the side of the unit With your thumb positioned on the outside of the unit apply enough pressure to pull the blue tab towards the outside of the unit and hold it there 4 While holding the blue tab lift the document feed plate up and to the left or up a...

Страница 19: ...o locate and access the document sensors follow the instructions below 1 Press the latch and lift the cover to access the imaging frame 2 Lift imaging frame to access the document sensors 3 Use a lens cleaning tissue or a damp lint free cloth to remove any ink or dust from the document sensors to remove any ink or dust from the main drive roller Document Sensors ...

Страница 20: ...ne line is working by removing the connection from the EC6000i Gen2 or the EC7000i and connecting it to a telephone base unit 3 If the telephone line is not working contact your local telephone company for repair Peripheral Device Does Not Respond 1 Ensure that the scanner s cable is still properly connected to the correct port on the back of the unit according to instructions provided by your dis...

Страница 21: ...1 Press the latch and lift the cover to access the imaging frame 2 Lift the imaging frame to access the document feed plate 3 Clear any paper or debris from the imaging frame and document feed plate 4 Ensure that the black fingers on the baffle move freely EC7000i only 5 Use a lens cleaning tissue or a damp lint free cloth to remove any ink or dust from the document sensors 6 Ensure that the rolle...

Страница 22: ...Properly Test the Card Swipe Mechanism 1 Ensure that you are swiping the card properly The black magnetic stripe on the back of the card must face downward and to the left 2 Try using another card to ensure the first card was not defective ...

Страница 23: ...x 6 2 wide x 5 3 high 22 5 cm long x 15 5 cm wide x 13 5 cm high Unit Weight EC6000i Gen2 3 1lbs 1 4 Kg EC7000i 3 4 lbs 1 5 Kg Unit Orientation For proper operation place unit on a level horizontal surface EC6000i Gen2 and EC7000i Connectors Power Red Mini DIN 3 pin USB Orange USB A 1 1 AUX Yellow Mini DIN 8 pin COM Green Mini DIN 9 pin TEL Purple RJ11 plug Modem optional ...

Страница 24: ...Maximum 4 W x 9 L 10 16 cm x 22 86 cm Weight Range 8 lb to 100 lb thermal paper to business card stock Font E13B MICR Character Set Alphanumeric OCR A and B font recognition optional Electrical Power Requirements for Power Adapter Use an RDM supplied power adaptor EC6000i Gen2 Power Supply RDM P N 302493 Input 120V 60Hz 0 4A Output 24VDC 0 5A EC7000i Power Supply RDM P N 302671 Input 100 240VAC 50...

Страница 25: ... V 34bis V 34 V F C V 32bis V 32 V 22bis V 22A B V 23 V 21 Bell 212A and 103 Error Correction V 42 LAPM and MNP 2 4 Data Compression V 42bis and MNP 5 Optional Magnetic Stripe Reader MSR Specifications MSR Specifications 3 track bi directional ...

Страница 26: ...remainder of the original warranty period The equipment is sold with the understanding that neither the Corporation such distributors nor such manufacturers will be liable for any damages whatsoever including without limitation direct or indirect damages for personal injury loss of business profits business interruption loss of business information or any other pecuniary loss arising out of the us...

Страница 27: ...ed to excessive heat or unstable environmental conditions Consumables such as Franking Acknowledgement Printer Cartridge or Franker Assembly or other EC6000i Gen2 or EC7000i consumables or accessories such as cables RDM s EC6000i Gen2 or EC7000i units with problems found to be caused by incorrectly set configuration parameters IRN Owner Code Merchant ID etc are not considered defective and will no...

Страница 28: ...ght RDM Corporation 2005 All rights reserved No part of this document may be reproduced in any form without the written consent of RDM Corporation Part Number 302665 Revision Number A Waterloo Ontario Canada ...

Отзывы: