background image

10

Chapter 2

Graphics contained within this publication are for representation only.

Using the Remote Control

PRESETS

In TV mode, picture options are reset to original factory settings.

RECORD 

 In VCR mode, press to program your VCR to record a program.

REVERSE 

 In DVD mode, press REVERSE to go backwards on a disc.

SEARCH

In VCR mode, accesses Index Search feature.

SKIP

Press once before changing channels and the TV will wait 30 seconds before

returning to the original channel. Press repeatedly to add more time. In DVD mode,
displays the Info Display with the Angle icon highlighted.

SPEED

In VCR mode, selects a recording speed.

STOP  

In DVD mode, stops playing the disc and displays the DVD’s menu system.

TV

Turns on the TV and puts the remote in TV mode. Also displays current status.

VCR

Puts the remote in VCR mode and, if auto tuning is enabled, will turn on the TV

and tune to the correct video input channel.

VOL – or VOL +

Decreases or increases the TV’s volume.

ZOOM

In DVD mode, zooms in on the picture.

Using the INPUT Button

Use the INPUT button to scroll through the available video input channels and view
components you have connected to the TV/DVD.
1. Make sure the component you want to view is turned ON.
2. Press INPUT to tune to an available video input source and view the component.
3. To return to the previous channel, continue pressing INPUT.

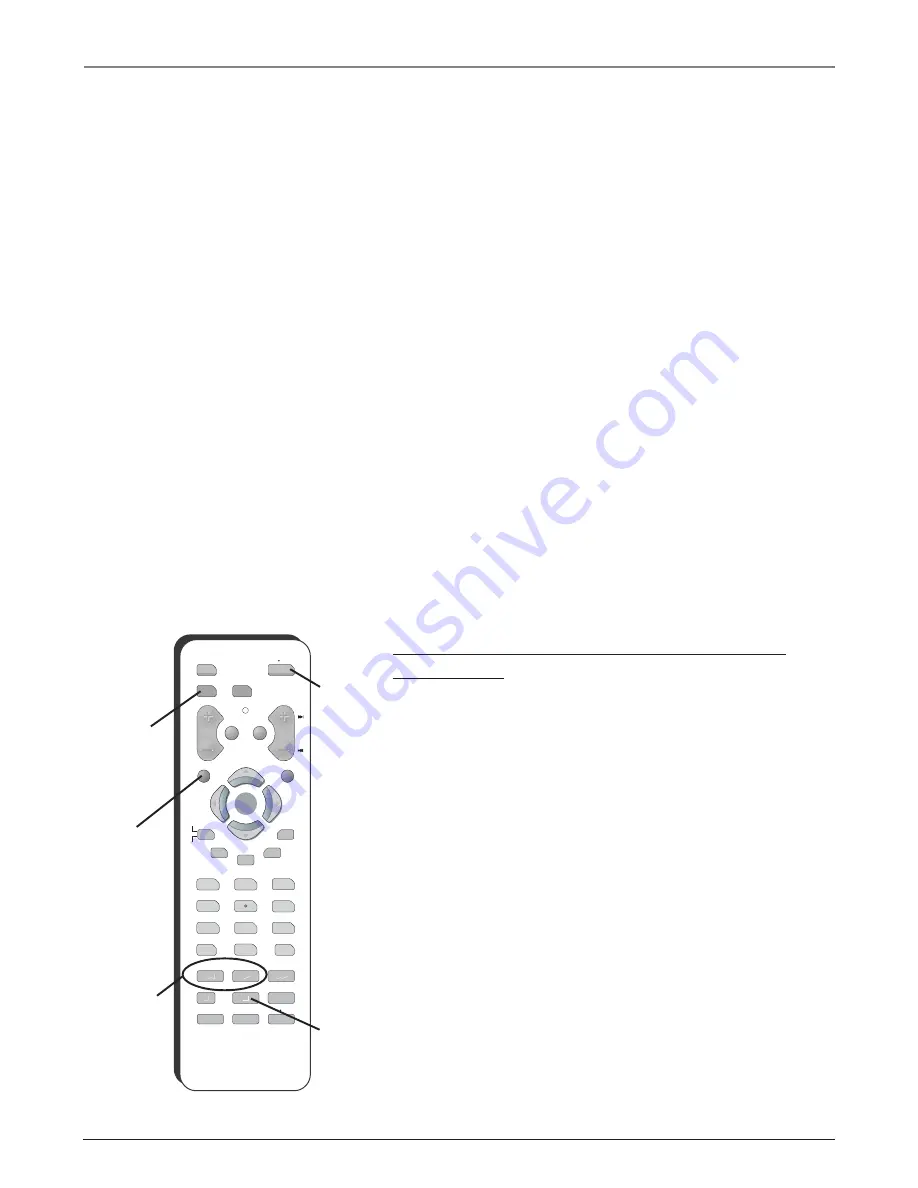
Programming the Remote to Operate Other
Components

The universal remote can be programmed to operate most
brands of remote controllable components. The remote is
already programmed to operate most RCA, GE, and Proscan
components.

Notes: The TV and DVD buttons can’t be programmed on this remote.

The remote may not be compatible with all brands and models of
components. It also may not operate all functions of the remote that
came with your component.

Find Out If You Need to Program the Remote

To determine whether the universal remote needs to be
programmed for your component, turn the component ON.
For example, to program the remote for a VCR, turn on the
VCR. Point the remote at the VCR, and press the VCR button.
Then press ON•OFF or CH + (channel up) or CH – (channel
down) to see if the VCR responds to the remote commands. If
the component does not respond, the remote needs to be
programmed.

DVD

ON  OFF

VCR

TV

VOL

MUTE

GO BACK

CH

CLEAR

MENU

PRESETS

CC

GUIDE

INFO

SKIP

1

2

3

4

5

6

7

8

9

0

INPUT

ANTENNA

REVERSE

PLAY

FORWARD

RECORD

STOP

PAUSE

AGAIN

ZOOM

OPEN  CLOSE

SPEED

SEARCH

OK

OK

DISC MENU

VCR button

ON•OFF
button

REVERSE
and PLAY
buttons

STOP
button

You’ll use these buttons when
programming the remote.

CLEAR
button

Содержание TruFlat 24F610TD

Страница 1: ...TV DVD User s Guide Changing Entertainment Again ...

Страница 2: ...gistration Please fill out the product registration card packed separately and return it immediately For U S customers Your RCA Consumer Electronics product may also be registered at www rca com productregistration Registering this product allows us to contact you if needed This symbol indicates that this product incorporates double insulation between hazardous mains voltage and user accessible pa...

Страница 3: ...mote Control Codes 12 Chapter 3 Playing Discs Regional Coding 14 Using Different Menus 14 Loading and Playing Discs 14 To Load and Play a Disc 14 Using a Disc Menu 15 Disc Playback Features Using the Remote 15 Using the On Screen Info Display 16 DVD Disc Info Display 16 Time Display 16 Selecting a Title 16 Selecting a Chapter 17 Selecting Subtitles 17 Changing the Audio Language 17 Using the Repea...

Страница 4: ... Play Mode Menu 33 Selecting a Play Mode 33 How to Create a Program 33 Editing a Program 34 AutoPlay 35 IntroScan 35 The Lock Menu 35 Locking Your DVD 36 Unlocking Your DVD 36 Changing Your Password 36 Setting the Ratings Limits 37 Unrated Titles 38 System Test 38 The Display Menu 39 TV Image 39 On Screen Displays 40 The Sound Menu 40 Sound Logic 40 Digital Output 41 The Languages Menu 42 Changing...

Страница 5: ...a uses 300 ohm twin lead cables do not coil the cables Also keep the twin lead cables away from audio video cables Important Stand and Base Safety Information Choose the location for your TV DVD carefully Place the TV DVD on a stand or base that is of adequate size and strength to prevent the TV DVD from being accidentally tipped over pushed off or pulled off This could cause personal injury and o...

Страница 6: ...w to the Video Output Jack on the VCR and to the VIDEO 1 VIDEO jack on the back of the TV DVD D Connect a coaxial cable to the TV ANT jack on your TV DVD and to the Output Jack on your VCR sometimes labeled OUT TO TV Note If your VCR has A V output jacks you can connect your TV to your VCR using audio video cables for better quality 2 Make sure cable or antenna is connected to your VCR Connect the...

Страница 7: ...nection The video connector is usually yellow S VIDEO IN Provides better picture quality than the video jacks because the color part of the signal is separated from the black and white part of the picture When using S VIDEO IN make sure to connect left and right audio cables to the L MONO and R AUDIO Input jacks VIDEO 2 VIDEO AUDIO R and L MONO Lets you connect a second component such as a VCR The...

Страница 8: ...video from another component such as a VCR camcorder or video game console Front Panel Buttons If you cannot locate your remote you can use the front panel buttons of your TV DVD to operate many of the TV DVD s features PLAY PAUSE Begins disc play If in play mode pauses disc STOP Stops disc play OPEN CLOSE Press to open and close the disc tray MENU OK Brings up the Main menu In the menu system it ...

Страница 9: ...n Use the up or down arrow button to move up or down Use the right or left arrow button to move right or left To select the item that you ve highlighted press OK Note Highlighted means that the menu item stands out from other menu items on the list appears darker brighter or a different color Turn on the TV Press TV on the remote or press POWER on the TV DVD s front panel Note Pressing the TV butt...

Страница 10: ...Language Selection Screen appears By default the DVD s on screen displays are shown in English If you want the on screen menus to appear in English press OK on the remote To change the language 1 Press the down arrow button on the remote until the appropriate language is highlighted 2 Press OK on the remote This screen sets all language preferences for on screen displays to the same language You c...
Страница 11: ... Info Display icon CLEAR Removes any menu or display from the screen and returns you to normal viewing DISC MENU In DVD mode press while playing a DVD or Video disc and the disc s menu system will appear DVD Puts the remote in DVD mode FORWARD In DVD mode advances the disc forward GO BACK In TV mode returns you to the previous channel In DVD mode returns you to previous screen GUIDE If you re oper...

Страница 12: ...ant to view is turned ON 2 Press INPUT to tune to an available video input source and view the component 3 To return to the previous channel continue pressing INPUT Programming the Remote to Operate Other Components The universal remote can be programmed to operate most brands of remote controllable components The remote is already programmed to operate most RCA GE and Proscan components Notes The...

Страница 13: ...ested once If the component does not turn off then the remote can t be programmed to operate that component Note Each time you press PLAY the remote sends about 10 sets of codes Therefore you might have to press the PLAY button up to 20 times If the component you want to operate does turn off 1 Press and release REVERSE then wait 2 seconds Repeat this step until the device turns back ON 2 To finis...

Страница 14: ...61 Citizen 2013 2014 2015 2016 2017 2018 2019 2027 Colortyme 2009 Colt 2061 Craig 2013 2014 2023 2061 Curtis Mathes 2000 2009 2013 2016 2018 2021 2022 2024 2115 2131 Cybernex 2013 Daewoo 2015 2017 2019 2025 2026 2027 2028 2110 Daytron 2110 DBX 2009 2010 Dimensia 2000 2131 Dynatech 2026 Electrohome 2014 2029 Electrophonic 2014 Emerson 2012 2014 2015 2021 2024 2025 2026 2029 2030 2031 2032 2033 2034...

Страница 15: ... 2026 2029 2049 2050 2096 2132 Radix 2014 Randex 2014 Ricoh 2128 Runco 2104 Samsung 2005 2013 2015 2033 2053 2112 Sanky 2104 2132 Sansui 2010 2092 2111 2123 Sanyo 2011 2013 2023 Scott 2012 2015 2025 2032 2038 2065 2093 2116 Sears 2011 2014 2021 2023 2048 2049 2050 2051 2055 2056 2107 2118 Sharp 2017 2029 2094 2095 2096 2097 2132 Shintom 2004 2056 2061 2098 Shogun 2013 Signature 2132 Singer 2021 20...

Страница 16: ...scs Video CD discs Audio CD discs mp3 discs CD R discs and CDs with JPEG files Before you load a disc make sure that it is compatible with the player The following discs CANNOT be used with this player Laserdiscs CD I CD ROM computer only discs CD RW DVD ROM Discs recorded using other broadcast standards i e PAL or SECAM To Load and Play a Disc To put the TV DVD in DVD mode and play a disc press t...

Страница 17: ...s the PLAY button at any time to resume normal playback Note You won t hear the sound audio on DVD discs when you re using the picture scan feature Freeze Frame and Frame Advance 1 Press PAUSE when a disc is playing to freeze the picture 2 Each time you press the PAUSE button the picture advances one frame 3 Press PLAY to resume normal playback Slow Motion Playback in Freeze Frame Mode While the d...

Страница 18: ...disc you re playing To make the Info Display disappear from the screen press INFO on the remote DVD Disc Info Display Time Display This feature displays the audio video time For DVD discs the time displayed refers to the current title time For Audio CDs it refers to the current track time For DVD video discs the Time Display also acts as a Time Search feature This lets you go to a particular scene...

Страница 19: ...language currently showing in the text box is the active selection The subtitles will be shown in that language 4 To make the Info Display disappear press the INFO button on the remote Notes Changing the subtitle language with the Info Display will only affect the disc currently being played When the disc is removed or the unit is turned off the subtitle language will revert to the language settin...

Страница 20: ... option A B Repeat A B Repeat lets you define a specific segment on the disc that you want to repeat For example you might like to watch the dogfight in the movie Top Gun To watch this scene over and over 1 Find the spot on the disc that is a few seconds before the beginning of the scene you want to repeat this gives you time to access the Info Display and the Repeat feature 2 Press INFO on the re...

Страница 21: ...angles the icon will read 1 of 3 This means angle 1 is currently being played 2 The text box beneath the icons displays Camera Angle 1 Use the up down arrow buttons to scroll through the camera angle choices The camera angle number displayed in the text window is automatically shown 3 To make the Info Display disappear press the INFO button on the remote Playing Other Discs The following are on sc...

Страница 22: ...arrows to scroll through the index numbers When a new index number is entered that index will begin playing Selecting a Play Mode Available only on Audio CDs and mp3s The Play Mode feature lets you set up the order in which you want the tracks on the disc to play There are three options Standard the tracks play in the order listed on the CD starting with track 1 mp3 files are listed in the order t...

Страница 23: ... and pressing OK or you can save the program by highlighting Done and pressing OK If you save the program you can select it from the Info Display The program will be erased when you remove the disc from the disc tray or the TV DVD is turned off To edit a mp3 1 If the disc is playing press STOP to stop playback the DVD s main menu appears 2 Highlight Play Mode and press OK the Play Mode menu appear...

Страница 24: ...e Using IntroScan Available only on Audio CDs and mp3s IntroScan plays the first ten seconds of each track on the CD similar to the scan feature that s on many car radios To use IntroScan 1 Press INFO on the remote the Info Display appears 2 Highlight the IntroScan icon Press OK The first ten seconds of each track will play After IntroScan goes through all of the tracks it stops If you want to sto...

Страница 25: ... Player to show the pictures in a slide show format After you put the disc in the DVD Player and it detects there are JPEG files on the disc the slide show plays automatically Press the FORWARD or REVERSE buttons on the remote to move forward or backward one picture at a time Press STOP to stop playing the slide show at any time When the slide show is complete the DVD s main menu appears ...

Страница 26: ... of time left before the TV switches back to the previous channel 07 18 am Displays the current time 06 ABCDEF Displays the current channel and label assigned to the channel Displayed when you mute the sound Why You Should Use the Auto Tuning Feature The auto tuning feature tunes the TV to the correct channel for different components you have connected to your TV like a VCR DVD Player etc When you...

Страница 27: ...eminder make sure the component s Channel 3 4 switch is set to the appropriate channel VID1 Component is connected to the VIDEO 1 VIDEO or S VIDEO IN jack on the back of the TV and you want the TV to tune to a video input channel when you press the corresponding button VID2 Component is connected to the VIDEO 2 VIDEO jack on the back of the TV and you want the TV to tune to a video input channel w...

Страница 28: ...dren under 14 Parents are strongly urged to exercise greater care in monitoring this program and are cautioned against letting children under the age of 14 watch unattended This program contains one or more of the following content themes intensely suggestive dialogue D strong coarse language L intense sexual situations S or intense violence V TV PG Parental Guidance Suggested Contains material th...

Страница 29: ...uidelines May contain infrequent mild profanity or mildly suggestive language Could also contain brief scenes of nudity G General Audience Programming considered acceptable for all ages groups While not designed specifically for children it is understood younger viewers may be part of the audience Violence Guidelines Will contain very little violence either physical or verbal or emotional Will be ...

Страница 30: ...d upset young children Viewing in the company of an adult is therefore recommended for young children under the age of 8 who do not distinguish between reality and imagination G General Audience This program is suitable for audiences of all ages It contains no violence or any violence that it does contain is either minimal or is presented in a humorous manner as a caricature or in an unrealistic w...

Страница 31: ...e content theme is currently View V or Block B TV MA Mature Audience Only TV 14 Parents Strongly Cautioned TV PG Parental Guidance Suggested TV G General Audience TV Y7 Directed to Children 7 years and older TV Y All Children Hierarchy of Age Based Ratings Blocking Age Based Ratings You can automatically block all program ratings above a specified age based rating level To block programs with high...

Страница 32: ...rols for rating limits to take effect Viewing Specific Content Themes If you block specific content themes you have the option of going back and changing some of the content themes back to V View 1 Determine the content themes you want to change to V View 2 Press the down arrow button to scroll to the rating whose content theme you want to change such as B under language L corresponding with TV 14...

Страница 33: ...ings above the one you selected change to lock V Chip Movie Rating Limit Set movie rating limits by blocking movies rated above a specified level To access the Movie Rating Limit menu 1 Press MENU on the remote control the MAIN MENU appears 2 Select Parental Control 3 Select USA V Chip 4 Select Movie Ratings Blocking Movie Ratings Once you are in the Movie Rating Limit menu follow the same steps d...

Страница 34: ...word used for V Chip V Chip Active Selecting this option lets you activate and deactivate parental control settings 1 From the PARENTAL CONTROL menu press the up or down arrow to highlight V Chip active 2 Press the right or left arrow to turn on box has check mark or off box doesn t have check mark V Chip active If you do not activate V Chip none of the settings for V Chip will take effect If you ...

Страница 35: ...he remote The Play Mode Menu The DVD s Play Mode menu lets you choose different ways to play the disc To see Play Mode menu options a disc must be in the TV DVD 1 If the disc is playing press STOP the DVD s main menu appears 2 Highlight the Play Mode menu option 3 Press OK The Play Mode menu items appear 4 Highlight the desired option and press OK Program Play will not work unless you have created...

Страница 36: ...the Title box so you can add more titles and or chapters Make sure the Title box is highlighted and enter your next title and or chapter 7 Continue adding titles chapters as explained in steps 4 6 until your program is complete You can play your program by highlighting Play and pressing OK or you can save the program by highlighting Done and pressing OK The program will be erased when you remove t...

Страница 37: ...tion is set to play your disc automatically after you close the disc tray To turn the option off 1 From the DVD s main menu in DVD mode no disc playing highlight the Play Mode option and press OK 2 The Play Mode selections appear Highlight the AutoPlay option and press OK to turn the option off 3 Press the left arrow button to return to the previous menu or press GO BACK to return to the main menu...

Страница 38: ...taneously press and hold VOL on the TV s front panel and CLEAR on the remote for approximately 5 seconds Enter a new password next time you access the Lock menu Unlocking Your DVD 1 If the disc is playing press STOP the DVD s main menu appears 2 Highlight Lock and press OK 3 The Enter Password box appears Enter your password the Lock menu options appear 4 Highlight Unlock Player and press OK The l...

Страница 39: ...K the Lock menu appears 3 Highlight Ratings Limits and press OK the Ratings Limits menu appears 4 Highlight Country and press OK a list of countries appears 5 Highlight the country you want to change to and press OK the country you selected appears next to the Country path menu 6 Press the left arrow key to return to the main menu Rated Titles The Rated Titles option lets you determine how your DV...

Страница 40: ...the left arrow button to return to the main screen Choose Unrated Titles to set free access or require a password for unrated titles Unrated Titles Some titles movies aren t rated but may contain material that is unsuitable for children You decide how you want the Ratings Limits feature to handle these discs free access or password required To set the Unrated Titles option 1 From the Lock Menu hig...

Страница 41: ... frame of the movie but it will take up a smaller portion of the screen vertically The movie might appear with black bars at the top and bottom of the screen 4 x 3 Standard Choose this setting if you want the movie to fill the entire screen of your TV DVD This might mean that parts of the picture the left and right edges won t be seen Most discs produced in a widescreen format can t be cropped in ...

Страница 42: ...ft arrow key to return to the main menu The Sound Menu The Sound menu lets you select different sound settings to match the equipment you have connected to your unit Sound Logic The Sound Logic feature compresses the dynamic range quietest sound to loudest sound of a disc s soundtrack For example action scenes might be very loud while whispered dialog is quiet The Sound Logic feature evens out the...

Страница 43: ...ital To change the digital output 1 From the main menu highlight and select the Sound option and press OK the Sound menu is displayed 2 Highlight the Digital Output option and press OK 3 Highlight the desired output and press OK 4 Press the left arrow key to return to the main menu Notes If you set Digital Output to DTS you must have your unit connected to a receiver or decoder with the DTS featur...

Страница 44: ...s menu is displayed 2 Highlight the language option for the language you want to change and press OK the language choices are displayed 3 Highlight the language you want to use and press OK The menu appears with your selection shown next to the language option 4 Press the left arrow button or press GO BACK to return to the previous menu Notes If you change the Player Menu Language the entire DVD s...

Страница 45: ... Press OK to turn SAP on or off Auto Vol level Auto Volume Level Reduces the annoying blasts in volume during commercial breaks Eliminates the need to constantly adjust volume control Press OK to turn Auto Vol level on or off Audio Output Press the right arrow button to scroll through the available output settings Fixed allows fixed output from the TV DVD s audio output jacks to an external compon...

Страница 46: ...ceiving Choose Cable if you are currently using cable or a cable box for TV signals Choose Antenna if you are currently using an off air antenna for TV signals Start Searches for channels the signal is receiving and stores them in the TV s channel list Go to page 8 for more information List Labels Edit the channels in the list or choose labels for each channel For example if channel 12 is NBC you ...

Страница 47: ... up the TV to automatically tune to the correct input channel when you press a component button VCR or DVD on the remote Go to Chapter 4 for details about the Auto Tuning feature Language Lets you select your preferred language for the menus Parental Control Menu The Parental Control menu was explained in Chapter 4 Go to page 25 for more information Time Menu Sleep Timer Lets you set the TV to tur...

Страница 48: ...isc can t be played This TV DVD is Region No 1 Play starts but then stops immediately The disc is dirty Clean it Condensation has formed Allow player to dry out Playback doesn t start at beginning of disc The DVD has a disc memory feature which remembers the five most recent discs DVD or Video CD only played and begins playback at the approximate point which the disc was last stopped To resume nor...

Страница 49: ... Idiomas in French as Langues From the Languages menu select the Player Menus option In Spanish shown as Menús del Lector in French as Menus Lecteur Highlight the language you prefer and press OK No forward or reverse scan Some discs have sections that prohibit rapid scanning or title and chapter skip If you re trying to skip through the warning information and credits at the beginning of a movie ...

Страница 50: ...in TV turns off unexpectedly Sleep timer may have been activated Go to page 45 for instructions KidPass may have been activated Go to page 32 for instructions Wake up timer turned on the TV and no remote or front panel buttons were pressed for two hours Electronic protection circuit may have been activated because of a power surge Wait 30 seconds and then turn the TV on again If this happens frequ...

Страница 51: ...ed captioning might be on Check the Closed Caption Display control panel in the Screen menu Go to page 45 for more instructions The Remote Control Doesn t Work Something might be between the remote and the remote sensor on the component Make sure there is a clear path Maybe the remote isn t aimed directly at the component TV or VCR that you re trying to operate The remote might be in the wrong mod...

Страница 52: ...age the TV DVD While cleaning do not spray liquid directly on the screen or allow liquid to run down the screen and inside the TV DVD Also avoid placing drinks or vases with water on top of the TV DVD This could increase the risk of fire or shock hazard or damage to the TV DVD Caution Using video games or any external accessory with fixed images for extended periods of time can cause them to be pe...

Страница 53: ...oth from the inner edge toward the outer perimeter If a disc becomes very dirty wet a soft cloth in water wring it out well Wipe the dirt away gently and remove any water drops with a dry cloth Do not use record cleaning sprays or anti static agents on discs Also never clean the discs with benzene thinner or other volatile solvents which may cause damage to the disc surface Limited Warranty What y...

Страница 54: ... how to install adjust and operate your product Any additional information should be obtained from your dealer Installation and related adjustments Signal reception problems not caused by your TV DVD Damage from misuse or neglect Batteries A TV DVD that has been modified or incorporated into other products or is used for institutional or other commercial purposes Damage from images burnt onto the ...

Страница 55: ...Y OR FITNESS FOR A PARTICULAR PURPOSE ON THIS PRODUCT IS LIMITED TO THE APPLICABLE WARRANTY PERIOD SET FORTH ABOVE How state law relates to this warranty Some states do not allow the exclusion nor limitation of incidental or consequential damages or limitations on how long an implied warranty lasts so the above limitations or exclusions may not apply to you This warranty gives you specific legal r...

Страница 56: ...ielded Has RCA type phono plugs on each end VH83 6 ft 5 95 2 way Signal Splitter Helps you connect a second TV or VCR VH47 3 95 S Video Cable Has multi pin connectors on each end for connecting S Video components to your TV DVD VH976 6 ft 7 95 VH913 12 ft 14 95 Accessory Information Below are accessories available to compliment your product Prices are subject to change without notice All accessori...

Страница 57: ......

Страница 58: ......

Страница 59: ......

Страница 60: ......

Страница 61: ......

Страница 62: ......

Страница 63: ......

Страница 64: ...nterference to radio communications However there is no guarantee that interference will not occur in a particular installation If this equipment does cause harmful interference to radio or television reception which can be determined by turning the equipment off and on the user is encouraged to try to correct the interference by one or more of the following measures Reorient or relocate the recei...

Отзывы: