background image

Zooming 

(continued)

47

• ZM:2 16X9 is used to change the

recording format.  ZM:2 16X9 is
explained below.

2. Press one of the power zoom buttons

(or T) to control the digital zoom
ratio.  

Notes: When you zoom in the close-up
direction above eight times, the zoom ratio
display (X8–X64) appears with the zoom
mode display.

Digital zoom above 16 times causes some
deterioration in picture resolution. 

Digital zoom above 16 times is primarily for
special effects.

(Pro870 Only) Digital Zooming

The Pro870 has an electronic power
zoom feature which allows you to zoom
in on a subject with magnification of up
to 64 times.  

1. Repeatedly press the ZOOM MODE

button to select the digital zoom mode.  

• Normal zoom mode allows you to

enlarge the image from 1-16 times
without changing the proportion of
the image.  No display will appear in
the viewfinder when normal zoom is
selected.

• Select ZM:2 to activate the extended

zoom mode which allows you to
zoom up to 64 times.

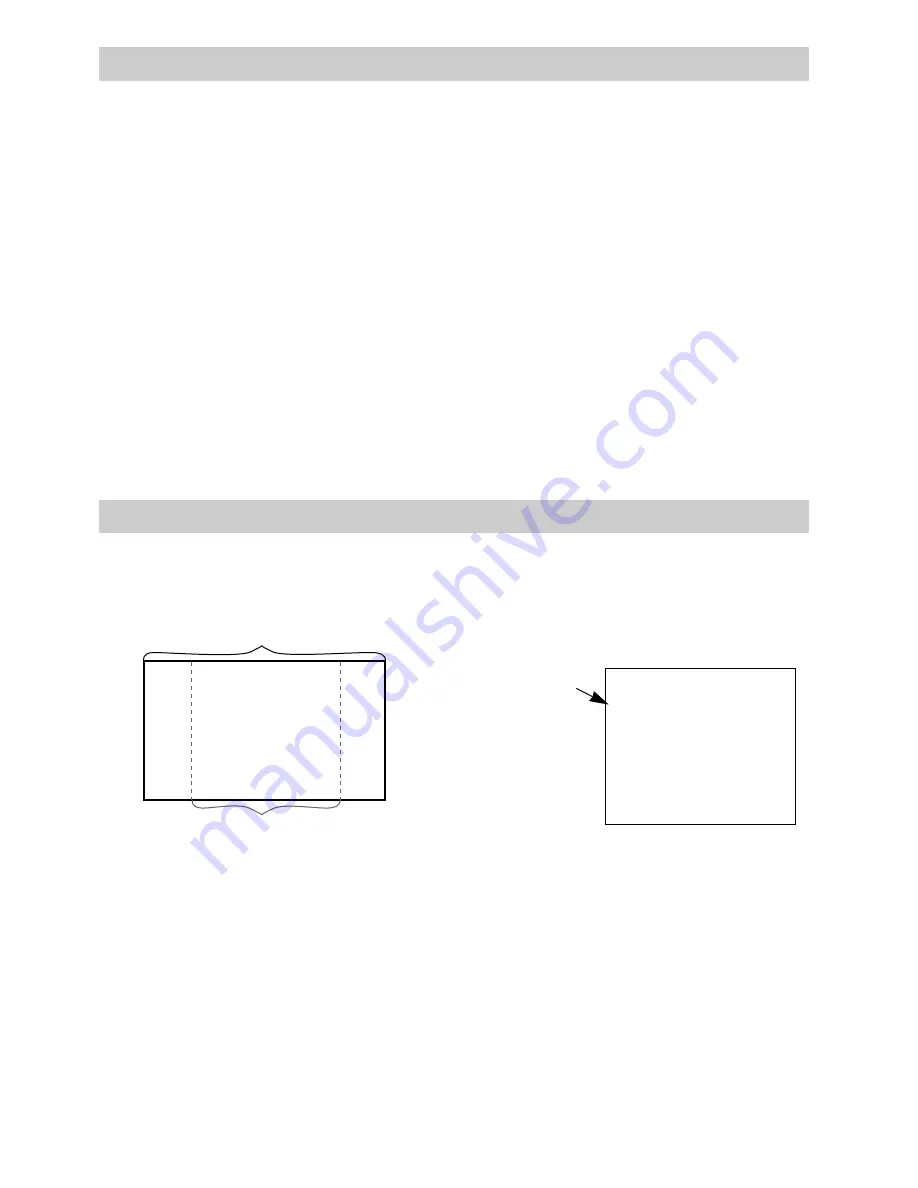
(Pro870 Only) 16 x 9 Mode

A new 16 x 9 TV format will be
introduced in late 1992 that provides a
30% wider picture.

The Pro870 has a 16 x 9 recording mode
that lets you make recordings that are
compatible with this new format.  When
the 16 x 9 mode is activated, the
camcorder will record the picture in a
compressed format that is then expanded
when played back on a 16 x 9 TV.  Do
not use this recording mode unless you
have a 16 x 9 TV.  When played back on
a standard size TV, the 16 x 9 recorded
image will appear thinner than normal. 

• Repeatedly press the ZOOM MODE

button to select ZM:2 16X9.  The
following display will appear in the
viewfinder.

• To turn off the ZM:2 16X9 mode,

repeatedly press the ZOOM MODE
button to return to the normal mode.
No display will appear in the
viewfinder.

ZM:2 

16X9

Display in Viewfinder

ZM:2 16X9
Display

New 16 x 9 TV Screen

Standard Size TV Screen

Содержание Pro867

Страница 1: ...ay 32 33 Electronic Viewfinder 34 Fading In and Out of Scenes 35 Focusing Your Camcorder 36 37 Variable Shutter Speeds 38 39 Displays in Viewfinder 40 43 Time Counter with Memory Stop and Time Remaining 44 45 Zooming Power and Manual 46 Zooming Digital Pro870 Only 47 Titler 48 49 Synchro Edit 50 51 Audio Video Dubbing 52 53 Recording on Camcorder 54 55 Recording and Traveling Tips 56 Attaching the...

Страница 2: ...d Time Display 32 33 Electronic Viewfinder 34 Fading In and Out of Scenes 35 Focusing Your Camcorder 36 37 Variable Shutter Speeds 38 39 Displays in Viewfinder 40 43 Time Counter with Memory Stop and Time Remaining 44 45 Zooming 46 47 16 x 9 Mode Pro870 Only 47 Titler 48 49 Synchro Edit 50 51 Audio Video Dubbing 52 53 Recording on Camcorder 54 55 Recording and Traveling Tips 56 Attaching the Shoul...

Страница 3: ...To obtain warranty parts and service you must show your sales receipt or other evidence of purchase to your Authorized RCA Compact Camcorder Servicenter Tape or staple your sales receipt to this manual so you will have it handy should service ever be needed Do not mail your sales receipt to us File it at home with your owner s manual for future reference Record Vital Information Here No other RCA ...

Страница 4: ...cessories connected to this unit should bear the UL listing mark or CSA certification mark on the accessories themselves and should not have been modified so as to defeat the safety features This will help avoid any potential hazard from electric shock or fire If in doubt contact qualified service personnel WARNING To prevent fire or shock hazard do not expose camcorder or AC adapter charger to ra...

Страница 5: ...d are the same number size and shape as those of the plug on the adapter charger 2 Extension cord is properly wired and in good electrical condition and 3 Wire size below is met Minimum Length of Extension AWG Size Cord Feet 18 Equal to or less than 100 16 Equal to or less than 150 Do not operate adapter charger with a damaged cord or plug Replace it immediately Do not operate adapter charger if i...

Страница 6: ...ur electrician to replace your obsolete outlet To prevent electric shock do not use this polarized plug with an extension cord receptacle or other outlet unless the blades can be fully inserted without blade exposure If you need an extension cord use one with a polarized plug 5 Power Sources This video product should be operated only from the type of power source indicated on the marking label If ...

Страница 7: ...ool and the like 11 Accessories Do not place this video product on an unstable cart stand tripod bracket or table The video product may fall causing serious injury to a child or adult as well as serious damage to the video product Use this video product only with a cart stand tripod bracket or table recommended by the manufacturer or sold with the video product Any mounting of the product should f...

Страница 8: ...t or power circuits or where it can fall into such power lines or circuits When installing an outside antenna system extreme care should be taken to keep from touching or approaching such power lines or circuits as contact with them might be fatal Installing an outdoor antenna can be hazardous and should be left to a professional antenna installer Use 14 Cleaning Unplug this video product from the...

Страница 9: ...ter D If the video product does not operate normally by following the operating instructions Adjust only those controls that are covered by the operating instructions Improper adjustment of other controls may result in damage and will often require extensive work by a qualified technician to restore the video product to its normal operation E If the video product has been dropped or the case has b...

Страница 10: ...ripod Its rugged compact design provides excellent stability It is ideal for all camcorder sizes and photo cameras It has a quick release shoe three section leg handstrap foot step and weighs only 35 ounces AC025A Soft Carrying Case Custom compact soft case designed especially to provide protection and utility for your RCA 8mm camcorder and most accessories Rugged fabric lined with soft non abrasi...

Страница 11: ...ve to be turned on for the DCC06 to operate the camcorder CPS85 AC Battery Charger The CPS85 battery charger plugs directly into an AC outlet and charges the BB060 and BB120 camcorder batteries Because the CPS85 operates on 100 240 volts 50 60 Hz it can be used virtually anywhere in the world A plug adapter may be required in some countries Charging takes approximately 5 hours for the BB060 1 hour...

Страница 12: ...her VCR camcorder or TV monitor This makes it convenient to copy tapes or record a television broadcast The VAA009 s plug is specially designed so other cables and accessories can be plugged into the camcorder at the same time AVS80 Synchro Edit Cable This cable attaches to the camcorder to provide video and audio outputs for dubbing or for direct input to a monitor receiver It can also control th...

Страница 13: ... camcorder steady and produce excellent video results RESET DISPLAY POWER TITLE SEL EDIT ADV REW PLAY F FWD STOP PAUSE OFF VCR CAMERA EJECT W T BA TT ER Y FULL AUTO SHUTTER DATE TITLER FOCUS OFF ON DO NOT PUSH REVIEW FADE Caution Before using a tripod make sure it is stable enough to hold the camcorder without falling over When attaching your camcorder to a tripod be careful not to force the tripo...

Страница 14: ...Audio Video Input Cable VAA009 29 95 Audio Video Output Cable VAA011 24 95 Video Color Control Center VCC1000 349 00 Coaxial RF Cable 177233 11 85 300 75 Cable Transformer 193983 6 95 Power Connector 203361 24 10 Replacement Remote 211028 49 95 Shoulder Strap 212473 13 95 Prices are subject to change without notice Total Merchandise 10 Minimum Order __________ Sales Tax __________ We are required ...

Страница 15: ...rd expires Copy Number above your name on MasterCard AUTHORIZED SIGNATURE Prices are subject to change without notice Name Street Apt City State Zip Print or type your name and address clearly This will be your mailing label Please make sure that both sides of this form have been filled out completely A complete and correct order will save you days of waiting Allow 8 weeks for delivery All accesso...

Страница 16: ...leted order form with credit card information money order or check in U S currency made payable to Thomson Consumer Electronics Inc to the following address RCA Video Accessories PO Box 8419 Ronks PA 17573 For more information on these accessories or current prices write to the following address Video Accessories Customer Service Thomson Consumer Electronics Inc Distributor Special Products 2000 C...

Страница 17: ... missing or appear damaged contact your RCA dealer immediately IN FR O M TV O U T TO TV C H 3 C H 4 Audio Video Output Cable Stock No VAA011 RF Output Adapter Stock No CRF80 Power Connector Stock No 203361 Remote Control Stock No 211028 Rechargeable 6 Volt Battery Stock No BB060 Coaxial RF Cable Stock No 177233 Shoulder Strap Stock No 212473 Clock and Remote Control Batteries 3 Volt Micro Lithium ...

Страница 18: ...is both a camera and a VCR it performs two completely separate groups of functions The position of the POWER CAMERA OFF VCR switch tells the camcorder whether you want to record CAMERA play back tapes VCR or turn off the camcorder s power OFF Some of the controls operate differently depending on the position of the POWER switch Press and hold the small button on the POWER switch while sliding it t...

Страница 19: ...ve the camcorder s power on When the DEW indicator stops flashing the camcorder is ready to operate POWERSAVE ON PUSH 6 Insert a cassette in the camcorder Insert a cassette by sliding the EJECT button to open the cassette compartment Insert the cassette only one way with the record protect safety tab facing up and the tape window facing out Gently close the cassette compartment door with your hand...

Страница 20: ...y shut off to prevent excessive tape wear Any material recorded on the tape will automatically be erased if you record over it 10 Play back what you have recorded Press the thumb trigger to stop recording Place the POWER switch in the VCR position Press the REW rewind button to rewind the tape Then press the PLAY button to play back the tape in the electronic viewfinder Press the STOP button when ...

Страница 21: ...EW FADE Microphone page 30 56 Eyepiece Focus Control pages 11 28 29 34 Power Zoom Buttons T Telephoto W Wide Angle pages 28 29 46 47 Electronic Viewfinder pages 11 28 29 34 59 Lens page 58 AV Audio Video IN OUT Connector Located behind small cover pages 50 55 60 63 Auto Focus Window pages 36 37 56 Tally Light pages10 11 30 31 Remote Control Sensor page 17 Focus Ring pages 36 37 Zoom Ring pages 36 ...

Страница 22: ...er Supply Here Adapter Charger Charged Battery or Optional DC Car Cord pages 20 25 Shoulder Strap Attachment Ring page 57 Shoulder Strap Attachment Ring page 57 Clock Battery Compartment page 32 Handstrap pages 10 11 28 29 ON POWERSAVE Lever pages 10 11 21 28 29 Thumb Trigger Record Start Stop Button pages 10 11 28 29 Lens Cap Attached to Handstrap pages 10 11 28 29 58 ...

Страница 23: ...irst Time Operation continued 14 EJECT Button pages 10 27 28 29 59 Pro870 Only REVIEW Button pages 28 29 30 31 51 REW Rewind Button pages 11 28 29 31 32 33 51 59 63 PLAY Button pages 11 28 29 31 51 59 63 F FWD Fast Forward Button pages 11 28 29 31 32 33 51 59 63 STOP Button pages 11 28 29 31 32 33 51 59 63 PAUSE Button pages 51 53 59 63 BATTERY Eject Lever pages 22 25 TITLE SEL and Buttons pages 4...

Страница 24: ...OT PUSH REVIEW FADE FOCUS TITLER DATE FULL AUTO OFF ON SHUTTER RESET DISPLAY FOCUS Button pages 36 37 SHUTTER Button pages 38 39 40 41 RESET Button pages 42 43 44 45 TITLER Button pages 48 49 DATE Button pages 32 33 41 DISPLAY Button pages 23 40 45 FULL AUTO OFF ON Switch pages 10 11 28 30 36 37 38 39 40 41 Pro867 REVIEW Button pages 28 29 30 31 51 Pro870 BACK LIGHT Button pages 30 31 ...

Страница 25: ...trol Remove the battery from the remote control if it will not be used for a month or more This will prevent possible damage from battery leakage If leakage occurs wipe up the liquid inside the compartment and replace the battery Battery Installation The battery supplied with your remote control is packed separately Install it as follows Back of Remote Control Battery Holder Caution Lithium batter...

Страница 26: ...nd to the remote control if the camcorder s remote control sensor is exposed to direct sunlight or strong artificial light Remote Control Sensor RESET DISPLAY POWER TITLE SEL EDIT ADV REW PLAY F FWD STOP PAUSE OFF VCR CAMERA EJECT W T B A T T E R Y FULL AUTO SHUTTER DATE TITLER FOCUS OFF ON DO NOT PUSH REVIEW FADE R E W F F W D S T O P P L A Y A V D U B P A U S E D I S P L A Y R E S E T T I T L E ...

Страница 27: ... button to return to normal playback Press and hold the REW button when the camcorder s POWER switch is in the CAMERA position to visually search the recorded material in reverse When you release the REW button the camcorder will stop playing and prepare to record at that point on the tape 2 STOP Button Press this button when the camcorder s POWER switch is in the VCR position to stop playback rew...

Страница 28: ...d hold the F FWD button when the camcorder s POWER switch is in the CAMERA position to visually search the recorded material forward When you release the F FWD button the camcorder will stop playing and prepare to record at that point on the tape 8 PLAY Button Press the PLAY button when the camcorder s POWER switch is in the VCR position to begin playback Press and hold the PLAY button when the ca...

Страница 29: ...the adapter charger s plug into the nearest AC outlet 100 240V 50 60Hz 5 If the adapter charger is properly connected its POWER indicator will light Note The battery level indicator may display when using the adapter charger to power the camcorder This indicator is used for battery operation and has no meaning when using other methods to power the camcorder To Remove the Adapter Charger 1 Unplug t...

Страница 30: ...ecommended The battery should be allowed to cool down before being attached 5 Remove the charged battery by sliding it off the adapter charger 6 Attach the charged battery to the camcorder as shown on the next page CHARGE POWER To AC Wall Outlet 110 240V 50 60 Hz Indicator Light CHARGE Caution When a battery is attached to the adapter charger do not turn them upside down The battery may fall off a...

Страница 31: ...attery to Power Your Camcorder continued POWERSAVE ON W T BATTERY PA U SE ST O P R EW PL AY F FW D PO W ER R EV IE W WARNING NICKEL CADMIUM BATTERY MUST BE DISPOSED OF PROPERLY POWER CAMERA OFF VCR Switch ON POWERSAVE Lever Display in Viewfinder Battery Level Indicator BATTERY Eject Lever Removing the Battery From the Camcorder Slide and hold the BATTERY eject lever on the camcorder while sliding ...

Страница 32: ...until it reaches the empty level camcorder automatically turns off before recharging The battery should be charged at a temperature of 32 F 95 F 0 C 35 C to prevent damage Do not operate the battery at temperatures below 14 F 10 C or above 95 F 35 C The battery may be damaged if operated at temperatures above 122 F 50 C Operation time will decrease at extremely low temperatures After repeated char...

Страница 33: ...Power Connector Eject Lever BATTERY POWERSAVE ON BATTERY PA US E ST OP RE W PL AY F F W D Cigarette Lighter Socket Jack DC OUTPUT Optional DCC06 DC Car Cord Adapter Using the Optional RCA DC Car Cord Adapters When using the DCC06 or DCC80 to power the camcorder the battery level indicator may display This indicator is used for battery operation and has no meaning when using other methods to power ...

Страница 34: ...osition Power Connector Eject Lever BATTERY POWERSAVE ON BATTERY PA US E ST OP RE W PL AY F F W D PO W ER CH AR GE Cigarette Lighter Socket Optional DCC80 Car Adapter Charger Jack DC OUTPUT Using the RCA DCC80 DC Car Cord Adapter Charger to Power the Camcorder Using the RCA DCC80 DC Car Cord Adapter Charger to Charge a Battery 1 If the power connector s plug is attached to the adapter charger s DC...

Страница 35: ... high quality formulation It has been manufactured to our critical specifications for excellent performance Use of tape not meeting these specifications could considerably reduce the performance of your camcorder Erase Protection Record Protect Safety Tab Recording Speed and Times A To prevent erasing a recording you want to keep close the cassette s record protect tab by sliding it in the directi...

Страница 36: ...t Tab Tape Window Cassette Door EJECT Button Press Here to Close Caution Insert the cassette only one way with the record protect tab facing up and the tape window facing out The cassette should slide easily into the compart ment Do not force the cassette 3 Gently close the cassette compartment door with your hand The camcorder will automatically close the top of the cassette compartment Do not pu...

Страница 37: ...d The camcorder will automatically close the top of the cassette compartment Do not push the top down or you may damage your camcorder C Place the FULL AUTO OFF ON switch in the ON position D Remove the lens cap and attach it to the lens cap holder on the hand strap FADE RESET DISPLAY POWER TITLE SEL EDIT ADV REW PLAY F FWD STOP PAUSE OFF VCR CAMERA EJECT W T B A T T E R Y FULL AUTO SHUTTER DATE T...

Страница 38: ...to use the special zooming features or 16 x 9 mode Details are on page 47 B Fade in and out of scenes 1 To fade into the scene you want to record press and hold the FADE button Then press the thumb trigger to start recording Release the FADE button after a few seconds 2 To fade out while recording press and hold the FADE button Then press the thumb trigger to stop recording After the recording sto...

Страница 39: ...ly focus on the nearest object and select the normal shutter speed 1 60 second Notes When the FULL AUTO OFF ON switch is in the ON position FULL AUTO appears in the viewfinder when you press the DISPLAY button Details are on page 40 Shutter speeds can still be selected by pressing the SHUTTER button when the FULL AUTO OFF ON switch is in the ON position Details are on page 39 RESET DISPLAY POWER T...

Страница 40: ... return to the record pause mode Tally Light The tally light on the front of the camcorder lights when the camcorder is recording Tape Positioning When the POWER switch is in the VCR position and the camcorder is stopped you can quickly fast forward or rewind the tape Press the F FWD fast forward button to fast forward the tape Press the STOP button to stop fast forwarding Press the REW rewind but...

Страница 41: ... on the POWER switch while you slide it in the CAMERA position Place the ON POWERSAVE lever in the ON position 3 If the date and time display does not automatically appear in the viewfinder press the DATE button 4 A flashing cursor lets you know which part of the display you are setting Press the F FWD or REW button repeatedly until the correct month appears Caution Lithium battery Must be dispose...

Страница 42: ...he REW F FWD and STOP buttons RESET DISPLAY POWER TITLE SEL EDIT ADV REW PLAY F FWD STOP PAUSE OFF VCR CAMERA EJECT W T B A T T E R Y FULL AUTO SHUTTER DATE TITLER FOCUS OFF ON DO NOT PUSH REVIEW FADE STOP Button F FWD Fast Forward Button DATE Button REW Rewind Button POWER Switch Press Button To Display in Viewfinder and Record on Tape One Time Two Times Three Times Four Times Date and Time Date ...

Страница 43: ...or viewing the tape during playback Cautions When carrying the camcorder with the shoulder strap rotate the electronic viewfinder to the front This helps prevent possible damage to the viewfinder from bumping against your body as you move 180 Tilt RESET DISPLAY POWER TITLE SEL EDIT ADV REW PLAY F FWD STOP PAUSE OFF VCR CAMERA EJECT W T B A T T E R Y FULL AUTO SHUTTER DATE TITLER FOCUS OFF ON DO NO...

Страница 44: ... picture and sound will gradually appear 1 Place the camcorder in the record pause mode 2 Press and hold the FADE button then press the thumb trigger to start recording 3 Release the FADE button after a few seconds The picture and sound will gradually appear in place of the blank screen Fading Out When you fade out of a scene the picture and sound will gradually disappear 1 While the camcorder is ...

Страница 45: ...hile recording with the auto focus system RESET DISPLAY POWER TITLE SEL EDIT ADV REW PLAY F FWD STOP PAUSE OFF VCR CAMERA EJECT W T B A T T E R Y FULL AUTO SHUTTER DATE TITLER FOCUS OFF ON DO NOT PUSH REVIEW FADE FOCUS Button FULL AUTO OFF ON Switch Macro Button on Zoom Ring Lever Auto Focus Window Focus Ring Power Zoom Button T Cautions Do not grasp or turn the focus ring when the FULL AUTO OFF O...

Страница 46: ...e zoom ring to the MACRO position Manual Focus Under certain conditions such as those listed you may need to focus manually Place the FULL AUTO OFF ON switch in the OFF position and turn the focus ring with your fingers To maintain proper focus throughout the zoom range zoom in on your subject and adjust the focus ring to display a sharp clear picture in the viewfinder You can zoom in by holding t...

Страница 47: ... such as stop action pause and slow motion The higher shutter speeds produce better performance during special effect playback A tape recorded at the higher shutter speeds may not show movement and change of scene as smoothly as recordings at the normal 1 60 second speed For indoor high speed shutter recording you may find that additional halogen or tungsten lighting is required When recording at ...

Страница 48: ...00 or AE will appear in the viewfinder for a few seconds and then FULL AUTO will return FULL AUTO OFF ON Switch OFF When the FULL AUTO OFF ON switch is in the OFF position you can select AE automatic exposure or one of six shutter speeds by repeatedly pressing the SHUTTER button Each time you press the SHUTTER button the shutter speed will increase When you press the DISPLAY button the shutter spe...

Страница 49: ...n FULL AUTO appears when the FULL AUTO OFF ON switch is placed in the ON position Note The AE or shutter speed display appears automatically for a few seconds when a new shutter speed is selected RESET DISPLAY POWER TITLE SEL EDIT ADV REW PLAY F FWD STOP PAUSE OFF VCR CAMERA EJECT W T B A T T E R Y FULL AUTO SHUTTER DATE TITLER FOCUS OFF ON DO NOT PUSH REVIEW FADE FULL AUTO ZM 2 NO TAPE 60 10 30AM...

Страница 50: ...Press the DISPLAY button to display the battery level indicator in the viewfinder This indicator will not be recorded on the tape when it appears Details are on pages 22 23 4 Status Displays One of the following displays will appear in the viewfinder to let you know what the camcorder is doing These displays are not recorded on the tape when they appear in the viewfinder REC appears when the camco...

Страница 51: ...e to 64 times zoom Repeatedly press the ZOOM MODE button to display ZM 2 16X9 Use this to make a recording that is compatible for playback on a 16 x 9 TV that has expand capabilities Details are on pages 46 47 Pro870 Only Zoom Display FULL AUTO ZM 2 NO TAPE 60 10 30AM 0 00 00M REC 11 18 92 Tape Display for Time Remaining Display Time Counter with Memory and Time Remaining Display 6 7 8 Displays in...

Страница 52: ...e viewfinder when you are using a 140 minute tape Details are on page 45 Note If you use a tape other than the above sizes the time remaining feature will not operate properly 8 Time Counter With Memory Stop and Time Remaining Display Press the DISPLAY button once to display the time counter with the battery level indicator in the viewfinder Press the DISPLAY button again to turn on the time count...

Страница 53: ... display shows the actual time elapsed when recording a program or playing back a segment of a pre recorded tape The time counter also helps you quickly locate the end of programs Note the time counter reading when you are finished recording or playing back a tape For example you recorded a 10 minute program Later if you want to locate the end of your recording you can insert the tape display the ...

Страница 54: ...rectly on tapes other than those listed above The corresponding buttons on the remote control can be used to operate the camcorder Time Counter With Memory Stop and Time Remaining continued 45 The time remaining display shows the amount of recording or playback time left on a tape while it is inside the camcorder The camcorder will calculate and display the time remaining for 15 20 30 45 60 90 120...

Страница 55: ...y holding the zoom ring lever with your fingers This lets you control the speed of the zoom Manual zoom allows you to zoom from wide angle to up to 8 times zoom Using Power Zoom Buttons The motorized zoom lens allows you to zoom in and out for close ups or wide angle shots just by pressing one of the power zoom buttons The zoom buttons are easily controlled by your index and middle fingers when yo...

Страница 56: ...in the viewfinder when normal zoom is selected Select ZM 2 to activate the extended zoom mode which allows you to zoom up to 64 times Pro870 Only 16 x 9 Mode A new 16 x 9 TV format will be introduced in late 1992 that provides a 30 wider picture The Pro870 has a 16 x 9 recording mode that lets you make recordings that are compatible with this new format When the 16 x 9 mode is activated the camcor...

Страница 57: ... or TITLE SEL button until the character you want appears See the Chart of Characters on the next page for the characters available in the titler s register 5 After you have selected the first character press the EDIT ADV button to move the flashing cursor to the position where you want your next character to appear 6 Repeat steps 4 and 5 until you have completed the title 7 Press the TITLE SEL bu...

Страница 58: ...ER button to display the titler graphics in the electronic viewfinder Correcting Errors During Programming 1 Press the EDIT ADV button until the flashing cursor is placed over the character you wish to correct 2 Press the TITLE SEL or TITLE SEL button until the correct character appears Note If you want to delete a character press the TITLE SEL or TITLE SEL button until the blank space appears Not...

Страница 59: ...compatible synchro edit jacks AUDIO IN R L VIDEO IN EDIT Back of VCR Optional AVS80 Synchro Edit Output Cable See Page 3 AV Audio Video IN OUT Connector Located behind small cover Compatibility Switch FADE RESET DISPLAY POWER TITLE SEL EDIT ADV REW PLAY F FWD STOP PAUSE OFF VCR CAMERA EJECT W T B A T T E R Y FULL AUTO SHUTTER DATE TITLER FOCUS OFF ON REVIEW Note If your VCR has a single mono AUDIO...

Страница 60: ...to the playback mode 5 Pressing REW rewind F FWD fast forward STOP or PAUSE on the camcorder automatically puts the VCR into the record pause mode This allows you to search forward or backward fast forward or rewind the tape in the camcorder without disturbing the tape in the VCR To search forward or backward press and hold F FWD or REW When you release the button the camcorder will resume normal ...

Страница 61: ... input cable to the VCR you will have no sound on the dubbed portion If you connect only the audio plugs of the audio video input cable to the VCR the camcorder will not dub AUDIO OUT VIDEO OUT Back of Mono VCR White Audio Plug Yellow Video Plug Optional VAA009 Audio Video Input Cable AUDIO OUT VIDEO OUT L R Yellow Video Plug White Audio Plug Y Adapter available from electronics supply store Optio...

Страница 62: ...stop dubbing when it reaches 0 00 00M Notes You can record new audio and video from the camcorder s built in microphone and camera Remove the audio video input cable from the camcorder Follow steps 1 through 4 above and then press the PAUSE button to start dubbing To stop dubbing press the STOP button The corresponding buttons on the remote control can also be used to operate the camcorder The cam...

Страница 63: ...onics supply store Optional VAA009 Audio Video Input Cable or Back of Stereo VCR or TV Monitor 1 1 2 2 3 3 AV Audio Video IN OUT Connector located behind small cover To connect your camcorder to a TV or VCR with AUDIO and VIDEO OUT jacks you will need an optional VAA009 audio video input cable shown on page 3 If your TV is already connected to a VCR you can attach the camcorder to the VCR and watc...

Страница 64: ...CR Note If your TV or VCR has stereo left and right AUDIO OUT jacks attach the plug to the one labeled MONO If one of the jacks is not labeled MONO you may need a Y adapter to record both channels 2 Attach the audio video input cable s yellow plug to the VIDEO OUT jack on the TV or VCR 3 Attach the plug on the other end of the audio video input cable to the AV IN OUT connector behind the small cov...

Страница 65: ...eos lasting appeal Consider recording a familiar or landmark scene from an unfamiliar vantage point for added interest Remember to check the lighting before starting to record Try to avoid taping backlit subjects indoors Bright light behind your subject may cause the subject to appear too dark and low in detail Pressing the BACK LIGHT button may help overcome this problem Include close up shots of...

Страница 66: ...er Strap 1 Unfasten one end of the shoulder strap from the buckle Make sure you leave the buckle on the strap 2 Thread one end of the shoulder strap through one of the shoulder strap attachment rings as shown below 3 Thread the strap back into the buckle Pull on the strap and make sure it is securely fastened before using the shoulder strap to support the camcorder 4 Repeat steps 1 3 for the other...

Страница 67: ...ain the original carton for future storage or shipping purposes Things to Avoid Do not attempt to disassemble your camcorder There are no user serviceable parts inside Avoid operating your camcorder immediately after moving it from a cold location to a warm location Give the camcorder 1 1 2 to 2 hours to reach a stable temperature before inserting a cassette When the camcorder is moved from cold t...

Страница 68: ...tion and view one frame of the tape Press the PAUSE button again to return to normal playback 5 Press the STOP button when you are finished Note The corresponding buttons on the remote control can be used to operate the camcorder RESET DISPLAY POWER TITLE SEL EDIT ADV REW PLAY F FWD STOP PAUSE OFF VCR CAMERA EJECT W T W T W T BA TT ER Y FULL AUTO SHUTTER DATE TITLER FOCUS OFF ON DO NOT PUSH REVIEW...

Страница 69: ...ble from electronics supply store Audio Video Output Cable or Back of Stereo TV or VCR 1 1 2 2 3 3 AV Audio Video IN OUT Connector Located behind small cover Installation 1 Attach the audio video output cable s white plug to the AUDIO IN jack on the TV or VCR Note If your TV or VCR has stereo AUDIO jacks attach the white AUDIO plug to the one labeled MONO If one is not labeled MONO you may need a ...

Страница 70: ...ton 5 Press the STOP button when you are finished Caution Pause is designed for momentary interruptions and should not be used for an extended period of time If the camcorder remains in the pause mode for more than five minutes the camcorder will automatically move the tape away from the spinning heads to prevent excessive tape wear PlaybackOperationandHowtoCopyTapesontheVCR 1 A Camcorder connecte...

Страница 71: ...rmer such as 193983 shown on page 3 2 Attach one end of the coaxial RF cable to the OUT TO TV jack on the adapter OR 1 OR OR 2 3 2 VHF VHF Back of TV VHF Antenna Coaxial RF Cable supplied CH3 CH4 Switch RF Output Adapter supplied Optional 300 75 ohm Transformer such as 193983 AV Audio Video IN OUT Connector Located behind small cover Optional 75 300 ohm Transformer such as AH011 VHF Antenna I N F ...

Страница 72: ...gh pitched squeal caused by feedback 2 Set the CH3 CH4 switch on the adapter to the same channel you selected on the TV 3 Slide the camcorder s POWER switch to the CAMERA position and insert the cassette you want to record on Make sure the ON POWERSAVE lever is in the ON position Press the thumb trigger to start recording You can watch what you are recording on the TV screen Normal TV Viewing For ...

Страница 73: ...ry it may need to be recharged If using AC adapter charger make sure it is plugged into a working outlet If using AC adapter charger make sure it is plugged into a working outlet If DEW indicator flashes in the viewfinder there is moisture in the camcorder Leave power on and wait until the DEW indicator no longer appears ON POWERSAVE lever in POWERSAVE position Place lever in ON position There may...

Страница 74: ...ot covering auto focus window during recording Subject is dark or behind glass Auto focus may not work under these conditions Place FULL AUTO OFF ON switch in OFF position and focus manually Lens is smudged and image appears unfocused Viewfinder eyepiece focus is misadjusted See page 34 Camcorder is in macro focus mode Press and hold zoom button T to release macro focus Don t use auto focus with w...

Страница 75: ...camcorder Remote control battery may need replacing If POWER switch is in CAMERA position the ON POWERSAVE lever must be in ON position for camcorder to operate POWER switch must be in CAMERA or VCR position for camcorder to operate Camcorder s remote control sensor is exposed to direct sunlight or strong artificial light This may interfere with operation of camcorder by remote control Camcorder i...

Страница 76: ...ensor 1 3 high resolution solid state CCD Imager Tripod Mount One 1 4 x 20 threaded hole Lens f1 8 8 1 6 7 54mm Diameter 34 mm This digital apparatus does not exceed the class B limits for radio noise emissions from digital apparatus set out in the Radio Interference Regulations of the Canadian Department of Communications L interférence radioélectrique générée par cet appareil digital ne dépasse ...

Страница 77: ...bles and other accessories originally furnished with the camcorder Include in the camcorder carton 1 a copy of your sales receipt or other evidence of purchase date 2 your name and address and 3 a brief description of the problem Ship the camcorder to an Authorized RCA Compact Camcorder Servicenter Pay any charges billed to you by the Servicenter for service not covered by the warranty What your w...

Страница 78: ...rding Tips 56 Camcorder Recording on from a VCR or TV 54 55 Camcorder Unpacking 8 CAMERA OFF VCR POWER Switch 9 11 14 28 30 31 32 Car Cords Using Optional 24 25 Care and Maintenance 58 Care and Storage of Battery 23 Care and Storage Cassette 26 Cassette Care and Storage 26 Cassette Door 10 13 27 Cassettes Inserting and Removing 10 27 CHARGE Indicator Light 21 Charging the Battery 21 Checking Batte...

Страница 79: ... Zooming 46 Memory Stop Feature 44 Microphone 12 30 56 NO TAPE Indicator 40 41 ON POWERSAVE Lever 10 13 21 28 29 Operation First Time 8 15 Optional Accessories 1 7 Order Form Accessories 5 7 PAUSE Button 14 51 53 59 63 PAUSE Display 14 40 41 59 PLAY Button 11 14 18 19 30 31 59 Playback 59 63 Playback on a TV with AUDIO VIDEO IN Jacks 60 61 Playback on a TV without AUDIO VIDEO Inputs 62 63 Playback...

Страница 80: ...hutter Speeds Variable 38 39 Solving Problems 64 66 SP Speed 26 Specifications 67 Status Displays 40 41 STOP Button 11 14 18 19 33 Synchro Edit 50 51 Table of Contents Front Cover Tally Light 10 11 12 30 31 TAPE END Indicator 40 41 Tape Copying 60 61 Tape Display 42 43 44 Tape Positioning 31 Things to Avoid 58 Thumb Trigger 11 13 28 29 Tilt Adjustment 34 Time and Date Display 32 33 Time Counter Di...

Страница 81: ...s avec votre appareil vous pouvez en obtenir un indiquer le numéro de modèle votre nom et votre adresse en vous adressant à Thomson Électronique Grand Public du Canada Service des données techniques 6540 Tomken Rd Mississauga Ontario Canada L5T 2E9 Thomson Consumer Electronics 600 N Sherman Dr PO Box 1976 Indianapolis IN 46206 1992 Thomson Consumer Electronics Inc Trademark s Registered Marca s Re...

Отзывы: