EN
- 6 -
connections
connections
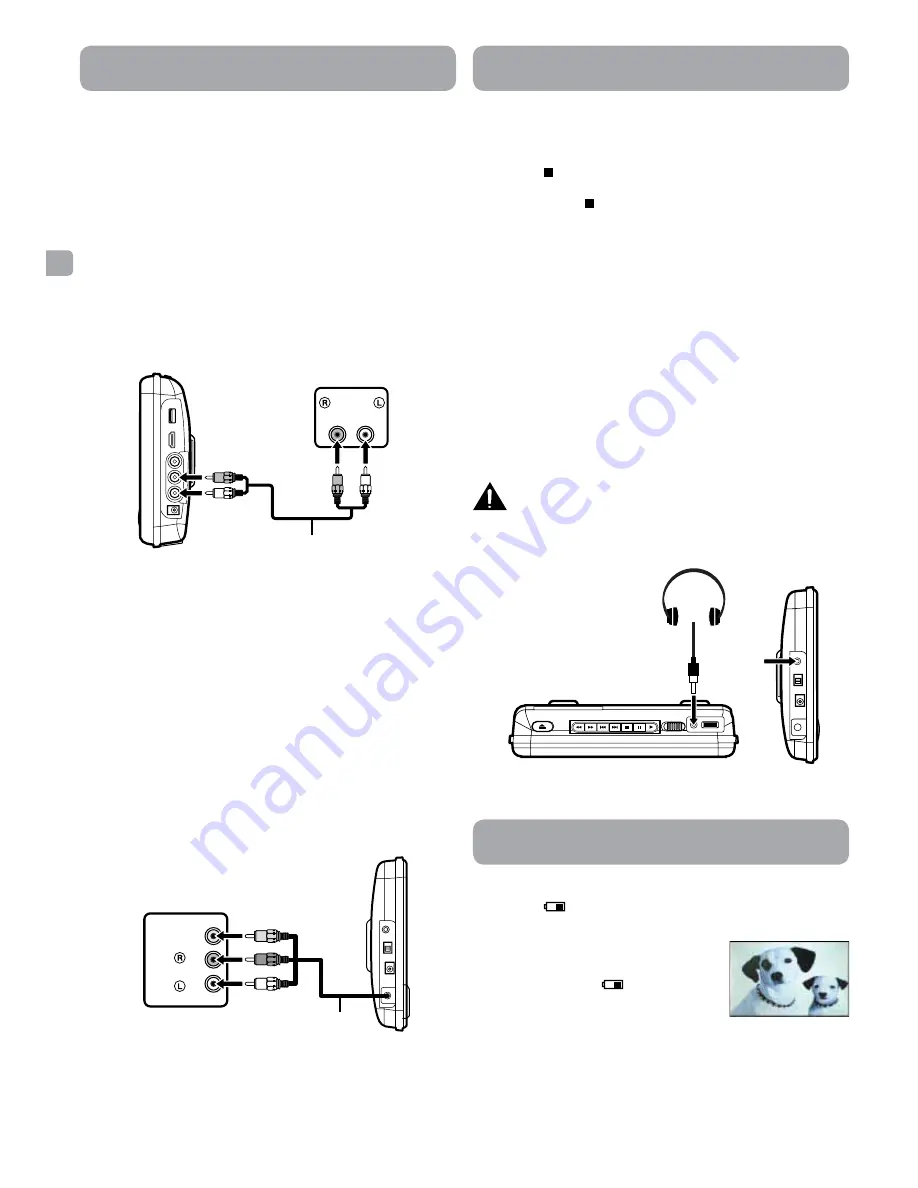
F. Using Headphones/Earphones
Turn down the volume before connecting the headphones/
earphones. Slowly raise the volume with the headphones on until you
reach your desired volume. When headphones are connected, the
speaker is automatically disabled.
Warning:
Excessive sound pressure from earphones and headphones can
cause hearing loss. Avoid listening to sound at excessive levels which
could be harmful to your ears.
E. Connecting a USB Flash Drive
you can connect a USB flash drive (not included) to the USB port on
the unit to play DivX® movies as well as music and picture files.
• Plug the USB flash drive to the USB port on the unit.
• Pressing
STOP
button while player is not playing content
will cause the player to switch between DVD and USB modes.
Repeatedly press
STOP
to select the mode you desire.
For operation of file playback on the USB flash drive, please refer to
the section “PLAyING DivX® VIDEO OR PICTURE FILES”.
Notes:
• It is recommended USB flash drive is plugged when the unit is in
STANDBy mode.
• It does not support USB hard disk mass storage device, multi-card
reader and other USB computer peripheral.
• It only supports USB flash drive (FAT32/16 max. capacity 32G bytes
max, video bitrate is 7Mbps).
• Make sure your USB flash drive is FAT16/FAT32 file system. All other
file system will not be supported.
DVD player
Stereo Receiver
/ Amplifier
TO AUDIO
OUT
AUDIO IN
AV cable
(not included)
Headphones / Earphones
[1/8” (3.5mm) diameter plug]
Monitor
or
DVD player
Turning on the Unit
1. Slide the
/ STANDBY / ON switch on the DVD player to the
ON position. Slide the ON / OFF switch on the monitor to the ON
position.
2. The start-up picture will appear on the
screens.
3. After use, slide the
/ STANDBY / ON
switch on the DVD player to STANDBY
(power off). Slide the ON / OFF switch on
the monitor to the OFF position.
Unit Operation
VIDEO OUT
AUDIO OUT
Built-in
AV cable
Monitor
Game System /
Video Equipment
D. Connecting Game Systems/Video Equipment (for the
Monitor Only)
you can connect game systems or other video equipment for
playback using the monitor.
Watching video equipment
1. Connect the other equipment to the monitor using the built-in AV
Cable.
2. Turn on the monitor.
3. Turn on the video equipment and follow the instructions
provided with it to playback.
Note:
• If you have a mono VCR, the volume level from the speakers will
be low.
C. Connecting a Stereo Receiver or Amplifier (for the DVD
Player Only)
The DVD player can play two channels Dolby Digital.
Listening on External Audio Equipment
1. Connect the DVD player to the left/right Audio In jacks on the
other equipment using a standard Audio cable (not included).
2. Turn on your audio equipment and follow the instructions
provided with it to select the AUDIO IN function.
Notes:
• Make sure to use the correct Audio cable. Connecting the plugs
incorrectly may cause a weak signal.
• If you have a stereo VCR, make sure you set it to stereo mode.
• Due to copyright protection, DVD movies cannot be copied. If
you copy a DVD movie onto a videotape, the resulting copy will
be unclear, with poor sound quality. This is NOT caused by a
defective DVD system.


