background image

Graphics contained within this publication are for representation only.

39

Chapter 4: Playing Discs

Using Different Menus

Each disc is programmed with different features. There are three separate types of menus that you can 
use to access features:

• 

The DVD’s Disc menu – 

The Disc menu is part of each disc and is separate from the DVD 

recorder’s menu. The contents of each Disc menu vary according to how the disc was authored 
and what features are included.


To make the Disc menu appear, press the MENU button while the disc is playing.

• 

The DVD recorder’s Info Display –

 The Info Display appears as icons across the top of the 

screen when a disc is playing. It can only be accessed while you are playing a disc. It’s turned on and 
off with the INFO button on the remote. The Info Display icons change based on the type of disc 
you’re playing. Go to page 40 for more information.

• 

The DVD recorder menu –

 If you’re playing a disc, press STOP (the DVD recorder’s menu 

appears automatically).

Remember: A feature will only work if the disc was programmed with that feature. For 
example, if you choose subtitles on the Info Display, the subtitles will only appear if the disc 
was created with subtitles. If a menu or icon is “grayed out” it means that item (or feature) 
isn’t available.

Search Options

Picture Scan

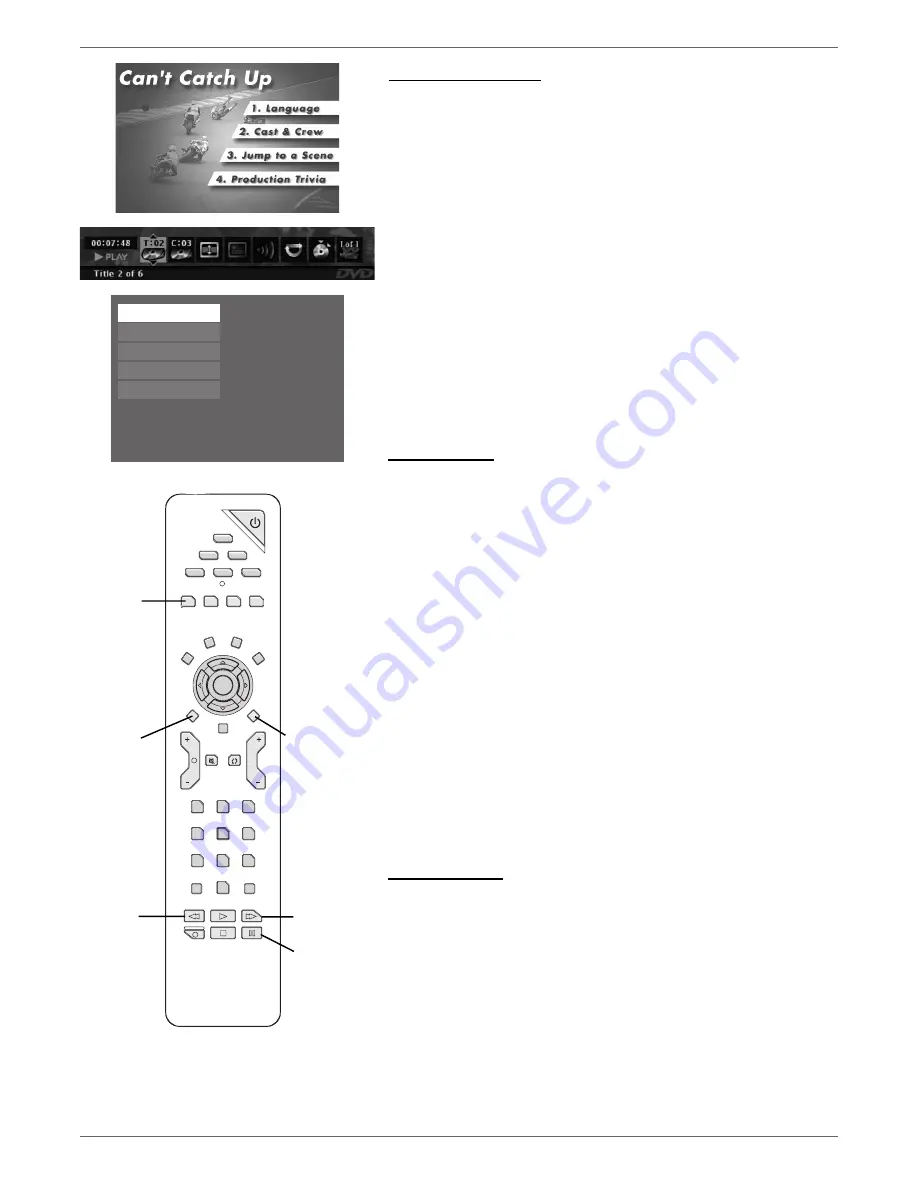
To search a disc during playback, use the FORWARD or REVERSE button. Each time you press 
FORWARD or REVERSE, your DVD recorder scans the disc faster until you reach the fastest scan 
speed. To resume normal playback, press PLAY.

Note: Many DVD titles are programmed to prohibit skipping of warnings or credits in the 
beginning so that you can’t fast forward through them.

Freeze Frame and Frame Advance

While a disc is playing, press PAUSE to freeze the picture. To advance one frame at a time, press 
PAUSE again (the on-screen icon changes from 

PAUSE

 to 

FRAME

). Each time you press the FORWARD  

button, the picture goes to the next frame. To resume normal playback, press PLAY.

Slow Motion (in Freeze Frame Mode) – DVD discs only

While a disc is playing, press PAUSE. Press REVERSE or FORWARD (each time you press REVERSE or 
FORWARD the slow motion will get a little faster until you reach the fastest slow motion speed). To 
resume normal playback, press PLAY.

Time Search – DVD and VCD discs only

Make sure the Time Display (top left side of the Info Display) is highlighted, and then use the number 
buttons to enter a specifi c time on the disc that is playing. Go to page 41 for more information about 
the Time  Display.

Quick Fast Forward and Quick Reverse – DVD and Audio CD only

While you’re playing a disc, press the AGAIN button on the remote (the disc automatically repeats the 
last 10 seconds of the movie).

Similarly, press the ADVANCE button to go forward approximately 30 seconds.

Playback options

Many of your DVD recorder’s playback features are accessed through the Info Display (described on 
pages 40-43). Additionally, with some discs you can use the Zoom Feature to see details of an image.

Zoom

1.

  While you’re playing a disc, press ZOOM (the player zooms in on the image). Each time you press 

ZOOM, the picture is magnifi ed even more (until you get to the maximum zoom level).

2.

  To see other parts of the picture when you’ve zoomed in on the image, press the up, down, left, 

and/or right arrow buttons to go in corresponding directions.

GO

BACK

VOL

CH

MUTE

TV

ON-OFF

DVD/VCR CABLE

AUX

AUDIO

CLEAR

MENU

OK

LIVE

RECORD

STOP

PLAY

INPUT

ANTENNA

PAUSE

FORWARD

REVERSE

7

1

2

3

4

5

6

8

0

9

ADVANCE

AGAIN

INFO

TIMER•GUIDE

SAT

ZOOM

EDIT

OPEN

CLOSE

ANGLE

PAUSE button

ZOOM 
button

AGAIN 
button

REVERSE 
button

ADVANCE 
button

FORWARD 
button

Watch TV

Disc
Disc Library
Timers
Setup

Live - Ch 2

No Disc

1 Library Disc(s)

10:49 am Thu 17-Mar 2003

To watch TV, press OK.

Содержание DRC8060N

Страница 1: ... DRC8060N Important Disc Information This Product Can Record on the Following DiscTypes DVD R 2 4x 4x 8x and 16x DVD RW 2 4x and 4x This recorder cannot record on DVD R or DVD RW discs Please make sure to purchase discs with the plus symbol on the package ...

Страница 2: ... immediately Returning the product registration card allows us to contact you if needed Keep your sales receipt to obtain warranty parts and service and for proof of purchase Attach it here and record the serial and model numbers in case you need them The numbers are located on the back of the DVD Recorder Model No __________________________ Serial No __________________________ Purchase Date _____...

Страница 3: ...h no cable box or off air antenna only 31 Timer Recordings 31 Setting up timer recordings to record programs automatically 31 Disc Library 32 Finding a title movie program etc by using the Sort Feature 32 Other Sorting Options ShowAll Discs 32 Erasing the Disc Library 32 Turning Off CommercialAdvance 33 Watching Commercials or SkippingThem Manually 33 Playback 34 Disc Information 34 Editing DVD R ...

Страница 4: ... connect Protect components from overheating Don t block ventilation holes on any of the components or the fan on the back of this product Arrange the components so that air can circulate freely Don t stack components When you place components in a stand make sure you allow adequate ventilation If you connect an audio receiver or amplifier place it on the top shelf Position cables properly to avoi...

Страница 5: ...e Box TV DVD recorder STOP CH SKIP CH SKIP FWD REV PLAY PAU SE OPEN CLO SE RECORD INPUT DVD recorder STOP CH SKIP CH SKIP FWD REV PLAY PAU SE OPEN CLO SE RECORD INPUT TV TV page 8 Coaxial Audio video S Video Component TV cable box page 10 Coaxial Audio video S Video Component TV satellite receiver page 12 DVD recorder STOP CH SKIP CH SKIP FWD REV PLAY PAU SE OPEN CLO SE RECORD INPUT TV Coaxial Aud...

Страница 6: ...nal not the sound S Video Jacks and Cables The S Video separate video jack provides better picture quality than a composite video jack sometimes labeled VIDEO and color coded yellow onTVs because S Video keeps the color part of the picture separate from the black and white part of the picture If yourTV has an S VIDEO jack connect the DVD recorder to theTV with an S Video cable for a better quality...

Страница 7: ... switch to the OFF position Try playing the disc again INPUT These jacks receive audio and video from a compatible component such as a satellite receiver Another set of Input Jacks INPUT 2 are on the front of the DVD recorder for temporarily connecting components such as a camcorder or a video game unit VIDEO Color coded yellow the video cable you use with this jack provides better quality than an...

Страница 8: ...able not supplied OPTICAL ON OFF OUTPUT L R PROG SCAN AUDIO OUT IN INPUT CABLE ANTENNA CH4 CH3 AC IN DIGITAL AUDIO OUT INPUT S VIDEO VIDEO OUTPUT Y Pb Pr COMPONENTVIDEOOUT L R AUDIO VIDEO HDMI OUT CH3 Ch4 Switch This switch is also found onVCRs it corresponds to theTV channel you would use to watch a disc if you only have yourTV connected to the DVD recorder with an RF coaxial cable via the CABLE ...

Страница 9: ...PUT button until INPUT 2 Front appears CH SKIP channel down skip reverse Goes to the previous channel in the channel list when you re watchingTV When playing a disc goes to the beginning of the current chapter or track unless you re within the first minute of a chapter or the first 15 seconds of a track then you ll skip to the beginning of the preceding chapter or track CH SKIP channel up skip for...

Страница 10: ...TV to its Input 1 channel orVid 1 channel If you need help finding your TV s various Video Input Channels go to page 19 The remote control packed with your DVD recorder is capable of being programmed to operate many brands and models of TVs and VCRs For instructions go to page 22 If the remote operates your TV press TV and INPUT to access the Video Input Channel Details about the different kinds o...

Страница 11: ... cable yellow to the OUTPUTVIDEO jack on the back of your DVD recorder and to theVideo Input jack on yourTV sometimes labeledVIDEO IN 3c S VIDEO OUT If yourTV has an S Video jack use the S Video cable supplied Connect one end of the S Video cable to the S VIDEO IN jack on the back of theTV and the other end to the S VIDEO OUT jack on the back of the DVD recorder 3d COMPONENT OUT Y Pb Pr not shown ...

Страница 12: ...y come with a different recommended connection diagram Normally ANALOG cable boxes are used so that the cable company can scramble the signal for premium channel programming like movie channels The cable box will descramble the signal if you are a premium channel subscriber In some cases your cable company may not scramble the signal for basic channels and the signal could be passed through the ca...

Страница 13: ... DVD recorder is off 2b Connect the audio cables A set of audio video cables was packed with your DVD recorder Connect the audio cables to the OUTPUT AUDIO L left white and R right red jacks on the back of your DVD recorder and to the corresponding Audio Input jacks on yourTV sometimes labeled AUDIO IN L and R 2c Connect the video cable The cables you use for the video determine the quality of the...

Страница 14: ...TV might look different than the one pictured here Details about the different kinds of cables used to connect your DVD recorder are on page 4 DVD recorder TV Satellite Receiver To watchTV satellite programming with the DVD Recorder turned on Tune theTV to its Input 1 channel orVid 1 channel Tune the DVD recorder to the INPUT 1 channel press the INPUT button on the remote Tune the satellite receiv...

Страница 15: ...the OUTPUT AUDIO L left white and R right red jacks on the back of your DVD recorder and to the corresponding Audio Input jacks on yourTV sometimes labeled AUDIO IN L and R 3c Connect the video cable The cables you use for the video determine the quality of the picture you ll see on yourTV when you re playing DVDs For more information about cables and signal quality go to page 4 Connect the video ...

Страница 16: ... play a disc Tune theTV to its Input 1 channel orVid 1 channel Notes about cable boxes The connection diagram shown above reflects a basic setup Since there are many different cable companies and types of cables boxes your cable box may come with a different recommended connection diagram Normally ANALOG cable boxes are used so that the cable company can scramble the signal for premium channel pro...

Страница 17: ...nect one end of the S Video cable supplied to the S VIDEO IN jack on the back of theTV and the other end to the S VIDEO OUT jack on the back of the DVD recorder 2d COMPONENT OUT Y Pb Pr not shown If yourTV has Component Input Jacks Y Pb Pr you can achieve even greater picture quality by connecting the DVD recorder to theTV using these jacks COMPONENTVIDEO OUTPUT Y Pb Pr on the DVD recorder For mor...

Страница 18: ...ightVideo Input Channel when you see the DVD recorder menu for the language selection see below If you have another brand ofTV turn on theTV and tune theTV to the correctVideo Input Channel if you don t know how to access theVideo Input Channel on your TV go to page 19 for help Note You can program your remote to operate most brands of remote controllable TVs Instructions are on page 22 Complete t...

Страница 19: ... to make sure the cable is connected properly Note If you are using only a cable box or satellite receiver there will be few if any channels in the channel list Antenna Cable Antenna Cable Done Searching channels 35 complete 2 channels found Select your local time zone Eastern Central Mountain Should the clock be automatically adjusted for daylight savings time Yes No 4 Channel List The Channel Li...

Страница 20: ... that corresponds to the Input Jacks on theTV you used to connect theTV to the DVD recorder If you need help finding theTV sVideo Input Channel go to page 19 The Main Menu Appears The main menu appears whenever you turn on the DVD recorder To watchTV press the OK button when theWatchTV menu is highlighted When you change channels the channel banner appears to give you programming information that ...

Страница 21: ...ssing a specific channel number see table below Press the Channel up and or down buttons on theTV s remote control sometimes theVideo Input Channel is stored in yourTV s channel list Next Steps This chapter is dedicated to connecting your DVD recorder Choose what you want to do next and go to the appropriate chapter for instructions Chapter 2 The Remote Control page 20 A description of each button...

Страница 22: ...our product than they appear in this book The on screen help text provides the most current operational information page 20 Chapter 2 The Remote Control Explanation of the Buttons Find Out if the Remote Can OperateYourTV Programming the Remote to OperateYourTV Programming the Remote to Operate Other Components Using the Remote s Features Code Lists ...

Страница 23: ...n screen menus and displays DVD VCR Turns on the DVD recorder and puts the remote in DVD mode so it operates the DVD recorder EDIT When playing a disc displays the Info Display and Edit menu see page 36 for details FORWARD Searches forward through the disc GO BACK Returns you to the previous menu When watchingTV goes back to the previous channel INFO Displays the on screen Info Display for details...

Страница 24: ...e search without programming theTV button to operate yourTV press CLEAR until the indicator on the remote turns off 1 Turn on theTV 2 Press and hold theTV button While you continue pressing theTV button press and hold the ON OFF button until theTV button turns on then release both buttons 3 Point the remote at theTV Press and release PLAY then wait 5 seconds or until theTV button stops flashing At...

Страница 25: ...s 3 Point the remote at the component 4 Press and release PLAY then wait 5 seconds or until the component button stops flashing At this point the remote is searching for the correct code you ll know it s found the correct code when the component turns off go to step 5 If after 5 seconds the component doesn t turn off press PLAY again to tell the remote to search the next set of codes Continue pres...

Страница 26: ... s remote control to operate your audio receiver or amplifier Go to page 23 for instructions If you can t program this remote to operate your audio receiver Volume Punchthrough won t work 2 While setting upVolume Punchthrough it s best to point the remote away from components 3 Decide which mode the remote will be in when the volume from the audio receiver punches through The mode will be one of t...

Страница 27: ...G 1006 Loewe 1038 Logik 1002 Luxman 1005 1007 LXI 1001 1007 1029 1038 1043 1044 1045 1104 1116 1130 1132 1147 1157 Magnavox 1005 1007 1008 1018 1038 1040 1041 1046 1047 1048 1055 1082 1083 1124 1125 1129 1139 Majestic 1002 Marantz 1005 1007 1036 1038 1049 Megatron 1007 1036 Memorex 1002 1006 1007 1029 1045 MGA 1005 1006 1007 1018 1020 1030 1050 1051 Mitsubishi 1005 1006 1007 1018 1020 1030 1050 10...

Страница 28: ... 2064 2074 2087 2088 Go Video 2073 2076 Goldstar 2006 2011 2015 2033 2036 Gradiente 2023 Harman Kardon 2006 Harwood 2037 Hitachi 2034 2035 2036 2054 2058 2064 JC Penney 2006 2007 2008 2009 2010 2011 2018 2019 2031 2034 2035 2037 2038 2054 Jensen 2034 2035 2058 JVC 2006 2007 2008 2015 2058 2065 2077 Kenwood 2006 2007 2008 2013 2015 2058 2065 KLH 2037 Kodak 2011 2018 LG 2011 Logik 2037 LXI 2011 Magn...

Страница 29: ...utton Aiwa 3004 Apex 3007 3008 3048 3049 Broksonic 3009 3050 Daewoo 3010 Emerson 3011 3012 3052 Funai 3012 GE 3000 3001 3013 3062 Go Video 3040 Hitachi 3014 JVC 3041 Kenwood 3015 Konka 3005 Koss 3051 Lasonic 3038 Magnavox 3002 3016 Memorex 3017 Mintek 3018 Mitsubishi 3003 NAD 3011 Norcent 3019 Onkyo 3020 Oritron 3024 Panasonic 3006 3021 3056 3057 Philips 3002 3044 3046 Pioneer 3022 3023 Proscan 30...

Страница 30: ...Receiver Tuner AUDIO button AUX button Aiwa 4008 4009 4010 4019 Denon 4023 Harman Kardon 4018 JBL 4018 JVC 011 Kenwood 012 Onkyo 4020 Optimus 4024 Panasonic 4021 RCA 4003 4013 4027 4028 4031 4034 4044 Sherwood 4022 Sony 4014 4015 Technics 4021 Yamaha 4016 4017 Home Theatre In A Box AUDIO button AUX button JBL Audio 4037 DVD 3053 JVC Audio 4038 DVD 3054 Koss Audio 4035 4036 DVD 3055 Audio AUDIO but...

Страница 31: ... of the menu screens buttons and display messages might be different in your product than they appear in this book The on screen help text provides the most current operational information Chapter 3 Recording Playback Features WatchingTV Recording DVD R and DVD RW Disc Library Playback ...

Страница 32: ...ee next section DISCSTHATYOU CAN USE FOR RECORDING DVD R 2 4x 4x 8x and 16x ONLY These are write once discs and can t be erased DVD RW 2 4x and 4x ONLY These are rewritable discs which can be erased and reused for recording Notes This recorder is not compatible with DVD R or DVD RW discs for recording Please make sure to purchase discs with the plus symbol on the package Also it is NOT possible to...

Страница 33: ...OK To exit press GO BCK RETURN Name Channel Day s Start Time Stop Time Recording Quality Timers Ch 002 05 19 19 Mon Once 03 00PM 04 00PM 1 Best Keep Timer Cancel Timer Timer Setup Screen Timer Recordings Setting up timer recordings to record programs automatically 1 From the DVD recorder s main menu use the remote s arrow buttons to highlight Timers and press the OK button Tip You can also access ...

Страница 34: ... When you choose Show All Discs additional sorting options appear Sort by Space Lists the discs by the amount of recording space left Sort by Disc No Lists the discs numerically Sort by DiscTitle Lists discs alphabetically by disc title Show AllTitles Lists all the titles recorded Delete Disc Deletes the disc that is highlighted and the its contents from the Disc Library but doesn t delete the con...

Страница 35: ...and less than one minute or there are frequent dark and quiet scenes Commercial Advance only works forTV programs recorded to disc It doesn t work for pre recorded DVD movies In order for a DVD RW disc to be played in other DVD players it needs to be made compatible See page 35 for details Turning Off Commercial Advance Commercial Advance is already set to be on for the default setting If you want...

Страница 36: ... all chapters including chapters that may have been hidden when editing the disc Also plays the title without automatically skipping recorded commercials if Commercial Advance is turned on DeleteTitle For DVD RW discs only Note You can delete a title from a DVD R disc that hasn t been finalized but the program will still be on the disc You will not be able to access the program once the title has ...

Страница 37: ...fo Display appears Details about the different icons appear in Chapter 4 Playing Discs However the edit feature includes special options for DVD RW discs 1 While playing a disc press the INFO button 2 Press the right arrow button to highlight the Edit icon and press OK The following choices appear use the up down arrow buttons to highlight a choice and press OK to select Insert Chapter Marker DVD ...

Страница 38: ...scTitle Menu and select Play All Chapters Rename Title Play Title Play All Chapters Delete Title Clear Chapters Insert Chapter Marker Delete Chapter Marker Hide Chapter New Title Frame Simon s 4th Birthday Fri 6 20 2003 03 00 pm 04 00 pm 1 Best Watch TV Disc Disc Library Timers Setup DV CAM To watch TV press OK Live Ch 2 No Disc 1 Library Disc s 10 49 am Thu 17 Mar 2003 Jpeg Picture Card Keep in m...

Страница 39: ...sages might be different in your product than they appear in this book The on screen help text provides the most current operational information Chapter 4 Playing Discs Regional Coding Types of DiscsYou Can Play How to Load and Play Discs Using the Different Menus Search Options Playback Options Using the On screen Info Display ...

Страница 40: ... the remote or press the STANDBY ON button on the DVD recorder 1 Make sure theTV is tuned to itsVideo Input channel if you need more information go to page 19 2 Press the OPEN CLOSE button the disc tray opens 3 Place a disc gently into the tray with the disc s label facing up double sided discs have content on both sides so you can place either side up 4 Press the OPEN CLOSE or PLAY button The dis...

Страница 41: ...e one frame at a time press PAUSE again the on screen icon changes from PAUSE to FRAME Each time you press the FORWARD button the picture goes to the next frame To resume normal playback press PLAY Slow Motion in Freeze Frame Mode DVD discs only While a disc is playing press PAUSE Press REVERSE or FORWARD each time you press REVERSE or FORWARD the slow motion will get a little faster until you rea...

Страница 42: ...splay feature isn t available for the disc you re playing The invalid symbol appears on the screen when you press a button that doesn t have any function To make the Info Display disappear from the screen press INFO on the remote control Text will appear here as you highlight different icons to help you use the Info Display This is the Info Display you ll see when you re playing a pre recorded DVD...

Страница 43: ...hese instructions to go to a differentTrack Notes You can also use the number buttons on the remote to enter the title track number Many discs only have one title Some DVD movies don t allow you to select titles from the Info Display You must use the DVD s disc menu Chapter Icon DVD Because DVD discs use digital technology a title can be divided into individual chapters similar to tracks on a CD Y...

Страница 44: ... Play Mode Standard appears at the bottom of the Info Display Audio Icon DVD andVideo CD If the disc was created with different language tracks recorded in different languages or different audio formats Dolby DTS stereo etc you can change the audio option while you re playing the disc 1 While a disc is playing press INFO the info display appears 2 Press the right arrow button until the Audio icon ...

Страница 45: ... in the DVD recorder s main menu system go to page 48 for instructions Random The Random option plays the tracks in a random order 1 While you re playing a disc press INFO the Info Display appears 2 Press the left or right arrow button to highlight the Play Mode icon 3 Press the down arrow button until Play Mode Random appears in the text at the bottom of the Info Display the tracks start playing ...

Страница 46: ...printed side facing up 2 If the AutoPlay option in the Disc Options menu is enabled see page 51 the disc s contents are displayed otherwise press the PLAY button to display them 3 Select a folder using the arrow buttons on the remote control then press OK to display the list of files or press PLAY to start playing all the files contained in the folder 4 Select a file using the up and down arrow bu...

Страница 47: ... the pictures play Play All all pictures in every folder on the disc play Play all pictures in the selected folder play Random All all pictures in every folder play at random Random all pictures in the selected folder play at random Repeat Allows you to set the repeat options for playback Repeat Disc all pictures in every folder repeat play Repeat Off repeat is set to off Rotate Rotates the pictur...

Страница 48: ...ttons and display messages might be different in your product than they appear in this book The on screen help text provides the most current operational information page 46 Chapter 5 Menu System Overview of the DVD recorder s Menu System WatchTV Menu Disc Menu Disc Library Menu Timer Menu Setup Menu ...

Страница 49: ...tails Disc Library contains information about all programs you ve recorded using this DVD recorder You can use the Disc Library as a search tool by sorting recorded programs As much information as possible is stored automatically The information is stored in the DVD recorder s memory and has storage limits You may need to delete some library contents in the future to make room for new recordings F...

Страница 50: ...sc Actions this menu allows you to do some of the more advanced disc function such as erasing and finalizing the discs Rename Disc press OK when highlighted the on screen keyboard appears Follow the on screen instructions to give the disc a different name Highlight Done when you re finished and press OK You cannot select the disc name for a finalized DVD R disc Erase Disc erases a DVD RW disc so y...

Страница 51: ...locked without any rating limits set If you want to use the Parental Control feature set Ratings Limits and then lock the player Lock and Unlock 1 From the DVD recorder s main menu select Setup and press OK the Setup menu items appear 2 Since Parental Control is highlighted just press the OK button the Parental Control menu items appear 3 Since Lock is highlighted just press the OK button on the r...

Страница 52: ... must lock the player page 49 in order for the ratings to be enforced UnratedTitles Some discs contain titles or movies that don t have a rating assigned to them Sometimes movies you might find the most explicit are unrated However much of the new programming on discs such as interviews with actors and directors is also unrated Additionally the discs you use to record DVD R and DVD RW are consider...

Страница 53: ...1 hour recording time on an empty 4 7 GB disc 2 High 2 hours recording time on an empty 4 7 GB disc 3 Good 3 hours recording time on an empty 4 7 GB disc 4 Normal 4 hours recording time on an empty 4 7 GB disc 5 Basic 6 hours recording time on an empty 4 7 GB disc 6 Low 8 hours recording time on an empty 4 7 GB disc Chapter Markers choose when to add automatic chapter markers choose between off 5 ...

Страница 54: ...ormation you entered when you first set up your DVD recorder you need to change the information in the following menus Interactive Setup the first time you turned on your DVD recorder you had to complete an interactive setup so your DVD recorder could have the information it needs to function properly For details about the Interactive Setup go to page 16 To go through this procedure again to chang...

Страница 55: ...oduct than they appear in this book The on screen help text provides the most current operational information Chapter 6 Additional Information Troubleshooting Handling Cautions Maintenance of Cabinet LimitedWarranty Accessory Information Copying content from DVD R or DVD RW disc toVCR videocassette Copying content from aVCR videocassette to a DVD R or DVD RW disc ...

Страница 56: ...et Procedure returns the DVD recorder s menus to the factory default settings and also erases the contents of the Disc Library The time clock is wrong Go to the Setup menu then Installation and select Clock Setup Set AutoClock to No and then set the time manually DVD Problems Disc won t eject When you put a disc into the player the player may take up to 15 seconds to read the disc and determine th...

Страница 57: ...ou start playing a DVD disc and again when you return to watchingTV No sound or distorted sound Make sure your player is connected properly Make sure all cables are securely inserted into the appropriate jacks You may need to readjust the Digital Audio Out setting from the System Options menu Go to page 51 If you select DTS and your DVD recorder isn t connected to a DTS capable receiver you won t ...

Страница 58: ...ay Can t make the Info Display appear The Info Display is only available when playing DVD discs Audio CDs Video CDs and watchingTV Timer Recordings Make sure the clock is set and the time is correct Your DVD recorder is equipped with an automatic clock but the feature might not work properly in some areas If the time is inaccurate set it manually by selecting the Setup menu then Installation and t...

Страница 59: ...abinet with a soft cloth Formation of Condensation Due to sharp changes in temperature and humidity condensation may form if warm air comes in contact with any cold parts inside the player When condensation forms inside the player the player may not operate correctly If this occurs leave the player at room temperature until the inside of the player becomes dry and operational If condensation forms...

Страница 60: ...ease complete the online Product Registration on RCA com or complete and mail the Product Registration Card packed with your unit It will make it easier to contact you should it ever be necessary The return of the card is not required for warranty coverage Limitation ofWarranty THEWARRANTY STATED ABOVE ISTHE ONLYWARRANTY APPLICABLETOTHIS PRODUCT ALL OTHERWARRANTIES EXPRESS OR IMPLIED INCLUDING ALL...

Страница 61: ...ical Plug to Optical Plug for Optical Audio connection to a compatible receiver 3 feet part number DV3 price 15 95 6 feet part number DV6 price 19 95 Optical Plug to Mini Plug 3 feet part number DV3M price 15 95 6 feet part number DV6M price 19 95 Surge Protector part number PS83202C2 price 34 95 GO BACK VOL CH MUTE TV ON OFF DVD VCR CABLE AUX AUDIO CLEAR MENU OK LIVE RECORD STOP PLAY INPUT ANTENN...

Страница 62: ...M CABLE ANTENNA jack on theTV 3 Make sure all of the components TV VCR and DVD recorder are plugged into working power outlets 4 Turn on all of the components 5 Tune theTV to channel 3 or 4 depending on the whether theVCR s 3 4 switch is set to 3 or 4 because theVCR is connected to theTV with an RF Coaxial Cable 6 Change the channel on theVCR to itsVideo Input Channel sometimes called LINE or LINE...

Страница 63: ...on the DVD recorder Connect the other end to the Cable Antenna Input jack on yourTV sometimes labeled CABLE ANTENNA 4 Make sure all of the components TV VCR and DVD recorder are plugged into working power outlets 5 Turn on all of the components 6 Tune theTV to theVideo Input Channel that corresponds with the Audio Video Input jacks you used to connect it to the DVD recorder 7 Insert the videocasse...

Страница 64: ...This page intentionally left blank ...

Страница 65: ...This page intentionally left blank ...

Страница 66: ...This page intentionally left blank ...

Страница 67: ......

Страница 68: ...al or on the carton This will only add delays in service for your product Thomson Inc Thomson Inc 10330 North Meridian Street Indianapolis IN 46290 2005 Thomson Inc Trademark s Registered Marca s Registrada s Printed in China TOCOM 16527470 Visit our website at www rca com THOMSON ...

Отзывы: