


9
A
CAUTION:
Once the natural gas pressures are
established, DO NOT adjust the Hi Delta gas valves to
attain the required propane pressures. Adjustments
must be made to the FlexGas propane regulator.
11. Replace the screw cover.
CAUTION:
Special manifold and air settings may be
required. Verify rating plate and blower housing.
12. Turn the gas selector key on the FlexGas control
panel to “OFF”.
13. Close the manual valve on the propane gas supply
and open the manual valve on the natural gas
supply. Turn the gas selector key on the FlexGas
control clockwise to “NAT”. The heater is now ready
for operation.
FlexGas Operation - Changing Fuels
From NAT to PRO:
1. Turn the boiler off (power switch on front control
panel).
2. Turn FlexGas key to “OFF”.
3. Close NAT manual valve.
4. Open PRO manual valve.
5. Turn FlexGas key to “PRO”.
6. Turn the boiler on.
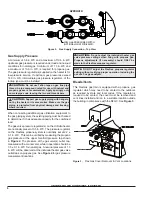
NOTE:
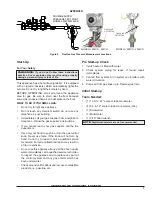
Reset Low Gas Pressure Switch (when equipped)
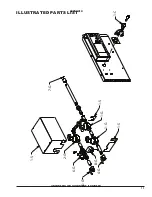
if necessary. Refer to Figure 2 for location.
From PRO to NAT:
1. Turn the boiler off (power switch on front control
panel).
2. Turn FlexGas key to “OFF”.
3. Close PRO manual valve.
4. Open NAT manual valve.
5. Turn FlexGas key to “NAT”.
6. Turn the boiler on.
Safety Inspection
1. Check all thermostats and high limit settings.
2. During the following safety checks leave
manometers hooked up, check and record.
3. If other gas-fired appliances in the room are on the
same gas main, check all pressures on the Hi Delta
with all other equipment running.
4. Check thermostats for ON-OFF operation.
5. Check high limits for ON-OFF operation.
6. While in operation, check flow switch operation.
7. Check the low gas pressure switch (if so equipped).
(For proper adjustment, use the attached manometers,
if available, to set pressure. The scales on the switch
are approximate only.) Low gas pressure switch must
be set at 5.0 in. WC for natural gas.
Follow-Up
Safety checks must be recorded as performed.
Turn heater on. After main burner ignition:
1. Check manometer for proper reading.
2. Cycle heater several times and re-check readings.
3. Turn unit off.
4. Remove all manometers and replace caps and
screws.
5. Replace all gas pressure caps.
6. Check for gas leaks one more time.
7. Restart unit.
APPROVED
UNCONTROLLED DOCUMENT IF PRINTED


