


1
2
3
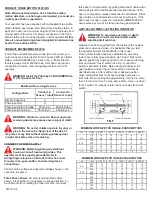
FIG. 5
5973132-6
CONNECT THREE BUTTON STATION
Your operator has been supplied with a standard three button
station labeled open-close-stop. Mount three button station in
sight of the door, at a minimum height of 5 feet and away from
moving parts of the door. For proper connection of the three
button station refer to wiring diagram in lid of operator.
At this
time also mount warning placard supplied in hardware box
next to three button station.
CONNECT ENTRAPMENT DEVICE
If other than constant pressure wiring type is required, you
must connect a photo electric control, series 5000 by Vitector
Fraba, model HAE00056 by Linear Corp., or Miller Electric
reversing edge model ME with blue color band. For proper
connection of device, refer wiring diagram found in lid of
operator.
WARNING: Failure to connect a Raynor approved
reversing device may cause severe injury or death
WARNING: Do not let children operate the door or
play in the door area. Keep clear of the door it
may move at any time without warning and keep door
in sight at all times when it is moving.
CONNECT TO POWER SUPPLY
WARNING: Before beginning any electrical
hook-up, consult local wiring codes. This
operator must be properly grounded. refer to
wiring diagram found on inside of control box cover
for power line, push-button, and reversing device
connections.
Verify that line voltage and operator voltage shown on the
cover are the same.
Three Phase Power:
On units requiring three phase
power, it is possible to run operator in wrong direction. To
be certain motor is rotating in proper direction, manually
LIMIT ADJUSTMENT and TESTING OPERATOR
WARNING: To avoid serious injury or death
always disconnect electrical power before
adjusting limit switches.
Operator has been supplied from the factory with constant
pressure to open and close, it is advisable that you test
the operator and set limit switches in this mode.
Once correct rotation has been established, manually
lower door to fully closed position. Set "close" limit nut at
desired position by depressing limit nut keeper and turning
limit nut toward "close" switch (see Fig. 5) until limit
switch is activated (clicks). Raise door electrically to full
open position and set "open" limit switch in manner as
described above. After setting nuts in desired position,
make certain that limit nut keeper engages grooves on
limit nuts. When making fine adjustments, turn nut no more
than 1/4 turn at a time. To stop door earlier, move nut closer
to limit switch. To stop door later, back nut away from limit
switch.
Limit Nut
Limit Nut Keeper
"Open" Limit Switch
"Close" Limit Switch
MINIMUM WIRE SIZE FOR SINGLE-PHASE MOTORS
MINIMUM WIRE SIZE FOR THREE-PHASE MOTORS
Hp
Volts
0-25 Ft.
50 Ft.
100 Ft.
150 Ft.
200 Ft.
0.5
115
230
14
14
12
14
10
14
8
14
6
12
0.75
115
230
12
14
10
14
8
14
6
12
4
10
1
115
230
12
14
10
14
8
14
6
12
4
10
1.5
230
14
14
12
10
8
Hp
Volts
0-25 Ft.
50 Ft.
100 Ft.
150 Ft.
200 Ft.
0.5
230
460
14
14
14
14
14
14
14
14
14
14
0.75
230
460
14
14
14
14
14
14
14
14
14
14
1
230
460
14
14
14
14
14
14
14
14
14
14
1.5
230
460
14
14
14
14
14
14
14
14
12
14
2
230
460
14
14
14
14
14
14
12
14
12
14
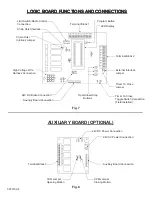
Configuration:
Connect to
Sensor 1 Input
Connect to
Sensor 2 Input
Electric Edge Only
X
-
Photo Eye Only
X
-
Photo Eye & Electric Edge
Photo Eye
Electric Edge
Photo Eye & Photo Eye
Photo Eye 1
Photo Eye 2
Monitored Reversing Devices
WARNING: Install the Photo Eye's NO HIGHER than
6" (15cm) above the floor.
Note: When a external device, like a 3-button station,
motion detectors, or photo eyes are required, you must use
a wire type of CL2 or equivalent.
raise door to mid-positioin, by pulling disconnect chain down
and locking it off in wall bracket as described above. With
door in mid-position, release disconnect mechanisms. Press
open button on control station and door should open. If the
door does not open, press the stop button IMMEDIATELY
and reverse any two of the three incoming power leads.


