background image

76

RC400 GPS Chartplotter

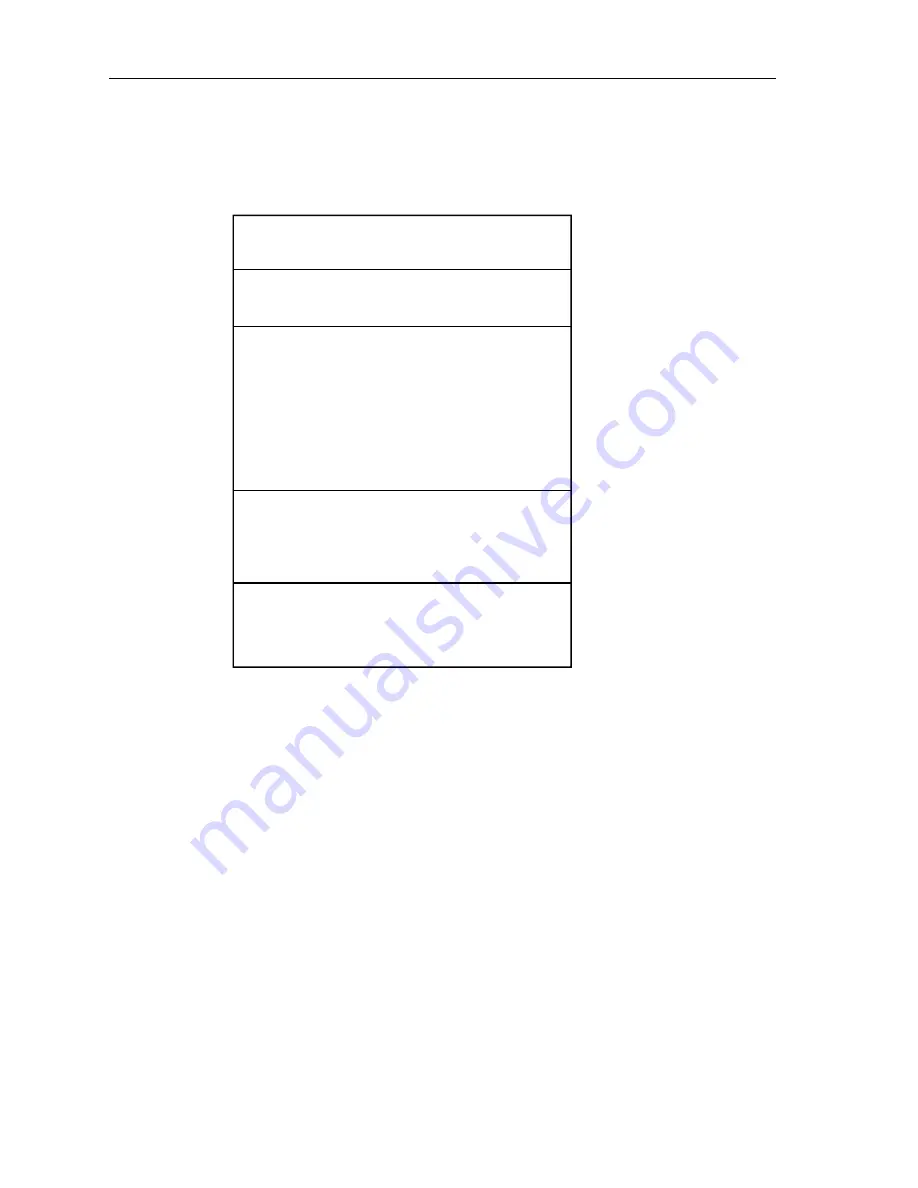
Waypoint Data

The Waypoint Data display comprises text data occupying the whole 
screen.


Figure 5-7: Waypoint Data

If a route is not selected, the 

ROUTE

 field displays 

NO ROUTE

.

The 

WAYPOINT

 field shows the name of the waypoint. If the waypoint is 

part of a route then the title field includes the waypoint index in the route. 
If there is no target waypoint the text indicates 

NO WAYPOINT

 and all 

waypoint data is shown as dashes, one per character. If a route is being 
followed and the waypoint is not named, the text shows the waypoint 
number within the route (as displayed on screen). If a 

GOTO

 Cursor or 

Port is in progress, the text indicates 

GOTO CURSOR

 or 

GOTO 

<

Port 

Name

>. 

BRG, RNG and XTE data relate to the target waypoint.

Time refers to time data which is acquired from GPS information. Any 
local time offset is set in the System Set Up menu, see 

Chapter 4

.

The Time To Go (TTG) and Estimated Time of Arrival (ETA) data relate 
to the target waypoint (not the whole route) and are based on the Speed 

ROUTE

"CURRENT"

"HILLHEAD"

COG 313°T     TIME 02:15 10/07/04 

BRG  313° T

RNG  3.76 nm

WAYPOINT 01

SOG 5.0 Kts   TTG  00:47 

XTE 0.02nm    ETA  03:02 10/07/04

STEER STARBOARD

>    l

D6243-2

Содержание RC400

Страница 1: ...RC400 GPS Chartplotter Owner s Handbook Document Number 81237 2 Date August 2004...

Страница 2: ...ii RC400 GPS Chartplotter...

Страница 3: ...eaterinstrument connected via the NMEA 0183 interface Note This handbook contains important information about installing usingandmaintainingyournewRaymarineproduct Togetthebestfrom the product please...

Страница 4: ...eownerinformationandreturnthecardto the factory in order to receive full warranty benefits Technical Accuracy To the best of our knowledge the information in this handbook was correct as it went to pr...

Страница 5: ...e have designed this product to be accurate and reliable manyfactorscanaffectitsperformance Asaresult itshouldonlybe used as an aid to navigation and should never replace common sense and navigational...

Страница 6: ...that could damage or destroy the unit Ni MH Battery Recycling ThisproductispoweredbyrechargeableNickelMetalHydride Ni MH batteries Ni MH batteries contain chemically active materials that are hazardo...

Страница 7: ...ction Bar 3 Pop Up Menus 4 Database Lists 4 1 2 Satellite Differential System 4 How it Works 5 Availability of WAAS and EGNOS Signals 6 Broadcast Continuation and Accuracy 6 Chapter 2 Installation 7 2...

Страница 8: ...ng the Display Mode 24 Moving Around the Chart 26 Using FIND SHIP 26 Changing the Chart Scale 27 3 5 Using Navionics Gold Chart Cards 29 Loading the Chart Data 29 Displaying the Chart Data 30 Chapter...

Страница 9: ...diting Waypoint Details 52 Erasing Waypoints 54 Moving Waypoints 54 5 3 Working with Routes 55 Creating a New Route 56 Saving the Current Route 58 Clearing the Current Route from the Screen 59 Retriev...

Страница 10: ...hiving a Track 90 Loading or Deleting an Archived Track 91 Archiving a Waypoint Set 93 Loading or Deleting an Archived Waypoint Set 94 5 10 Displaying Chart Information 96 Port Services 96 Tide Inform...

Страница 11: ...point Lists Display Tide Heights Tide Currents Sun and Moon data Display vessel s position direction and track on screen Convert a track to a route SmartRoute Alarms and Timers Man OverBoard MOB to na...

Страница 12: ...on baratthebottomofthescreen Note During many operations the cursor cannot be moved around the screen while a function bar is displayed for example and the cursor is used exclusively for selection POW...

Страница 13: ...peration this will be the scale of the chart the position of the cursor lat and long and the rangeandbearingtothecursor Whenthecursorisplacedoveradynamic object the status bar will display information...

Страница 14: ...to select an item from the list then use the appropriate function to edit the item For example a Waypoint or a Route can be erased 1 2 Satellite Differential System The RC400 GPS Antenna utilizes a sa...

Страница 15: ...ence Stations are located at known positions and receive data continuously from GPS The Ground Reference Stations send their data to the Master Stations which calculate the error of the GPS received p...

Страница 16: ...GNOS compatible However at the time of going to print the EGNOS was still under test Further information on the WAAS and EGNOS systems can be found at www raymarine com Broadcast Continuation and Accu...

Страница 17: ...en using the ship s power Raymarine equipment and cables connected to it are At least 3 ft 1 m from any equipment transmitting orcables carry ing radio signals for example VHF radios cables and antenn...

Страница 18: ...Support Department to obtain replacements Part Number Description E33018 RC400 GPS Chartplotter R38095 Mounting Bracket Base R38096 Mounting Bracket Adapter R38097 Mounting Knob AA size Ni MH batteri...

Страница 19: ...Interference The selected locationshould be farenoughawayfrom devices that may cause interference such as motors and generators Power Source The unit should be located near a DC power source Thepowerc...

Страница 20: ...10 RC400 GPS Chartplotter Figure 2 1 RC400 Dimensions 3 57 90 57mm 6 48 164 6mm 1 75 44 52mm D6523 2 POWER CLEAR PAGE ENTER RANGE IN GOTO MOB RANGE OUT...

Страница 21: ...the rear of the RC400 beneath the battery tray Installing the AA cells and the chart card both require first removing the battery tray To remove the battery tray 1 Loosen the two retaining screws on t...

Страница 22: ...of the chartplotter adja cent to the chart card if already installed and turn to the appropriate position ALKALINE or RECHARGEABLE Figure 2 3 Locating the BATTERY TYPE Switch 3 Noting the proper orien...

Страница 23: ...canstoreupto20 chartsin an electronicformat SeeUsing Navionics Gold ChartCardson page 29 for details To insert a Gold Chart card refer to Figure 2 4 1 Check that you are using the correct Gold Chart c...

Страница 24: ...ly bracket mounted on a dash area or deckhead Mount the unit as shown in Figure 2 5 1 Using the mounting base as a template or using the template at the end of this handbook mark the locations of the...

Страница 25: ...mb on one hand to depress one of the two release tabs on either side of the mounting bracket 2 GraspingtheRC400withtheotherhand pullthechartplotterforward and remove from the bracket Figure 2 5 RC400...

Страница 26: ...use on positive ground vessels The POWER NMEA connector provides for 12VDC power connection and NMEA inputs outputs using the supplied cable The chartplotter is intended for use on vessel s DC power...

Страница 27: ...ress down on the outer ring as you pull the con nector away from the RC400 This will prevent damage to the connector 2 Cut the cable to length and connect the red wire via a 1A quick blow fuse to the...

Страница 28: ...ion 2 4 Installing the Batteries and Chart Card 2 Connect the Power NMEA cable to ship s power or Connect the Cigarette Lighter Adapter into a 12 VDC cigarette lighter 3 Connect the molded plug with t...

Страница 29: ...singtrackpadleft right selecttheSYSTEMSETUPfunctionandpress ENTER TheSYSTEMSETUPmenuisdisplayed listingtheparameters and their current settings Figure 2 7 System Set Up Menu 3 Using trackpad up down s...

Страница 30: ...ridge data is displayed 4 Ensure that position data is available use the FIND SHIP function to check that the cursor is fixed on the vessel symbol which is correctly positionedatthecenterofthechartdis...

Страница 31: ...e battery icon appears empty When fully charged the battery icon appears full The figure to the left indicates the six status levels the battery level icon can display When battery charging is complet...

Страница 32: ...n against unintentionally powering on the unit and draining the batteries you must press the ENTER key within 30seconds of pressing POWER or the unit will power itself OFF again If this is the first t...

Страница 33: ...that the screen is not too dim to view Tip To achieve maximum brightness in sunlight and minimum bright ness in dim ambient light conditions you will need to adjust both the LIGHTS and CONTRAST contro...

Страница 34: ...he top left of the chart screen 3 4 Controlling the Display This section describes how to Change the display mode Move around the chart by panning the display changing the chart center and changing th...

Страница 35: ...O CAP DE LA HAGUE ALDERNEY GUERNSEY JERSEY PORTB CSR 48 30 367 N POS 1 35 636 W 128 nm BRG 231 T RNG 40 91nm SIM OV NU TIME 02 18 DATE 10 07 04 STEER STARBOARD l ETA WAYPOINT 03 03 10 07 04 TTG WAYPOI...

Страница 36: ...re are three ways in which you can reposition the chart Use the trackpad to move the cursor to the edge of the chart the chart pansacross Thismethodisusefuliftheareayouwishtoseeisjustoff screen Automa...

Страница 37: ...rtography Plotter mode is available to allow you to zoom into a smaller area even when no chart data is available for that scale To enable plotter mode see Chapter 4 Setting Up You can change the char...

Страница 38: ...in again repositioning the cursor first if needed An area of further chart detail is indicated by a box around the area 3 In normal operation the unit will allow you to zoom in as far as the chart det...

Страница 39: ...appropriate level of detail for a given geographic area and scale this data can be displayed down to a range of 1 8 nm on the screen height if the data is available To obtain Navionics Gold Chart card...

Страница 40: ...chartplotter s memory If a different portfolio is desired this can be accessed by the SELECT CHART option see Select Chart on page 41 Displaying the Chart Data The new chart data will be displayed whe...

Страница 41: ...default settings GPS status and default settings The set up parameters are selected via three soft keys System Set Up controlling overall functionality Chart Set Up controlling the chartplotter funct...

Страница 42: ...ENTER key is pressed 6 Press CLEAR to clear the function bar and return to normal operation Note To return all settings to their original factory settings perform a factory reset as described in Chapt...

Страница 43: ...METERS PER HOUR KPH MILES PER HOUR MPH KNOTS DEPTH UNITS METRES FEET FATHOMS METRES VARIATION 30 W to 30 E 1 steps 0 0 E VARIATION MODE MANUAL AUTO AUTO DATE FORMAT DD MM YY or MM DD YY DD MM YY TIME...

Страница 44: ...The Default value is zero Note Variation can only be changed if the VARIATION MODE is set to MANUAL Variation Mode This can be set to AUTO or MANUAL In AUTO mode the RC400 automatically calculates an...

Страница 45: ...low If a GOTO or Follow is started the simulator does not use the selected value of COG but instead generates a value of COG that simulates the navigation function in progress When GOTO or Follow is s...

Страница 46: ...infollowingthenext keypress The selected value is retained on power down The default is OFF Light Saver This function defines the timeout period after which the backlight is switched off following key...

Страница 47: ...your system configuration and your personal preferences To set the Chart default parameters 1 Press the PAGE key to display the SET UP function bar 2 Usethetrackpadleft righttohighlighttheCHARTSETUPfu...

Страница 48: ...sandtheiroptions shows the factory default setting and provides a space to make a note of the new default setting Parameter Options Factory Default New Setting ORIENTATION NORTH UP COURSE UP HEAD UP N...

Страница 49: ...ue is shown upwards To update the Course Up reference while Course Up is the current mode re select COURSE UP from the set up menu If a new course is selected a new target waypoint for example the cha...

Страница 50: ...beyondthelargestcartographicscale unless Plotter Mode is activated When in MOB mode Autozoom is selected automatically and will zoom in as far as possible irrespective of the selection of Plotter Mode...

Страница 51: ...n power up XTE Alarm The selected value is used as the cross track error limit The alarm is triggered when the cross track error exceeds the selected limit when a GOTOoraRoute Follow isin progressanda...

Страница 52: ...played The selected setting is retained when the unit switched off Light Sectors When ON light sectors are displayed The selected setting is retained when the unit switched off Presentation Set to dis...

Страница 53: ...and the position entered Note Pressing ENTER with a selected offset of more than 2nm gives a warning message which is cleared on any key press The Calibration Set Up mode maintains and the user can ei...

Страница 54: ...angles are used in a triangulation process to calculate your position HDOP Horizontal Dilution Of Position is a measure of this accuracy a higher figure signifies greater error In ideal circumstances...

Страница 55: ...ct ON to allow the unit to use SD corrections if available Select OFF to force the unit to calculate a normal GPS fix with no satellite GPS corrections 3 Press CLEAR twice to return to the normal disp...

Страница 56: ...46 RC400 GPS Chartplotter...

Страница 57: ...sel s position or at a specific lat long Waypoints can also be placed before the chartplotter is installed on your vessel When a new waypoint is placed it is displayed using either the default symbol...

Страница 58: ...he way point list and named using the next available number The waypoint functions remain displayed so that further way points can be placed Use EDIT WAYPOINT to name the waypoint as described in Edit...

Страница 59: ...g the Waypoint List Select WAYPOINT LIST The Waypoint List and associated function Soft Keys are displayed Figure 5 1 Waypoint List Display 7 Select MAKE NEW WAYPOINT Thewaypointisplacedatthecurrentve...

Страница 60: ...ypoint and transfer waypoints To select a waypoint using the cursor 1 Movethecursoroverthewaypoint the WAYPOINT OPTIONS function bar together with help text is displayed 2 Press ENTER to select the wa...

Страница 61: ...opofthe screen or the waypoint details can be viewed on the waypoint list To display waypoint data Movethecursoroverthewaypoint Thewaypointdataisdisplayedinthe status bar indicating waypoint number na...

Страница 62: ...oint function bar is displayed 4 To edit the waypoint name select EDIT NAME The NAME WAYPOINT window is displayed 5 Use the trackpad to enter or edit the name as follows Use trackpad left right to mov...

Страница 63: ...characters 6 To edit the waypoint symbol select EDIT SYMBOL i Use trackpad left right to highlight the desired symbol ii Press ENTER toacceptthechoiceor CLEAR to aborttheoperation 7 To change the wayp...

Страница 64: ...s previously described The waypoint list function bar is displayed 2 Use trackpad up down to move through the list to highlight the desired waypoint 3 SelectEDITWAYPOINTandpressENTERtodisplaytheEditWa...

Страница 65: ...an be current and is displayed if it is in the field of view as solid lines connecting waypoints If following the route the current leg is shown as a dotted line Afteraroutehasbeencreated theGOTO MOBk...

Страница 66: ...el functions 3 Select MORE to see more functions 4 Select MORE again to return to the first level functions 5 Press CLEAR twice to return to chart mode Creating a New Route Note If there is a current...

Страница 67: ...t waypoint position a dotted line connects the cursor to the last placed waypoint 5 Press ENTER again The next waypoint is placed and the dotted line changes to a solid line Note If the waypoint was p...

Страница 68: ...he list is highlighted You can use track pad up down to select another position in the list which can be a blank slot or an existing route you no longer need 4 Press ENTER to save the route Press ENTE...

Страница 69: ...been saved a prompt gives the options ENTER to save or CLEAR to remove the route from the screen 4 To save the route in the database press ENTER The Name Route functions are displayed see Saving the...

Страница 70: ...e route leg or press CLEAR To display information about a route waypoint move the cursor over the waypoint until its pop up data box is displayed To remove the data move the cursor away from the waypo...

Страница 71: ...ct ROUTES followed by MORE then ROUTE LIST The route list is displayed with the selected route highlighted 2 Select NAME ROUTE and press ENTER 3 To name or rename a route use trackpad left right to se...

Страница 72: ...s to scroll through the list 3 To display the ETA at each route waypoint selectTIME ETA andpress ENTER 4 To enter a planned SOG rather than actual SOG select PLANNED SOG and press ENTER Use the trackp...

Страница 73: ...hen EDIT ROUTE and press ENTER the PLACE WAY POINT function is displayed 2 Add waypoint s to the route by moving the cursor and pressing ENTER in the same way as the route was first created 3 Remove w...

Страница 74: ...oint appears 5 Press CLEAR again to remove the function bar and route leg data The waypoints in the current route are re numbered to identify the new positions Note If you already have 50 waypoints in...

Страница 75: ...ction explains how to perform the following tasks Follow a route Reverse a route Target Point Arrival Altering the route including joining at a selected waypoint advanc ing waypoints and restarting XT...

Страница 76: ...waypoint This line remains fixed on screen as the vessel moves The function bar is removed Reverse a Route This option enables a return route to be generated from an existing route which is then follo...

Страница 77: ...Press any key to cancel the arrival alarm The target becomes the origin the next waypoint becomes the target pointandthetwoareconnectedbyadottedlineindicatingthecurrentleg Ifthe targetwaypoint wasthe...

Страница 78: ...tart XTE is useful if you find yourself off track and prefer to go directly to your target rather than get back onto the original track While following a route or going to a target point you can resta...

Страница 79: ...aypoint a port or nearest facility or the current cursor position Go to a Waypoint To navigate directly to an existing waypoint 1 From the normal chart display i Use the trackpad to position the curso...

Страница 80: ...egins Go to Cursor Note If navigation is currently in progress or if the cursor is homed Find Ship it is not possible to go to cursor To navigate directly to the current cursor position 1 Press andrel...

Страница 81: ...to display the Port List 2 Use trackpad up down to select the desired port and press ENTER to start the GoTo or CLEAR to cancel the operation A dotted line is drawn between the current vessel positio...

Страница 82: ...GE key provide the following display modes Set Up functions see Chapter 4 Course Deviation Indicator CDI Bearing Distance Indication BDI Waypoint data Navigation data Time Date data Return to Chart di...

Страница 83: ...r line when the vessel is on course Cross Track Error XTE Bearing to Waypoint Distance to Waypoint Time to Go TTG Course Over Ground COG and Speed Over Ground SOG are also shown Timeto Go is calculate...

Страница 84: ...ent on the value of XTE The first arrow is shown when the XTE reaches 0 01nm the second at 05nm and subsequently at 0 1nm intervals BDI Display Figure 5 6 BDI Display The BDI display shows deviation f...

Страница 85: ...ouin steering the vessel back towards the rhumbline between origin and destination The steering instruction is STEER PORT if the waypoint line is 1 or more to port STEER STARBOARD if the waypoint line...

Страница 86: ...wed and the waypoint is not named the text shows the waypoint number within the route as displayed on screen If a GOTO Cursor or Port is in progress the text indicates GOTO CURSOR or GOTO Port Name BR...

Страница 87: ...n 0 01 on either side If no GoTo or Follow is in progress the steering instruction is NOT TRACKING no steering arrows are shown but the rhumb line indicator is shown The graphicalXTEindicationplaces a...

Страница 88: ...no GPS fix but thereis avalueforthelastfix this is shown instead POSITION is replaced with LAST POSITION The c indicatoronlyappearswhenthepositionhasbeenusercalibrated The Fix indicator shows the GPS...

Страница 89: ...first opened the data relates to the current day unless there is no date information available In this case dashes are displayed Thevessel scurrentpositionis used unlessthereis noGPSfix in which case...

Страница 90: ...he position functions 2 Select PREVIOUS DAY or NEXT DAY as desired to display Sunrise Sun set information for a particular date 3 Select TODAY to return the display to current date To set the position...

Страница 91: ...dallroutesintheRouteList SendingtheWaypointListdoesnotaffect current routes Note SendingtheWaypointListincludeswaypointsinanunsavedroute The RECEIVE WAYPOINTS function adds waypoints and routes receiv...

Страница 92: ...er press ENTER To receive waypoints and route lists 1 Display the Waypoint List as previously described then select WPT ROUTE TRANSFER 2 Select RECEIVE WAYPOINTS and press ENTER the text changes to ST...

Страница 93: ...et up a track and specify the interval between track points Clear the current track Convert the track to a route SmartRoute To access the track controls 1 Press the PAGE key to display the chart set u...

Страница 94: ...erval setting guide below to determine the best settingforyourplannedvoyage thisisparticularly importantifyouwish to use SmartRoute to convert the track to a route Figure 5 10 Track Interval Setting G...

Страница 95: ...are to be placed select TRACK OFF and press ENTER the TRACK OFF text changes to indicate TRACK ENABLE SmartRoute SmartRoute enables the latest track to be converted to a route To convert a track to a...

Страница 96: ...displayed 3 Using trackpad left right select OBJECT INFO A list of cartography objects under the cursor is displayed 4 Use the trackpad up down to select the desired object and press ENTER for detaile...

Страница 97: ...00 waypoints or 20 routes each with up to 50 waypoints If the Gold Chart card also con tains chart files then these values will be lower Archiving a Route To archive a route 1 In chart mode press ENTE...

Страница 98: ...left right and up down to change Press ENTER when com plete 5 The route is now archived Press CLEAR twice to return to normal operation Note Once archived the route can be erased from the chartplotter...

Страница 99: ...om the archive 1 In chart mode press ENTER the primary function bar is displayed 2 Using trackpad left right select ARCHIVES 3 Using trackpad left right select MORE and then ROUTE ARCH LIST Figure 5 1...

Страница 100: ...ENTER The first character of the selected route name will be highlighted Use the trackpad left right to select the character and up down to change When your changes are complete press ENTER to save o...

Страница 101: ...e Current Track on page 85 Loading or Deleting an Archived Track Using the TRACK ARCH LIST function a previously archived track can be loaded back into the chartplotters memory renamed or deleted To l...

Страница 102: ...ack from the archive Use trackpad up down to select the track you wish to load and press ENTER To delete a track from the archive Use trackpad up down to select the track you wish to delete then use t...

Страница 103: ...s ENTER to save or CLEAR to discard any changes Archiving a Waypoint Set To archive the waypoints currently loaded on the system 1 In chart mode press ENTER the primary function bar is displayed 2 Usi...

Страница 104: ...ing Waypoints on page 54 Loading or Deleting an Archived Waypoint Set Using the WAYPOINT ARCH LIST function a previously archived waypointsetcanbeloadedbackinto thechartplotter renamedordeleted To loa...

Страница 105: ...an either add to the waypoints currently loaded on the chartplotter or replace the waypoints currently loaded To load a waypoint set from the archive Use trackpad up down to select the waypoint set yo...

Страница 106: ...le suchaslights buoys portsortidaldata Placingthecursorover an object displays its associated data in a pop up box Typical examples for Port Services and Tide Information are given below Port Services...

Страница 107: ...etails Figure 5 18 Port Service Details 4 To see more options if available select the More option and press ENTER 5 Press CLEAR to remove the pop up from the screen D4993_1 OTHER INFORMATION FUEL GENE...

Страница 108: ...he operation If no Fix is available to provide date information a warning box appears The Port Name is that supplied by the Gold Chart cartridge The Tidal Heightgraphisautomaticallyscaled Thecursor re...

Страница 109: ...n bar Using trackpad left right move the cursor to the desired time of day The Cursor box shows the Tide Height for that particular Date Time 4 Select TODAY to return to current Date Time CURSOR TIME...

Страница 110: ...pictorial representation Figure 5 20 Tidal Heights Sun Moon Data Display 2 Select TIDAL HEIGHTS or press CLEAR to return to the Tidal Heights data SUN RISES 04 18 SETS 19 13 TODAY DATE 10 07 04 TIME 0...

Страница 111: ...l Current Display D4978_1 TIDAL CURRENT ENTER FOR TIDAL INFORMATION CLEAR OR MOVE CURSOR QUITS MAX CURSOR TIME 04 30 SET 350 DRIFT 1 1Kts TODAY DATE 10 07 04 TIME 01 15 10 TIDAL CURRENT SLACK 12 02 05...

Страница 112: ...separate box shows corresponding SLACK figures This data corresponds to the selected Date Time 3 To return to chart display press CLEAR To display the Tidal Current data for a particular Date 1 Press...

Страница 113: ...RISES 04 18 SETS 19 13 TODAY DATE 10 07 04 TIME 01 16 56 MOON RISES 04 50 SETS 19 45 MOON PHASE FIRST QRT IN 7 DAYS NANTUCKET HARBOR D4980 3 TIDAL CURRENT PREVIOUS DAY TODAY NEXT DAY TIME 2 0 03 0 32...

Страница 114: ...ent position as a temporary waypoint with an MOB symbol which replaces any current active waypoint and route Displays the MOB data box showing the bearing and range to the MOB position the elapsed tim...

Страница 115: ...Indicates Arrival The vessel has arrived at the active waypoint it has either reached the arrivalcircle the radius ofwhichis specified or has reached its closest point of approach defined by a line pa...

Страница 116: ...106 RC400 GPS Chartplotter...

Страница 117: ...chas chafing cutsornicks Check that the cable connectors are firmly attached and that the con nections to the vessel s DC power are clean and tight Ensure that the cartridge cover is always fitted cor...

Страница 118: ...Three types of reset are available for the Chartplotter Power On Reset When you turn the display unit off then on again the screen reverts to the chart display with all windows cleared Hardware Reset...

Страница 119: ...nnectionsaretight and free from corrosion 2 Check polarity of the DC power cables for proper connection Reconnect cables if necessary 3 Check in line fuse Replace if necessary 4 Check vessel s power b...

Страница 120: ...ory key words or phrases If the answer you are seeking is not available click the Ask Raymarine tab to submit your own question to our technical support staff who will reply to you by e mail In the US...

Страница 121: ...ymarine unit should develop a prob lem please contact your authorized Raymarine dealer for assis tance The dealer is best equipped to handle your service requirements and can offer timesaving help in...

Страница 122: ...handles inquiries concerning installation operation fault diagnosis and repair For technical helpdesk contact Tel 44 0 23 9271 4713 Fax 44 0 23 9266 1228 Accessories and Parts Raymarine accessory item...

Страница 123: ...Input from ship s battery 10 0VDC to 18 0VDC 12VDC nominal Controls 7 defined keys and trackpad Display type TFT LCD Display 320 x 240 pixels VGA color portrait Interfaces Power NMEA NMEA 0183 receive...

Страница 124: ...aypoints in more than one route NMEA Data GPS Time to first fix Cold start Warm start Hot start Typically 3 min 4 min max Typically 60 seconds Typically 8 seconds GPS Position accuracy 15m RMS 5m with...

Страница 125: ...stimated Time of Arrival GPS Global Positioning System HDOP Horizontal Dilution Of Precision The multiplicative factor that modifies ranging error It is caused solely by the geometry between your vess...

Страница 126: ...116 RC400 GPS Chartplotter...

Страница 127: ...ext 41 Cigarette Lighter Adapter 8 16 18 COG Vector 40 Connectors NMEA 16 Power 16 Contrast Level 22 Cursor 2 Customer Service 110 D Database Lists 4 Date 34 Dedicated Keys 3 Depth Contours 42 Depth U...

Страница 128: ...and Routes 81 O Object Information 86 Operating Controls 1 Cursor 2 Dedicated Keys 3 Trackpad 2 Orientation 39 P Plotter Mode 39 Pop up Menus 4 Port Services 96 Position Calibration 42 Power cable 16...

Страница 129: ...me 34 Time Date Display 79 Trackpad 2 Tracks 83 85 Archiving 90 Clearing 85 Deleting from Archive 91 Interval settings 84 Loading from Archive 91 Setting up 83 SmartRoute 85 Troubleshooting 109 V Vari...

Страница 130: ...120...

Страница 131: ...returned to Raymarine or its approved national distributor with a copy of a Proof of purchase showing the date of purchase and the name of the seller of the product and the serial number of the affect...

Страница 132: ...ess for a particular purpose and ii all obligations of Raymarine for damages including but not limited to accidental consequential or special damages including punitive or multiple or any financial lo...

Страница 133: ...der Services Telephone 1 800 539 5539 Ext 2333 or 1 603 881 5200 Ext 2333 Customer Support Telephone 44 0 23 9271 4713 Fax 44 0 23 9266 1228 Technical Support Telephone 1 800 539 5539 Ext 2444 or 1 60...

Страница 134: ...Warranty...

Страница 135: ...3 96 100 49 mm front 2 76 70 00 mm 2 09 53 00 mm 3 91 99 36 mm 0 28 17 12 mm RC400 Mounting Template D6525 1...

Страница 136: ...Mounting Template...

Отзывы: