background image

i

Purpose

This handbook contains very important information on the installation,
operation, and maintenance of your new equipment. To get the best results
in operation and performance, please take the time to read this handbook
thoroughly.

RAY215E

The RAY215E is a VHF radiotelephone that, when outfitted with the
optional Full Function Handset, includes equipment for Class “D” Digital
Selective Calling. It is intended for general communication within the
Maritime Mobile Service worldwide and is for use on non-SOLAS vessels.

License

License

License

License

License

Regulations in some areas require that you obtain an operator license before
operating VHF radio equipment. It is your responsibility to determine
whether a license is required in your area before operating this equipment.

Maritime Mobile Service Identity (MMSI)

Maritime Mobile Service Identity (MMSI)

Maritime Mobile Service Identity (MMSI)

Maritime Mobile Service Identity (MMSI)

Maritime Mobile Service Identity (MMSI)

If outfitted with the optional Full Function Handset, the RAY215E includes
equipment for Class “D” Digital Selective Calling (DSC). An MMSI
number is required to operate the DSC features. In some areas, a radio
operator license is required before an MMSI number will be issued. You
can request an MMSI number from the same agency that issues radio
operator licenses in your area. You can then program the MMSI number
into your RAY215E using the operation described in this handbook. If
regulations in your area do not permit you to program the MMSI number
yourself, your Raymarine dealer can program the number for you.

Automatic 

Automatic 

Automatic 

Automatic 

Automatic TTTTTransmission Identification System (A

ransmission Identification System (A

ransmission Identification System (A

ransmission Identification System (A

ransmission Identification System (ATIS)

TIS)

TIS)

TIS)

TIS)

If needed, your RAY215E can activate the Automatic Transmission
Identification System (ATIS) feature for use in the inland waterways of
European countries that require automatic identification transmission. An
ATIS ID number is required to operate the ATIS feature. You can request
an ATIS ID number from the same agency that issues radio operator
licenses in your area. You can then program the ATIS number into your
RAY215E using the operation described in this handbook. If regulations
in your area do not permit you to program the ATIS number yourself, you
can have your authorized Raymarine dealer program the number for you.
If outfitted with the optional Full Function Handset, the RAY215E is
fully Class “D” DSC compliant and therefore may, by regulation, disable
ATIS when it is not required.

Содержание Ray215e

Страница 1: ...O w n e r s H a n d b o o k VHF Radio Ray215e...

Страница 2: ...RAY215E Modular VHF Radio Owner s Handbook Document number R49018_2 Date April 2002...

Страница 3: ......

Страница 4: ...MMSI number will be issued You can request an MMSI number from the same agency that issues radio operator licenses in your area You can then program the MMSI number into your RAY215E using the operat...

Страница 5: ...osure Antenna Mounting and EME Exposure Antenna Mounting and EME Exposure Antenna Mounting and EME Exposure Antenna Mounting and EME Exposure For optimal radio performance and minimal human exposure t...

Страница 6: ...iii United States Raymarine Inc 22 Cotton Road Unit D Nashua NH 03063 4219 USA Telephone 603 881 5200 800 539 5539 Fax 603 864 4756 Raymarine Inc 2001...

Страница 7: ...22 includes second station kit The products have been assessed to Conformity Procedure Annex IV of the Directive and by application of the following standard s EMC EN 60945 1997 Safety EN 60945 1997 T...

Страница 8: ...7 2 4 3 NMEA Data 2 8 2 4 4 Antenna Connections 2 8 2 4 5 Antenna Mounting Suggestions 2 9 2 4 6 Grounding 2 9 Section 3 Operation with Minimum Function Handset 3 1 Introduction 3 1 3 1 1 DSC and NME...

Страница 9: ...ction 4 1 4 2 Minimum Full Function Handset Priority 4 1 4 3 Handset Connections 4 2 4 4 Control and LCD Display 4 3 4 4 1 Controls 4 3 4 4 2 LCD Display 4 7 4 5 Radio Functions 4 9 4 6 Operating Proc...

Страница 10: ...6 19 ATIS Operation 4 40 4 7 Menu Operation 4 40 4 7 1 Selecting the Menu Operation 4 40 4 7 2 NAVSTAT Operation 4 41 4 7 3 DSC Operation 4 42 4 7 3 1 Selecting Distress Call Type NATURE 4 43 4 7 3 2...

Страница 11: ...ed memory channels MMSI Maritime Mobile Service Identity a number issued by each country to identify maritime stations NOAA National Oceanographic and Atmospheric Administration PTT switch Microphone...

Страница 12: ...marine VHF channels available in your RAY215E You should familiarize yourself with these tables to ensure proper channel usage 1 2 Equipment Features The RAY215E is designed and manufactured to provi...

Страница 13: ...tion Handset is NOT installed the unit is not a Class D DSC radio and will have only basic functionality You will not have access to DSC functions or NMEA GPS position data operation If ATIS is enable...

Страница 14: ...Power Optional Speaker NMEA Cable R49017 Mounting Yoke R49011 Yoke Knob R49012 Handbook RAY215E E49018 Sun Cover R49014 2 2 1 Optional Accessories The following is a list of options available for the...

Страница 15: ...he transceiver is NOT designed to be mounted in engine compartments Do NOT install the transceiver in a location where there may be flammable vapors such as in an engine room or compartment or in a fu...

Страница 16: ...st 9 of clear depth behind the panel is required CAUTION Make sure there are no hidden electrical wires or other items behind the desired location before proceeding Check that free access for mounting...

Страница 17: ...round the inside edge of the bezel to avoid water entry behind the console 8 Insert the radio into the cutout until the front bezel is flush with the console 9 From behind the console push the flush m...

Страница 18: ...2 5 Installation 170 6 69 106 4 17 140 5 51 25 1 195 7 68 223 8 78 80 3 15 139 5 47 9 0 35 9 0 35 Figure 2 2 Outline and Mounting Dimensions All dimensions are shown in millimeters and inches...

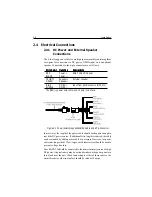
Страница 19: ...power NMEA input and an optional speaker Connections to the 6 pin connector are as follows Figure 2 3 Power External Speaker NMEA Cable and 6 Pin Connector In most cases the length of the power cable...

Страница 20: ...power up but no damage will occur Check the polarity with a VOM Voltage Ohm Meter and reconnect observing correct polarity If the fuse ever needs replacement be sure to use the same type and rating 2...

Страница 21: ...onnector block is shown in the diagram below For specific instructions how to connect your particular GPS please refer to the handbook that came with that device Note For non differential GPS all retu...

Страница 22: ...VHF transmission is essentially Line of Sight mount the antenna at the highest possible location on the vessel and free of obstruction to obtain maximum range If you must extend the length of the coax...

Страница 23: ...2 10 Installation Figure 2 6 Typical Grounding Method...

Страница 24: ...tion Handset Priority When both a Minimum Function Handset and Full Function Handset are in use only one can have priority to make a call When the Full Function Handset is out of its cradle it has pri...

Страница 25: ...ear the base station using the optional Handset Relocation Kit part number E46026 which is available from your authorized Raymarine dealer distributor The Relocation Kit must be connected to the HANDS...

Страница 26: ...o seconds CH Channel Selection Knob This knob selects the active channel Turning the knob clockwise increments the channel number Turning the knob counterclockwise decrements the channel The knob is a...

Страница 27: ...vailable channels The SCAN indicator illuminates on the LCD When at least one channel has been programmed into memory pressing and releasing SCAN MEM causes the MEM and SCAN indicators to flash for 3...

Страница 28: ...between the handset on the base station and an optional remote Full Function Handset Press PTT to converse with the other station DSC PRI Key Pressing and releasing the DSC PRI key by itself has no e...

Страница 29: ...operates only when an optional Second Station Full Function Handset which enables Class D DSC functionality is also installed PTT Key Pressing the PTT Push To Talk key enables the radio s transmitter...

Страница 30: ...elected MULTI indicator Appears when the radio is in the Multi Call mode or a Multi Call channel is selected TX indicator Appears during transmission 1W indicator Appears when the current transmission...

Страница 31: ...bar graph ATIS indicator Appears when the ATIS automatic identification transmission feature is active 3 5 Operating Procedures 3 5 1 Turning the Power On Rotate the VOLUME PWR knob clockwise to turn...

Страница 32: ...H No CH No Designator Designator Designator Designator Designator TX RX MHz TX RX MHz TX RX MHz TX RX MHz TX RX MHz Use Use Use Use Use UK 1 M1 37C 157 850 157 850 Pleasure Boat 2 M2 161 425 161 425 P...

Страница 33: ...ress the 16 key to switch to the Priority Channel 16 3 5 7 Setting the Frequency Mode The RAY215E can transmit and receive on all available International marine VHF radiotelephone channels With a soft...

Страница 34: ...he RAY215E can store any International or US channel if the optional US channel set has been programmed The stored channels are the ones scanned in the Memory Scan mode To store a channel in memory se...

Страница 35: ...mes scanning SCAN is displayed on the LCD while the Scan mode is active If the SCAN MEM key is pressed again while SCAN is flashing the All Scan Standby state is suspended and the unit returns to the...

Страница 36: ...tional mode Tri Watch monitors the selected working channel Channel 16 and the last used Multi Call channel To start Tri Watch initiate the Dual Watch mode and then press the MULTI key The MULTI indic...

Страница 37: ...channel is displayed Use the UP DOWN key on the handset or Channel Selection CH knob to increment decrement through the Multi Call channels in memory When exiting Multi Call the last used channel is...

Страница 38: ...s turned on The alarm is required by safety regulations and cannot be disabled However the NMEA indicator will not light nor will the alert tone sound if no Full Function Handset is installed Operatio...

Страница 39: ...edicated DSC channel for Marine VHF For a Distress call transmission your RAY215E takes the position and time information from the input NMEA data along with your Maritime Mobile Station Identifier MM...

Страница 40: ...e Identity MMSI number in the RAY215E before the DSC system will be operational You can request an MMSI number when you apply for a radio license if your country allows you to enter an MMSI number you...

Страница 41: ...annot be changed except by Raymarine factory representatives 8 If the number is verified as correct press and hold the DSC PRI key for 2 seconds and a tone sounds Your MMSI number has now been stored...

Страница 42: ...all That way that channel will already be displayed when the radio prompts for a working channel after the MMSI has been selected Note Only simplex channels those which are transmitted and received on...

Страница 43: ...as many times as required until the number is entered correctly 9 When the MMSI number is verified as correct press and hold the DSC PRI key for 2 seconds to verify Note The operation is cancelled if...

Страница 44: ...hip or station 13 If the target station acknowledges a tone sounds and ACK illuminates on the LCD After 2 seconds the RAY215E switches to the previously selected working channel or If the call is not...

Страница 45: ...p s MMSI number the radio prompts you for the working channel to communicate on The large character display shows the last used channel number and a W appears in the small channel display 6 Using the...

Страница 46: ...nel display the DSC indicator illuminates and in appears in the small channel display to designate individual call 2 Press and release the DSC PRI key The DSC indicator appears 0 is displayed in the l...

Страница 47: ...MMSI press DSC PRI 11 If you wish to assign a different letter to the Other Ship s MMSI rotate the Channel Selection Knob until the desired letter is displayed 12 Press DSC PRI to store the MMSI numb...

Страница 48: ...e unit automatically switches to DSC mode TX flashes on the LCD and one of the following categories of Individual Ship s Calls flashes in the small number display Ir for ROUTINE Individual Ship s Call...

Страница 49: ...s channel 16 Sending an All Ships Call 1 Press and release the DSC PRI and D L I C keys simultaneously to enter the DSC mode 2 Rotate the Channel Select CH knob on the front panel to select the desire...

Страница 50: ...Handset can only receive Group Calls You must use the Full Function Handset to send a Group Call If you are currently on a selected working channel or private channel in the Monitor mode or in the Sca...

Страница 51: ...second 3 When the countdown has completed the radio enters the DSC mode and sends the digital information at high power Once transmitted the radio monitors channel 70 for a Distress acknowledge but al...

Страница 52: ...eceiving a non DSC call 1 When receiving a calling signal the unit sounds the DSC tone and enters the DSC mode A d flashes in the small channel display for Distress 2 Press the DSC PRI key The radio a...

Страница 53: ...tinguished indicating the unit has exited the DSC mode The alert tone continues to sound until DSC PRI is pressed to accept the call or 16 key is pressed to exit the DSC mode You should attempt to con...

Страница 54: ...Press and hold the DSC PRI and D L I C keys simultaneously for 2 seconds Atone sounds and two dashes appear in the large character display 2 Press and release MON 1 25 key The ATIS indicator appears 0...

Страница 55: ...ept by Raymarine representatives 8 If the number is verified as correct press and hold the DSC key for 2 seconds and a tone sounds YourATIS ID number has now been stored in memory 9 If the number is i...

Страница 56: ...umeric keypad Dedicated keys for Individual and All Ships DSC calls DSC distress calls that describe the type of distress Send and receive DSC Group Calls Expanded ship and shore phonebooks for making...

Страница 57: ...ou should install the base station in the radio operation room or the location from which the ship is normally navigated If a Second Station Full Function Handset is also installed that handset is the...

Страница 58: ...e This Full Function Handset is also used with Raymarine radios that have additional features As a result the yellow Function labels POWER 16 key CELL 3 key HAIL key and FOG key represent features tha...

Страница 59: ...UP DOWN SCROLL key Increases or decreases the squelch sensitivity Pressing the UP key increases the squelch while the DOWN key decreases it The number of segments in the SQ bar graph on the LCD displ...

Страница 60: ...er 5 When an alphanumeric response is appropriate each press of this key alternately inputs the characters 5 J K then L Pressing the FUNC key followed by the 5 PRIV key switches to the Private Channel...

Страница 61: ...by the 0 IC key starts Intercom mode which enables conversation between the Minimum Function Handset connected to the port on the front of the base station and a Full Function Handset connected to the...

Страница 62: ...ormal operation places the radio inTransmit mode and displays the TX indicator in the LCD When the key is pressed in various function modes the assigned operation is initiated Note After 5 minutes of...

Страница 63: ...nal frequency group is selected 1Windicator Displayed when the transmission power of 1W is selected with the 9 1 25 key or when a low power channel is selected DESENS indicator Displayed during the de...

Страница 64: ...among two frequency groups International and US available only with a software upgrade 2 Receiving the Weather Channels Optional The RAY215E can programmed to receive 10 NOAA weather channels and will...

Страница 65: ...y over the Minimum Function Handset When the Full Function Handset is in the cradle the Minimum Function Handset has priority and BASE appears on the handset s LCD If you need to make an emergency cal...

Страница 66: ...ound at maximum volume regardless of whether the external speaker is switched on or off Note The external speaker is included with the Second Station Full Function Handset kit but not the Single Stati...

Страница 67: ...hannel number remains the same as was selected in the previous group as long as that number is present in the new group If a channel number is absent in the destination group the new channel will be t...

Страница 68: ...hile the Weather Channel is active the WX indicator appears in the LCD display and the frequency group indicator disappears If the channel number is changed while in the Weather mode the new channel n...

Страница 69: ...private channel s that are approved for your country Note While using the Private Channel selecting a new Working Channel or pressing the CLR key returns operation to the Working Channel Priv Priv Pri...

Страница 70: ...t the private channel number on the keypad For 5 seconds the channel number flashes on the LCD display If the ENT key is pressed during this flashing phase or the 5 seconds elapse without pressing ano...

Страница 71: ...nel to be stored Press and release the FUNC key then press and hold the 8 M CALL key for 3 seconds The MULTI indicator appears when the registration is complete Deleting a Channel from Multi Call From...

Страница 72: ...the 7 D L key While the desensitize function local mode is active the DESENS indicator appears in the LCD display To return to full receiver sensitivity distant mode again press the FUNC 7 D L key com...

Страница 73: ...ress FUNC followed by 0 IC Making a Call from the Base Station 1 Press and hold the D L I C key to enter Intercom mode IC appears on the large channel display While calling REMOTE flashes on the small...

Страница 74: ...l Channel Scan and Memory Channel Scan TheAll Channel Scan function searches all channels within the same frequency group The Memory Channel Scan searches only the channels stored in memory in the sam...

Страница 75: ...D Before the 3 seconds elapse press the 2 SCAN key again to begin All Scan If the 3 seconds elapse before you press the 2 SCAN key the radio will enter Memory Scan Pressing FUNC followed by 2 SCAN key...

Страница 76: ...monitor the severe weather broadcast To start Tri Watch mode select the Working Channel or Private Channel and then press the FUNC key followed by the MON TRI key The Working Channel appears on the 7...

Страница 77: ...If positional data that was previously detected becomes invalid or is no longer detected the radio monitors the NMEA line for 1 minute for it to be restored If a signal is restored on the NMEA line an...

Страница 78: ...an All Ships Call 4 Transmitting Receiving a Distress Call 5 Receiving a Distress Relay Call DSC transmission and reception occurs on Channel 70 When the DSC signal is received the unit quickly switc...

Страница 79: ...ss the INDV key Ind appears on the 7 segment display and the DSC indicator is displayed Pressing the SQ UP DOWN key alternates between SHIP and SHORE INDV Alternates with each click of the SQ UP DOWN...

Страница 80: ...UT Input the 9 digit MMSI number with the numeric keypad then press the ENT key ENT numeric keypad Flashing Flashing 5 Specify the Working Channel with the SQ UP DOWN keys and press the ENT key ENT SQ...

Страница 81: ...ompt to press the PTT key appears once more After 15 seconds elapses without pressing the PTT key following the prompt operation returns to the state before the call NO ACK Scrolls every second 3 min...

Страница 82: ...by scrolling with the SQ UP DOWN keys and pressing the ENT key ENT SQ UP DOWN ENT Use SQ UP DOWN key to scroll through list of MMSI nicknames Press ENT when desired selection is displayed Note The Fu...

Страница 83: ...d after pressing the PTT key a receive confirmation message is displayed After 5 seconds have elapsed the channel is shifted to a communication channel and the Individual Call is completed ACK 5 sec I...

Страница 84: ...ese 3 minutes the radio places the incoming call into the DSC log and reverts to the operation mode that was active before the Individual Call was received The DSC indicator continues to be flashed on...

Страница 85: ...oup MMSI number as outlined in Section 4 7 3 4 4 When GROUP appears press the ENT key GrP appears on the 7 segment display and the registered Group MMSI number appears on the dot matrix display INDV E...

Страница 86: ...er the ENT key or the CLR key are pressed the prompt is flashed at 1 second intervals and is accompanied by an alarm for up to 3 minutes If neither ENT nor CLR are pressed during these 3 minutes the r...

Страница 87: ...FETY and URGENCY As with any DSC operation the call is made on channel 70 Then after theAll Ships Call is sent or received the radio automatically selects channel 16 To send an All Ships Call 1 Press...

Страница 88: ...stored in the log If CLR is pressed the radio reverts to the mode before receiving the All Ships Call and the contents are stored in the log ENT If CLR is pressed the radio reverts to the mode before...

Страница 89: ...the key for the full 5 seconds the DISTRESS call is cancelled 3 After the countdown has completed the message RELEASE appears on the dot matrix display Release the DISTRESS key The unit switches to ch...

Страница 90: ...lert tone by pressing the CLR key for one second Pressing CLR only turns off the alert sound it does not interrupt the Distress call Specified Distress Call You can assign one of eleven distress types...

Страница 91: ...the list with the SQ UP DOWN keys When the appropriate message is displayed press the ENT key On the dot matrix display appears the distress type plus a message prompting you to press and hold the DI...

Страница 92: ...wledged along with the sending station s MMSI number The message and alert are repeated until the CLR key is pressed When the CLR key is pressed the unit exits the DSC mode and continues monitoring Ch...

Страница 93: ...y and the DSC Distress alert is sounded On the dot matrix display are scrolled RECEIVED RELAY the MMSI number of the station making the call DISTRESS the type of distress the MMSI number of the ship i...

Страница 94: ...and Group Calls RELAY for Relay Distress Calls 3 When the desired log appears press ENT to accept The log number appears next to the log type beginning with 0 the latest entry 4 Press the SQ UP DOWN...

Страница 95: ...u Operation The menu operation is used for making various settings and confirming the current state The operation is roughly divided in three functions as follows Function Function Function Function F...

Страница 96: ...lowed by the MENU key to initiate the Menu operation 2 Select NAVSTAT and press the ENT key The following five items are automatically displayed at 3 second intervals in the following order 1 Latitude...

Страница 97: ...the MENU key to initiate the Menu operation 2 Select DSC and press the ENT key The 7 segment display shows dSC and the dot matrix display shows L L ENT The DSC Main Menu is made up of NATURE L L ENT P...

Страница 98: ...on above select the DSC operation NATURE 2 Press the ENT key to initiate the process The 7 segment display shows nAt and the dot matrix display shows FIRE 3 Use the SQ UP DOWN key to select the type o...

Страница 99: ...previous subject item SQ UP For Latitude alternates between N and S DOWN key For Longitude alternates between E and W For UTC no effect 3 The subject items can be changed in the following order Numeri...

Страница 100: ...press 5 press 7 press ENT press 0 press 7 press ENT press 2 press 0 press ENT press 1 press ENT press ENT press ENT press ENT press ENT Flashing Flashing Flashing Flashing Flashing Flashing Flashing F...

Страница 101: ...eration PHNBOOK 2 Press the ENT key to initiate the process The 7 segment display shows Phb and the dot matrix display shows SHIP ENT 3 Use the SQ UP DOWN key to select between SHIP or SHORE 4 Press t...

Страница 102: ...ances to the next digit s place To go back by 1 digit press the CLR key 2 To enter the nickname use the numeric keys 0 through 9 to input the associated alpha or numeric value The currently selected l...

Страница 103: ...ected the oldest MMSI number or nickname flashes on the dot matrix display 1 Follow instructions in Section 4 7 3 3 Modifying the MMSI Number List PHNBOOK to enter the phonebook 2 When SHIP is display...

Страница 104: ...2 When SHORE is displayed press the ENT key SHO appears on the 7 segment display while on the dot matrix display shows ENTRY 3 The ENTRY selection is used to register add an item to the list Press th...

Страница 105: ...lashing character After inputting the desired letter or numeral press the ENT key to submit the entry and proceed to the next place To go back by 1 digit press the CLR key 3 When the message CONT Y ap...

Страница 106: ...he deletion and exit the Menu operation To exit without deleting press the SQ UP DOWN key until DEL N is displayed If the list has no stations entered the message PHNBOOK IS EMPTY HOLD DOWN CLR KEY is...

Страница 107: ...as been filled the message CONT Y appears Press ENT to register the group and exit the Menu operation To exit without registering press SQ UP DOWN until DEL N is displayed Press the ENT key and operat...

Страница 108: ...S function ON or OFF Note The ATIS selection only appears if this option has been enabled by the dealer 4 Select the desired operation and press the ENT key to submit your selection ENT 4 7 4 1 Settin...

Страница 109: ...eys Action Action Action Action Action 0 9 keys Changes the flashing numeric value then advances to the next digit s place ENT key Advances the flashing subject item to the next one without changing t...

Страница 110: ...ep 1 10 Press ENT to verify The message ENT STORE CLR EXIT is displayed 11 Press ENT one last time to register the ATIS number in memory Operation returns to the mode before the Menu operation began T...

Страница 111: ...bled Pressing the INDV ALL SHIP and DISTRESS keys will only sound an error alert 1 Press the FUNC key followed by the MENU key to initiate the Menu mode Mn appears on the 7 segment display and NAVSTAT...

Страница 112: ...NT key The message ENT ACCEPT CLR EXIT scrolls across the display 8 Press the ENT key to submit the number The message ENTER MMSI NO AGAIN is displayed 9 Press ENT The nine underscore placeholders app...

Страница 113: ...4 58 Operation with Full Function Handset Flashing Flashing Flashing ENT ENT Input MMSI number using numeric keypad ENT ENT ENT re enter MMSI No ENT ENT...

Страница 114: ...nd ATIS OFF appears on the dot matrix 3 Press the SQ UP DOWN key to toggle between ATIS ON and ATIS OFF 4 After selecting the desired operation press the ENT key 5 If the setting is acceptable press t...

Страница 115: ...4 60 Operation with Full Function Handset...

Страница 116: ...air Accessories and Parts Raymarine accessory items and parts are available through your authorized Raymarine dealer Please refer to the lists of component part numbers and optional accessories in Sec...

Страница 117: ...Service may also obtained by returning your unit to Raymarine s Product Repair Center at the address below Raymarine Inc Product Repair Center 22 Cotton Road Unit D Nashua NH 03063 4219 On the Intern...

Страница 118: ...band Frequency Stability 10PPM 0 001 20 C to 50 C Frequency Range 156 025 to 157 425MHz Channel Spacing 25 kHz Increments Power Output 25 Watts switchable to 1 Watt into 50 Ohms at 13 6 VDC Modulation...

Страница 119: ...into 4 Ohm load internal Hum Noise in Audio Less than 40dB 5 3 3 Operating Requirement Input Voltage 13 6 VDC 15 11 6 to 15 6 VDC Current Required Typical 6 amp at 25 Watts Transmit Typical 2 amp at 1...

Страница 120: ...1 inches Weight Approx 138 g 0 30 lbs Optional FFHS Cradle Height 50 mm 1 97 inches Width 64 mm 2 52 inches Length 102 1 mm 4 02 inches Weight Approx 70 g 0 15 lbs without cables Optional FFHS Extern...

Страница 121: ...5 6 Maintenance This page intentionally left blank...

Страница 122: ...5 7 Maintenance 5 4 Drawings Assembly Drawing...

Страница 123: ...5 8 Maintenance Block Diagram RF PCB...

Страница 124: ...5 9 Maintenance Control PCB...

Страница 125: ...5 10 Maintenance Front PCB Microphone PCB...

Страница 126: ...Movement Hi Lo 13 156 650 156 650 Intership Navigation Safety Hi Lo 14 156 700 156 700 Port Operations Ship Movement Hi Lo 15 1 1 1 1 1 156 750 156 750 On Board Communications Intership Lo Only 16 156...

Страница 127: ...t Operations Ship Movement 66 156 325 160 925 Public Correspondence Marine Operator Hi Lo Port Operations Ship Movement 67 156 375 156 375 Intership Port Operations Hi Lo 68 156 425 156 425 Port Opera...

Страница 128: ...ternational frequency mode is not legal for use while operating in US waters The TX RX frequencies available in International frequency mode were agreed upon by the attending countries at the 1968 ITU...

Страница 129: ...nly 16 156 800 156 800 International Distress Safety and Calling Hi Lo 17 3 3 3 3 3 156 850 156 850 State Controlled Lo only 18A 156 900 156 900 Commercial Hi Lo 19A 156 950 156 950 Commercial Hi Lo 2...

Страница 130: ...X Power Channel Frequency MHz Number TX RX 66A 156 325 156 325 Port Operations Hi Lo 67 1 1 1 1 1 156 375 156 375 Commercial Bridge to Bridge Intership Lo only 68 156 425 156 425 Non Commercial Hi Lo...

Страница 131: ...61 775 Weather Receive only 0 163 275 Weather Receive only Important Notice The US National Oceanic and Atmospheric Administration NOAA broadcasts continuous weather reports and severe weather alerts...

Страница 132: ...Ltd Anchorage Park Portsmouth Hampshire England PO3 5TD 44 0 23 9269 3611 44 0 23 9269 4642 fax www raymarine com Raymarine Inc 22 Cotton Road Unit D Nashua NH 03063 4219 USA 603 881 5200 603 864 475...

Отзывы: