background image

180

E-Series Networked Display Reference Manual

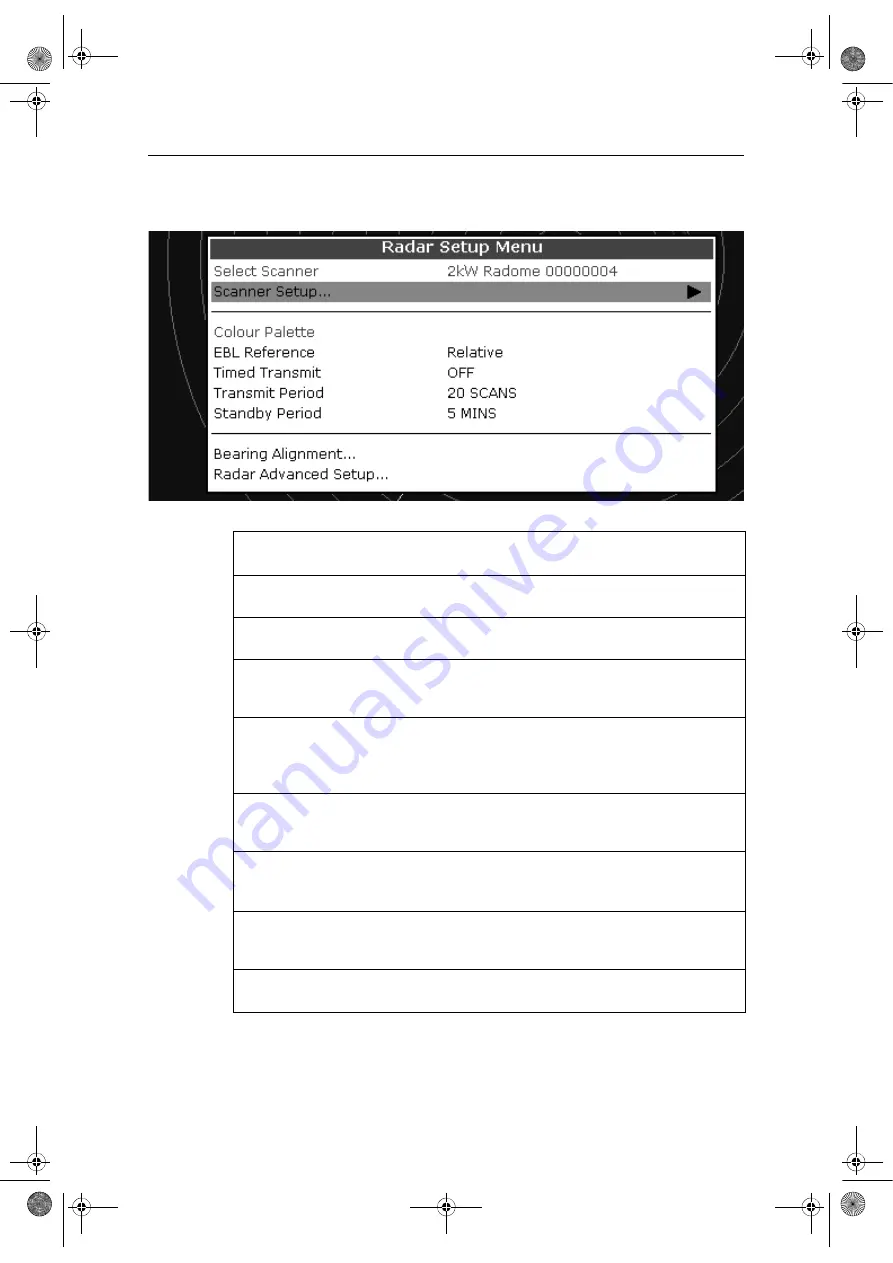
1. Select 

MENU

2. Select 

Radar Setup


Function

Description

Options

(Default in 

bold

)

EBL Reference

The EBL gives you a bearing to a target on the Radar display window.

Mag/True

Relative

Timed Transmit

Controls the radar’s timed transmission power-save mode.

OFF

ON

Transmit Period

When ON, the scanner performs the number of scans specified and then 
shuts down for the number of minutes specified by the Standby Period.

10 scans

20 scans
30 scans

Standby Period

Indicates the number of minutes that the system shuts down - the scan-
ner does not rotate and the display is in standby mode.

3 minutes

5 minutes
10 minutes
15 minutes

Sea Clutter Curve...

Adjusts the acuteness of the sea clutter curve when the sea clutter 
option is set to manual (see 

page 152

).

1-8

Antenna Size

If an open array scanner is fitted, this specifies the size of the scanner.

Open array
48”
72”

Bearing alignment

Correct for display azimuth error.
Please refer to the E-Series installation guide.

Radar Advanced Setup

Please refer to the E-Series installation guide.

81244_4.book  Page 180  Thursday, January 31, 2008  1:53 PM

Содержание E-Series

Страница 1: ...E Series Networked Display Reference Manual Document number 81244_4 Date January 2008 81244_4 book Page i Thursday January 31 2008 1 53 PM...

Страница 2: ...r parts thereof W3C SOFTWARE NOTICE AND LICENSE http www w3 org Consortium Legal 2002 copyright software 20021231 1 The full text of this NOTICE in a location viewable to users of the redistributed or...

Страница 3: ...language date time format and units of measurement 16 Selecting a page set 17 Selecting an application page 17 Selecting an application window 18 Adjusting the display lighting 19 2 7 Using CompactFla...

Страница 4: ...ng a waypoint 41 Erasing a waypoint s 42 Changing the default symbol or group 43 3 7 Sorting the waypoint list 44 3 8 Organizing waypoints into groups 44 Displaying the waypoint group list 44 Making a...

Страница 5: ...est 65 Displaying an aerial photo overlay 66 Displaying vessel identity AIS 68 4 8 Measuring distances and bearings 69 from your boat 69 between two points on your chart 69 4 9 Navigating to a specifi...

Страница 6: ...track 98 4 17 Defining how the chart windows are presented 99 Working with multiple chart views 99 Setting the orientation of the chart 100 Setting the motion mode 101 4 18 Altering the level of chart...

Страница 7: ...the 3D chart 117 5 7 Other 3D controls 118 Soft keys 118 5 8 Changing the mode 119 Active motion mode 119 Planning mode 119 5 9 Changing the view 120 View options 120 Multiple views 120 Vessel offset...

Страница 8: ...ew a live image 134 A SCOPE modes 135 6 7 Range control 135 Changing the range 135 Range shift 136 6 8 Presentation toolbar 136 Adjusting gain and power 136 Auto gain settings 137 Manually set gain le...

Страница 9: ...g the range rings 160 Changing the bearing mode for EBLs 160 7 7 Getting the best picture 160 Using the GAIN functions 160 Using the enhance echoes softkey functions 163 7 8 Changing the displayed ran...

Страница 10: ...1 Operation modes 191 Other vessels or objects 191 Factors affecting echo strength 192 8 6 Using waypoints with the radar 192 8 7 Radar display options 192 Orientation 192 Setting the motion mode 194...

Страница 11: ...g a data application 213 9 3 Selecting the data for display 214 Pre configured data panels 214 Customize the panels 215 Chapter 10 Autopilot Control 219 10 1 Emergency disengage 219 10 2 Enabling and...

Страница 12: ...Course Deviation Indicator 235 13 1 Introduction 235 13 2 The CDI screen 235 Steering instructions 236 13 3 Selecting the CDI application 236 13 4 Modifying the CDI application 236 Chapter 14 Weather...

Страница 13: ...isplaying marine watchboxes 250 Displaying watchbox data 250 14 11Weather application setup 251 Selecting the Weather Setup Menu 251 Weather Setup options 251 Showing hiding marine watchboxes and zone...

Страница 14: ...ew 259 16 2 Setting up Navtex weather 259 16 3 Incoming message alerts 259 16 4 Viewing messages 260 Displaying the Navtex Message List 260 Displaying and scrolling through a message 260 16 5 Managing...

Страница 15: ...t setting 277 18 3 Changing the databar 277 Databar position 277 Data bar size 279 Compass bar 279 Turning the compass bar on and off 280 Compass bar setup 280 Customizing the contents of the data bar...

Страница 16: ...nd how to solve them 299 19 5 Getting Technical Support 302 Help us to help you 303 World wide web 304 Contacting Raymarine in the US 304 Contacting Raymarine in Europe 305 For Navionics cartography 3...

Страница 17: ...the user s responsibility to exercise common prudence and navigational judgement This device should not be relied upon as a substitute for such prudence and judgement WARNING Product installation Thi...

Страница 18: ...display unit whilst power is switched on Doing this may result in irreparable damage CAUTION UV Light ToprovideprotectionagainstthedamagingeffectsofUVlight itisadvisable to replace the sun cover provi...

Страница 19: ...contained within the Service and neither WSI nor Sirius shall be responsible for inaccurate omitted delayed or erroneous information Subscriber further acknowledges and agrees that the Service may be...

Страница 20: ...HER CAUSE OF ACTION RELATING TO THE PERFORMANCE OR NON PERFORMANCE OF THIS AGREEMENT THIS ALLOCATION OF RISK AND THE DISCLAIMER OF WARRANTIES IN THIS AGREEMENT ARE REFLECTED IN SIRIUS SERVICE PRICES A...

Страница 21: ...knowledge the technical information contained within this handbook was correct at the time of printing However Raymarine cannot accept liability for any inaccuracies or omissions it may contain In add...

Страница 22: ...the appropriate level of detail for the geographic area you wish to navigate are required The charts are available in electronic format on Navionics Chart cards A chart card provides an appropriate l...

Страница 23: ...al dealer national distributor or Raymarine Technical Services for information on product disposal Warranty To register your new Raymarine product please fill out the warranty card included in the box...

Страница 24: ...viii E Series Networked Display Reference Manual 81244_4 book Page viii Thursday January 31 2008 1 53 PM...

Страница 25: ...ndix 1s and to other SeaTalk instruments within the system For more detail on system integration please refer to the Installation Guide CANCEL OK RANGE IN OUT PAGE ACTIVE WPTS MOB MENU DATA CANCEL OK...

Страница 26: ...where you are going Record where you have been Navigate to a specified position waypoint Build and navigate routes View details of nearby features services View details of boats equipped with AIS Dist...

Страница 27: ...gate to a specified position waypoint View details of boats equipped with AIS VRM EBL GAIN TARGETS DISPLAY PRESENTATION TARGET TRACKING 6nm North Up Relative Motion Rings 1nm D7375 2 D7376 1 View data...

Страница 28: ...pter 17 Pilot Control Chapter 10 Sirius audio Chapter 15 Whilst not applications in their own right waypoints AIS Pilot control Sirius Audio are handled at system level and are covered in separate cha...

Страница 29: ...n use the simulator Before installation Simply connect the display to a 12V DC power supply fused at 1 amp by attaching the red core from the power lead to positive and the black core to negative Afte...

Страница 30: ...6 E Series Networked Display Reference Manual 81244_4 book Page 6 Thursday January 31 2008 1 53 PM...

Страница 31: ...F Power ON Press the POWER button untilthe introductory logo isdisplayed The keys light up and after a few seconds an application page and a navigation warning and weather data disclaimer is displayed...

Страница 32: ...to return to multiple windows PAGE Press to scroll through available pages Press and hold to select different page set or customise your own layout WPTS MOB Press to display the waypoint soft keys Pre...

Страница 33: ...UP DEFAULT SYMB GROUP D7364 2 WPTS MOB PAGE ACTIVE MENU DATA Example The example above shows the series of button and soft key presses required to change the waypoint default symbol or group Access sy...

Страница 34: ...ease see Appendix C 2 For details of how to temporarily hide the cursor please see page 293 2 4 Displaying applications The variousapplicationsthat make upyour E Seriessystem are displayed in aseries...

Страница 35: ...d Gives information associated with your boat or the environment Customisable content Vertical or horizontal format Display or hide Normal or large size Data bar Contain information you have added to...

Страница 36: ...PS Status Compass Setup AIS Layer Status System Setup Alarm Setup Display Setup Databar Set Select Page Setup System Diagnostics Remove CF Card D8500_1 Setup Chart Setup GPS Status Compass Setup Carto...

Страница 37: ...is not case sensitive e g WAYPOINT 1 Waypoint 1are con sidered to be the same name 2 If you need to use special or accented characters e g the Extended Character Set should be switched to ON in the Sy...

Страница 38: ...status of your GPS FIX your unit is successfully connected to a GPS receiver NO FIX yourunithasbeenunabletoconnecttoasuitableGPSreceiver The scanner icon indicates the current status of your radar sca...

Страница 39: ...arm is active The Auto pilot is in Power Steer mode The Autopilot is in Wind Vane mode o The AIS icon indicates the current status of the AIS function AIS unit not available i e not connected or off A...

Страница 40: ...s powered on for the first time an alarm will sound and you will be asked to nominate which display is to be the data master For details of how to change the data master please see page 30 Setting the...

Страница 41: ...ular requirements and or you intend to use the engine monitor weather or video application refer to the Setup and Customizing chapter for details of how to customize both the layout and the applicatio...

Страница 42: ...associated soft keys Multiple to single window To make the active window full screen when multiple windows are being displayed Single to multiple windows To return to multiple windows Active window hi...

Страница 43: ...aysavesthecurrentpalettewhentheunitispoweredoff Ifthepalettewasset toNIGHT when it was last used and you then power on in bright sunlight it may be difficult to see the screen Reset the palette to DAY...

Страница 44: ...most from your display Their uses include Detailed cartographic information Obtain detailed cartographic information of the area that you navigate using Nav ionics chart cards To check the current av...

Страница 45: ...ater and consequent damage close the chart card door and press firmly until a click is heard Removing a card with the unit powered on 1 Select the CF Card Removal function IMPORTANT If you try to remo...

Страница 46: ...Managing data This section explains how you can manage the data contained in your E Series and includes the following Writing retrieving to a CF card Erasing information from a card Erasing informatio...

Страница 47: ...ing 3 Define data for saving ARCHIVE AND TRANSFER SAVE TO CARD DATA D8070_1 Insert card Toggle to required list D8655_1 Contents for selected list displayed SELECT LIST WPT RTE TRK ROUTE LIST Route 2...

Страница 48: ...options of retrieving as new replacing or cancelling the retrieving process ARCHIVE AND TRANSFER RETRIEVE FROM CARD DATA D9094_1 Insert card Toggle to required list D8655_1 Contents for selected list...

Страница 49: ...takes place 1 Insert the card and select the ERASE FROM CARD function 2 Select the required list 3 Define data to be deleted ARCHIVE AND TRANSFER ERASE FROM CARD DATA D8168_1 Insert card Toggle to req...

Страница 50: ...cting your waypoints If required you can prevent access to modification and sight of your waypoint and route databases and functions by means of a password Password confirmation When Password Protecti...

Страница 51: ...ord status to ON read and accept the warning 3 Enter a password and confirm it MENU D8954_1 Highlight required System Setup Menu Select System Setup Menu Highlight Waypoint Password Setup Select Waypo...

Страница 52: ...it Password Password Confirm Password Hint Choose a word that will help you to remember your password Repeat to confirm the password and or OK Carrot Edit Password Password Confirm Password Hint Choos...

Страница 53: ...hall display the hint There is no limit to the number of attempts to enter a valid password but if you forget your password you will need to perform a Settings D8958_1 Add a hint word 0 16 characters...

Страница 54: ...user created databases are managed by the data master The display that has been installed and nominated as the master should always be switched on preferably first The master display will copy its da...

Страница 55: ...tion Ruler settings Postion Mode TD Setup Simulator Bearing Mode MOB Data Type Variation Source Manual Variation Langauge Extended Charactor set Ground Trip Reset Settings Reset Settings and Data Rese...

Страница 56: ...MOBdatatypesetintheSystem SetUp see page 285 Assuming that your boat and the MOB are subject to the sametideandwindeffects deadreckoningnormallygivesamoreaccuratecourse Radar range change if radar is...

Страница 57: ...tion via in built alarms which are generated for the system as a whole or for individual applications When an alarm sounds a message box is displayed explaining the cause of the alarm You can specify...

Страница 58: ...y on SeaTalk generates alarms these will sound on your E Series display accompanied by a pop up message box You can cancel these alarms by pressing the ACKNOWLEDGE soft key The alarm will be silenced...

Страница 59: ...orm aroute If you have networkedseveral E Series Displays any waypoints that are created on one display are seen by all the other displays The details of all waypoints irrespective of the application...

Страница 60: ...s a waypoint is represented only when it is active displayed in a box Waypoints on Fishfinder windows When a waypoint is created it is represented on fishfinder windows by a vertical line labelled WPT...

Страница 61: ...tailsandeditthem ifnecessary For more information see page 39 and page 40 at the cursor at your vessel s position Ifthesystemcannotdetermineyourposition awarningisdisplayedandthewaypoint is not placed...

Страница 62: ...f required you can display navigation details for the active waypoint in the data bar see page 281 using the cursor To navigate to a waypoint using the cursor when a chart or radar application is acti...

Страница 63: ...point in the data bar see page 281 using the cursor To view the details of a waypoint that is not active Note Detailsofthewaypointthatyouarecurrentlynavigatingto canbeaccessedvia the waypoint list as...

Страница 64: ...of ways You can Change the waypoint details name symbol group or add a comment Move a waypoint Erase a waypoint Change the default symbol and group of newly placed waypoints D6560 2 Waypoint List D750...

Страница 65: ...y entering new coordinates If you know the new co ordinates bearing or range for the particular waypoint you canenterthisinformationbyeditingthewaypointasdescribedintheprevioussection by dragging the...

Страница 66: ...displayed If you attempt to erase a waypoint from a hidden route a warning message will be dis played 2 For details of erasing groups of waypoints see page 47 Erasing an individual waypoint You can er...

Страница 67: ...grouptobeselectedforthedefault itmustfirstbecreated see page 45 1 Select either the default symbol or group 2 Change the symbol or group default D8716 1 ARCHIVE AND TRANSFER ERASE FROM SYSTEM SELECT L...

Страница 68: ...lly placed in the default My Waypoints group when they are created In order to make your waypoints easier to manage you can organize them into groups of your choice Whenfishing forexample youmayonlywi...

Страница 69: ...ing Shallow fishing Reef fishing GROUP LIST e g D8293_1 MAKE NEW GROUP OK D8293_1 MAKE NEW GROUP OK Or EDIT GROUP NAME OK Edit name Save MAKE NEW GROUP MAKE NEW GROUP OK Make a new group and accept th...

Страница 70: ...D8298_1 OK Fishing GROUP LIST My Waypoints Waypoint 1 Waypoint 2 Waypoint 3 MOVE BETWEEN GROUPS GROUP A GROUP B SELECT GROUP B My Waypoints Deep fishing Shallow fishing Reef fishing GROUP LIST Move c...

Страница 71: ...display When you have placed many waypoints on your system it may become difficult to easilyinterpretchartorradarinformation Thisisparticularlythecaseifyouhavemany waypointsinasmallarea Thereareanumbe...

Страница 72: ...ations 1 Display the SHOW BY GROUP function 2 To change the status show or hide of a waypoint group Note Waypoints in an active route are always displayed regardless of whether the display is set to s...

Страница 73: ...analsobeusedtohelpyougain experience It is strongly recommended that before you use your chart application that you read and understand Chapter 3 Working with Waypoints CAUTION The equipment should no...

Страница 74: ...t card provides an appropriate level of detail and scale for a given geographic area Up to 6 Gold or 2 Platinum chart cards can be used in an E Series Networked system The maximum capacity Navionics c...

Страница 75: ...rovided to customize your chart application to your own particular requirements and circumstances You can Alter the way the chart is drawn in relation to your boat and the direction you are travelling...

Страница 76: ...on mode is suspended the mode is shown in the status bar in parenthesis e g RELATIVE MOTION zoom operates about your cursor position Provided the necessary data to ascertain your vessel s position is...

Страница 77: ...g moves the chart that is displayed to a different area To pan a chart simply press the appropriate arrow left right up down on the trackpad When thecursor reachestheedgeofthescreen thechartpans Note...

Страница 78: ...n the chart including source data for structures lines open sea areas etc Details of ports port and business services tidal and current information wrecks and obstructions Panoramic photos Aerial phot...

Страница 79: ...You can locate the nearest waypoint port port service tidal and current stations wreck or obstruction to the cursor position 1 Select position for the FIND NEAREST option 2 Select the feature or serv...

Страница 80: ...n the 24 hour period You can also choose to view the animation continuously or to step through it in increments of time you set To view tide and current animations In the Chart application 1 Highlight...

Страница 81: ...r backwards in time set the size of the step or select a date for the animation The animation plays in a loop when it reaches the end of a 24 hour animation period it starts again at the beginning To...

Страница 82: ...DATE softkey This displays the Edit Date screen and toolbar 2 Press OK to save the new date and return to the Tide Current Animation screen which will update to display the tide or current for the da...

Страница 83: ...the displayed date using the soft keys Displaying details of currents You can display details of currents by Selecting the appropriate current diamond see below or Via the FIND NEAREST function see pa...

Страница 84: ...e page 55 using the port search option The port search option allows you to specify the name a port and display its services 1 Select the edit name option 2 Enter the port name or the first few charac...

Страница 85: ...CT PORT GANDERS MARINE GANDERS BASIN Position Bearing and Range from selection 290 43 730N 840 58 957W Restaurants Travel Agencies Beauty Shops 3420 T 007nm GANDERS QUAY SELECT PORT GANDERS MARINE GAN...

Страница 86: ...ot Book Position 290 58 147N 0930 52 215W Utilities Banks Restaurants Bars Supplies Hookups Fuel Services for selected port displayed Select appropriate port symbol D8317_1 Highlight required service...

Страница 87: ...15W Book5 Chp6 Book5 Chp5 Pilot Book D8745_1 OBJECT INFO RAINBOW MARINA Photos Pilot Book Position 290 58 147N 0930 52 215W Highlight required book chapter Selected book chapter displayed VIEW PILOT B...

Страница 88: ...laced where the photo was taken and the angle of the shot is indicated by the camera symbol You can also access the photo from the port services information To display a panoramic photo D8262 1 D8263_...

Страница 89: ...witching on the DECLUTTER option via the PRESENTATION soft key Business services points of interest symbols Airport Babysitting Barber Bank Camping Car hire Fishing equipment Parking Firemen Gas Petro...

Страница 90: ...ability of a colored overlay is dependent on the region covered by the chart card Note Ifanaerialphotooverlayisappliedtoachartwindowthatissettosystemview the overlay will be displayed in all other sys...

Страница 91: ...from shal lower light blue and to view land features simultaneously In shallow water in some parts of the world where the photos are good and clear you will actually see bottom features like sandbanks...

Страница 92: ...and safety related messages Thisinformationisdisplayedintheformof anoverlayandadditionaldataisdisplayed in a dialog box on your 2D chart screen e g To switch on AIS This feature can also be used in c...

Страница 93: ...e individual windowon which you are working To position the ruler 1 Position the ruler starting point 2 Position the ruler end point To reposition the ruler To reposition either the start or end point...

Страница 94: ...e the chart to determine the bearing or direction to steer Note If you are currently navigating a routeor going to the cursor waypoint you must press STOP GOTO before the system can commence a new GOT...

Страница 95: ...track error XTE When you are following a waypoint you can restart the XTE This results in a new course from the current vessel position to the current target waypoint Restarting XTE is useful if you...

Страница 96: ...Auto Range mode Note For more detail see Setting the motion mode on page 101 4 10 Building and following a route This section describes how to use routes and includes the following What is a route Wha...

Страница 97: ...ine If you have a network of E Series Displays routes are shared across all the Displays What can I do with a route You can Build a temporary route that you follow immediately Quick Route If you do no...

Страница 98: ...than once in a route but the same waypoint can not be placed consecutively You cancreate a new route whenthe route listis full but on saving this you willbe prompted to choose an existing route to ove...

Страница 99: ...e see page 77 for details Building a route using the waypoint list You may prefer to build routes using existing waypoints in the waypoint list 1 Select the Waypoint List route build option Sunday Tri...

Страница 100: ...een route build only Delete a waypoint from the new route list waypoint list route build only Abandon the route build Undoing the last waypoint To remove the last waypoint when you are building a rout...

Страница 101: ...ute for later use and rename it if required Quick routes A route that is saved and immediately followed is referred to as a Quick Route If a Quick Route already exists it is overwritten unless you ren...

Страница 102: ...rm is acknowledged the next waypoint is selected the display updates to indicate the next leg of the route and the system sends the new navigation data to the autopilot There are several ways to selec...

Страница 103: ...intsaccordingly Theroutenamemovestothe reassigned first waypoint and then the system automatically activates the reverse follow route function Note To stop following an active route at any time press...

Страница 104: ...urrent vessel position to the current target waypoint Restarting XTE is useful if you find yourself off track and want to go straight to your target rather than get back onto the original track Althou...

Страница 105: ...ive the data is updated to show bearing distance and time from your current position via the route list 1 Display the Route List 2 Display details of the selected route with the cursor 1 Select route...

Страница 106: ...ystem shall cancel the edit the waypoint shall remain in its original position Selecting a route for editing For a route to be edited it must first be selected either via the route list or by selectin...

Страница 107: ...keys not applicable when adding a waypoint at the beginning of a route Note You will not be able to edit the waypointthat you are currently navigating to target waypoint Add a waypoint at the beginni...

Страница 108: ...waypoint for insertion Make Route Waypoints Harbour Ent Midchannel Outer Harbour Waypoint 4 500 16 75N 0010 6 095W 500 47 356N 0010 6 604W Pierhead Sunday tour 01 Midchannel 02 Outer Harbour 03 Harbo...

Страница 109: ...d route course option 3 Define new or existing waypoint D8373_1 INSERT WAYPOINT PLACE WAYPOINT Move cursor over appropriate leg of route Stretch to position for new waypoint Route course changes Route...

Страница 110: ...hin a route provided that it has not been used in anotherroute Ifyoutrytoremoveawaypointthatisusedinanotherroute thesystem will warn you that it cannot be removed D8381_1 PLACE WAYPOINT New leg added...

Страница 111: ...ute You can delete any route in your system except for the one that you are following When you erase a route the system deletes only those waypoints created with this particular route Waypoints that h...

Страница 112: ...wo open arrow heads The lengthof these lines is determined by the distanceyour boat will travelinthetime you have specified 3 mins 6 mins or infinite in the Chart Setup Menu see page 107 at the curren...

Страница 113: ...red when you are in the chart application System alarms Anchor Timer Alarm clock and Temperature Navigation alarms Arrival and Off track Radar alarms Guard zones Fishfinder alarms AIS alarms Weather a...

Страница 114: ...s 1 Radar range synchronization is not available when the chart motion modeisset to Autorange 2 The2Dchartcanbesynchronizedwitheitherthe3Dchart seepage 125 or the radar but not both 3 Ifyouhaveadigita...

Страница 115: ...To access the MARPA controls when you are in a chart application Note MARPAtargetscannotbeacquiredifyouhaveaDigitalScanner whichissetto Dual Range D6609 3 TARGET TRACKING RADAR OPTIONS Select the tar...

Страница 116: ...to ON theoverlayistemporarilydisabled The Overlay status indicatorisshowninpa renthesis butthesoftkeyremainssettoON Tore enableOverlay disengagedual range The default soft keys change to give access t...

Страница 117: ...e chart window When the radar overlay is set to ON the radar range is indicated in the top left hand corner of the chart window in the same color as the overlay You can now change the radar range Note...

Страница 118: ...represents the course you have taken This trail is made up of a series of track points which are created automatically You can save the track to create a permanent record of where you have been D6607_...

Страница 119: ...between each track point see page 107 Creating a track To start a track If the power fails whilst a track is being recorded or the position fix is lost a break will occur in the track Only the last se...

Страница 120: ...ute CAUTION Beforefollowingtheroute ensurethatitissafefornavigation notingthatit may deviate from your actual path travelled from the current track You can create a route from the track that you are c...

Страница 121: ...ack to be edited it must first be selected either via the track list or by selecting the appropriate track on screen D8368_1 CREATE ROUTE FROM TRACK YES NO Route generation completed Maximum deviation...

Страница 122: ...Select the appropriate track for editing see page 97 2 Select the Edit Name or Edit Color option 3 Edit and save Erasing a track You can delete any track in your system 1 Select the appropriate track...

Страница 123: ...ries displays System chart view When a chart application is started it defaults to system view Any windows set to system view will have the same presentation as other system windows for Chart mode and...

Страница 124: ...continuous backwards and forwards rotations as the boat yaws from side to side the chart will not update unless the heading changes by at least 10 degrees from the last displayed orientation 2 It is...

Страница 125: ...pends motion mode The default setting is relative motion with zero offset The mode that you select is restored at power up When a chart window is set to SYSTEM view the motion mode will be set but not...

Страница 126: ...True Motion when the orientation is set to Head Up Autorange Autorange selects and maintains the largest possible scale of chart that will display both the boat and the target waypoint Autorange is no...

Страница 127: ...isplay bathymetric information Fish n Chip In the Chart application 1 Press the PRESENTATION softkey 2 Press the CHART LAYERS softkey 3 Press the CHART TYPE softkey to toggle between FISH and NAV opti...

Страница 128: ...aypoint names from the screen Show hide waypoint index Theorderofwaypointswithinarouteisindicatedbythewaypointindex Toshow hide this index SHOW HIDE WAYPOINTS SHOW BY PRESENTATION D6879_2 Toggle to sy...

Страница 129: ...etto system view will be displayed in all other system view chart windows using the cursor You can use the cursor method to hide a route or track Note Use the route track list to return the display st...

Страница 130: ...ilable on your cartography To declutter your chart If the declutter option is applied to a chart window that is set to SYSTEM view the declutter will be applied to all other system view chart windows...

Страница 131: ...is played by pressing OK ALL ON the info pop up for all cartographic areas including objects is displayed PointsON theinfopop uponlydisplayedforobjectsselectedwith the cursor OFF All ON Points ON Vect...

Страница 132: ...cartography This adjustment is indicated as a distance north west ve or south east ve from your vessel position to a maximum of 1000m To view the effects of an offset you can turn the feature on off...

Страница 133: ...et value 1 Select the Chart Offset function see previous section 2 Set the north south offset value 3 Set the east west offset value Resetting the offset value To reset the chart offset to zero 1 Sele...

Страница 134: ...c ON OFF Chart Boundaries The line indicating the boundary of the chart ON OFF Spot Soundings Number on the chart indicating depth ON OFF Safety Contour Areaswithdepthsshallowerthatthespecifiedvalue a...

Страница 135: ...ed on the water cables nature of seabed points tide station current stations and port information ON OFF Land Features The cartographic features that are displayed on the land ON OFF Colored Seabed Ar...

Страница 136: ...igation options from the chart application 1 Press OK twice 2 Select RADAR options or NAVIGATION OPTIONS with the appropriate softkey Using radar with the chart You can combine the chart view with the...

Страница 137: ...ge To access MARPA controls from the chart application 1 Highlight a MARPA target with the cursor or 1 If radar overlay is switched on press the RADAR OPTIONS softkey 2 Press the TARGET TRACKING softk...

Страница 138: ...stances at a glance The rings are always centred on your vessel and thescalevariestosuityourcurrentzoomsetting Eachringislabelledwiththedistance from your vessel To turn range rings on or off 1 Press...

Страница 139: ...ather conditions The simulator mode can also be used to help you gain experience It is strongly recommended that before you use your 3D chart application you read and understand Chapter 3 Working with...

Страница 140: ...ty is poor 3D cartography can help to give you the confidence to know where you are and what is around you As with a conventional chart active waypoints and routes can also be shown on the 3D chart 5...

Страница 141: ...around the 3D chart and display the area required at the appropriate scale and angle use a combination of panning zooming rotating and pitching Panning Panning moves the 3D chart that is displayed to...

Страница 142: ...D SHIP GO TO ADJUST ON EYE CENTER ADJUST ROTATE PITCH PRESENTATION D8053_2 To find your boat and reinstate active motion mode forward looking chart view To select an existing route to follow or a wayp...

Страница 143: ...chart will put it into planning mode Planning mode Planning mode enables you to view an area of the chart different to the one in which you are navigating so that you can analyse locations and featur...

Страница 144: ...hallower depth than the set limit is shown as a lighter shade Transparancy settings can be used to adjust the level of shading Multiple views You can display multiple 3D chart views by creating a page...

Страница 145: ...specify whether the boat is fixed in the centre of the window 0 offset or offset by 1 3 or 2 3 of the screen If you change the offset to 1 3 or 2 3 the view ahead of your boat will be increased D8252_...

Страница 146: ...gion covered by the chart card Aerial photo overlay is controlled via the 3D Chart Setup Menu See page 127 for more details 5 11 Making the view clearer You can make the view clearer using the followi...

Страница 147: ...can make features or even your position difficult to see Declutter helps you to reduce this confusion and make the chart clearer by removing some objects from view To declutter your 3D screen Exaggera...

Страница 148: ...set to view the two applications together see page 18 3D view locator If required you can show the 3D view locator on the 2D chart This is a polygon outlined in blue and extending from the virtual eye...

Страница 149: ...onizethe2Dcharttothe same view Anychangesmadetotheheading rangeorpositionineither2Dor3Dchartswill be displayed in both 2D and 3D windows Ifthe2DchartviewforthecurrentwindowissettoSYSTEMandyouhavemulti...

Страница 150: ...transducer cone to indicate the area that it covers on the 3D chart This is particularly useful when fishing as it enables you to compare the chart view with the information your fishfinder is showin...

Страница 151: ...D chart are also shown on the 3D chart 5 15 Setting up the 3D Chart The set up for your 3D chart can be changed from the standard configuration to suit your particular needs Although you will probably...

Страница 152: ...rge Huge Aerial photo overlay Overlay an aerial photograph on the 3D chart ON OFF Chart text Text viewed on the 3Dchart ON OFF Navigation marks Navigation marks viewed on the 3Dchart ON OFF D8242 1 Hi...

Страница 153: ...eabed A transducer on the bottom of the boat sends pulses of sound waves into the water and measures the time it takes for the sound wave to travel to the bottom and back The returning echoes are affe...

Страница 154: ...g the readout The dark layers indicate a good echo the lighter areas weaker echoes This could mean that the upper layer is soft and therefore allowing sound waves to pass to the more solid layer below...

Страница 155: ...however set the sensitivity manually by using the gain modes gain color gain and TVG Transducer frequency Lower frequencies scan a wide area and penetrate water well Use these settings if you want a l...

Страница 156: ...e the standard fishfinder image with the zoomed image or display the zoomed image alongside the standard fishfinder image Set the zoom factor to a pre defined level or adjust it manually Reposition th...

Страница 157: ...defined settings or select xR to set a factor manually For manual settings adjust the zoom factor with the rotary controller 3 Press OK to accept your setting Adjusting the position of the zoomed are...

Страница 158: ...osition the image on screen to anywhere between the bottom of the window 0 and the middle of the window 50 by using the Bottom Shift control To adjust bottom lock 1 Toggle to FULL or SPLIT 2 Use the a...

Страница 159: ...displayed frequency from the Range Adjust toolbar which gives you control over the range and range shift settings The DSM automatically adjusts the display to show the shallowest required range Alter...

Страница 160: ...or trackpad 4 Press OK To return to the standard fishfinder image 1 Toggle to AUTO on the RANGE softkey 2 Press OK 6 8 Presentation toolbar The PRESENTATION softkey gives you access to GAIN VRM for me...

Страница 161: ...set gain levels manually Manually set gain levels are applied to the active window and any other fishfinder windows displaying that frequency To set the gain level manually 1 Select the PRESENTATION s...

Страница 162: ...e DSM automatically determines the required power setting based on the current depth speed and bottom signal strength Manual If you wish to manually adjust the power to suit current conditions you can...

Страница 163: ...VRMs to indicate the distance behind your boat andthe depth below of selected objects Note When multiple fishfinder windows are open we recommend you have the depth reading displayed in at least one...

Страница 164: ...allows you to set the scroll speed as a percentage of the maximum scrollrateforthatdepth Thelowerthepercentage theslowertheimagewillscroll The default is manual adjustment with a full speed scroll 10...

Страница 165: ...waypoints and navigate to them in an active fishfinder window 6 10Fishfinder alarms In addition to the system alarms see page 289 the following alarms can be set when you are connected to a DSM or whe...

Страница 166: ...elect Fishfinder Setup menu 3 Open the Configure Preset Frequencies screen 4 Select the frequency you wish to use from the list available Automatic frequency selection The behavior of automatic freque...

Страница 167: ...the DSM Its setup menus enable you to change settings to allow for this The system automatically adjusts the following settings to optimize the fishfinder image Operating frequency Gain modes Gain Co...

Страница 168: ...et frequencies Change the settings for one or more of the fishfinder presets The settings available depend upon the transducer fitted Target depth ID Depth readings for identified targets Depth lines...

Страница 169: ...strengths White line When this feature is applied a white lIne is drawn along the bottom as defined by the digital depth value and the detail below the bottom removed Fish near the bottom can now be...

Страница 170: ...is one that does not include an integrated speed transducer Frequency Calibration Hides the setup menu and brings up a set of soft keys to tune the transducer frequencies Depth Offset waterline Offse...

Страница 171: ...shfinder 147 Ping Enable Normally enabled you can disable the ping when appropriate to test other equipment or if there is a diver beneath the vessel for example 81244_4 book Page 147 Thursday January...

Страница 172: ...148 E Series Networked Display Reference Manual 81244_4 book Page 148 Thursday January 31 2008 1 53 PM...

Страница 173: ...tectthepresenceofobjects knownas targets atadistance andiftheyaremoving detect their speed This chapter of the Reference manual provides the information and instructions to enableyoutostartusingtherad...

Страница 174: ...a radar picture Not all radar echoes are produced by valid targets Spurious echoes may be caused by Side lobes Indirect echoes Multiple echoes Blind sectors Sea rain or snow clutter Interference Throu...

Страница 175: ...cts Sidelobeechoesformeitherarcson the radar screen similar to range rings or a series of echoes forming a broken arc Indirect echoes There are several types of indirect echoes or ghost images These s...

Страница 176: ...nsity though not necessarily a completecut off However forwiderobstructionstheremaybeatotallossofsignalin the shadow area There may also be multiple echoes which extend behind the obstruction Blind se...

Страница 177: ...urnssometimesappearaslargehazyareas dependingontheintensityofthe rainfall or snow in the storm cell Interference When two or more radar equipped vessels are operating within range of each other mutual...

Страница 178: ...ut not transmitting and antenna not rotating Antenna does not rotate the scanner does not transmit and the radar data is removed from the screen This is a power save mode used when radar not needed fo...

Страница 179: ...nd may not necessarily be proportional to its physical size Nearby objects may appear to be the same size as a distant larger objects With experience the approximate size of different objects can be d...

Страница 180: ...TS MOBbuttoninthesameway as they are placed on a chart You can edit waypoints and navigate to waypoints in the radar window For full details on using waypoints and passage planning see Chapter 3 Worki...

Страница 181: ...ble whilst in this mode a warning messagewillbeshown thestatusbarindicatesNorth Upinbrackets andtheradaruses0 headinginrelativemotion Whenheadingdata becomes available once more North Up mode is reins...

Страница 182: ...hown thestatusbarindicatestheCourseUpinbracketsandtheradaruses0 headinginrelativemotion Whenheadingdatabecomesavailableoncemore Course Up mode is reinstated To select the orientation mode The selected...

Страница 183: ...tain a constant position andmovingvessels includingyourboat travelintrueperspectivetoeachotherandto fixed landmasses on the screen As the boat s position approaches the edge of the screen the radar pi...

Страница 184: ...and on the ADJUST EBL soft key To change the EBL reference 1 Select MENU 2 Select Radar Setup 3 Select EBL Reference 4 Select either Mag True or Relative 7 7 Getting the best picture You can improve t...

Страница 185: ...cts of land clutter so that small target are not lost It should be used when you are in harbor or in close proximity to land OSH Automatic Offshore mode the system continually calculates the required...

Страница 186: ...clutter echoes is shown while the effect on smaller ship echoes is only slight As the receiver is less sensitive and background noise and fill in returns from land and other large targets reduced you...

Страница 187: ...er see page 153 OFF If you wish to detect the presence of other radars in the vicinity turn INT REJECT to OFF Expansion The expansion function allows you to either override the pulse length or to give...

Страница 188: ...ore only affect the individual display on which you are working Displaying wakes To switch on the wakes function Specifying the wake period You can select via the Radar Setup Menu whether these wakes...

Страница 189: ...btain the maximum signal strength indicated by the eight step horizontal bar If you cannot tune the radar successfully refer to the Installation Guide 7 8 Changing the displayed range You can zoom in...

Страница 190: ...ge and chart scale When synchronization is switched on The radar range in all radar windows changes to match the chart scale Sync is indicated in the top left hand corner of the chart window If you ch...

Страница 191: ...u range in and out Using the cursor To measure the bearing and range from your boat to a specified target move the cursor to the appropriate position on the screen Note If cursor data is not shown ref...

Страница 192: ...our boat to the edge of the window When this line is rotated to align with a target its bearing relative to your boat s heading is measured and displayed on the ADJUST EBL soft key The data is also di...

Страница 193: ...to your boat s head If this setting is adjusted the display will retain the adjustmentsand use them when the VRM EBL isnext turned on 2 Adjust the VRM to the required size 3 Adjust the EBL to the req...

Страница 194: ...btain the bearing Floating a VRM EBL 1 Create the VRM EBL as described previously 2 Select the floating option 3 Measure the range between two points 4 Measure the bearing between two points Position...

Страница 195: ...rget is within a specified zone Guard Zones Display detailed information on tracked targets MARPA Display the identity of other vessels and if broadcasted their voyage information AIS Display the rang...

Страница 196: ...0 circular zones Your radar can be set up using one or two zones You can adjust the sensitivity of the guard zone via the Alarms Setup Menu described on page 290 To set up a guard zone 1 Select the gu...

Страница 197: ...ET INNER xx xx nm Press to highlight Set inner limit for guard zone OK Repeat for other settings 6nm Head Up D6832 2 Circular Guard Zone D6761_3 ZONE SHAPE CIRCLE SET INNER xx xx nm Press to highlight...

Страница 198: ...the effect of the other conditions Introduction to MARPA You can use the Mini Automatic Radar Plotting Aid MARPA functions for target tracking and risk analysis MARPA improves collision avoidance by o...

Страница 199: ...ilence the alarm and remove the on screen warning and the target lost symbol How far from my boat does MARPA work MARPA target acquisition is only available at radar range scales of up to 12nm althoug...

Страница 200: ...th set in the MARPA Setup menu To display the CPA graphic and associated soft keys MARPA targets D6810_4 D9008_1 Vector CPA graphic 3 9 D9009_1 CPA GRAPHIC CPA GRAPHIC CPA GRAPHIC 1810 T 17 1 kt Move...

Страница 201: ...eriod specified for drawing length of vectors 0 5min 1 min 3 min 6min 12min 30 min 60 min Target History Plots a target s previous position at specified intervals The four most recent position points...

Страница 202: ...PA List 2 Cancel target s D6829 2 TARGET TRACKING Move cursor over target to be acquired Target D8806 1 ACQUIRE TARGET Target being acquired symbol displayed If target present for several scans the ra...

Страница 203: ...refer to Chapter 17 Automatic Identification System AIS 7 11 Setting up your radar The set up for your radar can be changed from the standard configuration to suit your particular needs Although you w...

Страница 204: ...ns 20 scans 30 scans Standby Period Indicates the number of minutes that the system shuts down the scan ner does not rotate and the display is in standby mode 3 minutes 5 minutes 10 minutes 15 minutes...

Страница 205: ...k alarms When an alarm is triggered a buzzer sounds and a pop up window describing the alarm and how to clear it is displayed To switch these alarms on off and set the limits Note For more details of...

Страница 206: ...182 E Series Networked Display Reference Manual 81244_4 book Page 182 Thursday January 31 2008 1 53 PM...

Страница 207: ...es you make in this menu are kept when you remove power from the E Series system Note The radar needs to be receiving heading and position data for full functional ity Select scanner Selects which sca...

Страница 208: ...table below for definition of ranges and radar operation Tune adjust The tune adjust function is used to fine tune the scanner s receiver for maximum target returns on the display Auto mode recommende...

Страница 209: ...is set to Off or Standby The changes you make are applied at the end of the next transmit cycle To open the radar setup menu 1 Make a radar application window active 2 Press the MENU button Antenna s...

Страница 210: ...er powered on but not transmitting antenna not rotating This is a power save mode used when radar is not needed for short periods When you return to transmit mode the magnetron does not need to warm u...

Страница 211: ...ty Not all radar echoes are produced by valid targets Spurious echoes may be caused by Side lobes Indirect echoes Multiple echoes Blind sectors Sea rain or snow clutter Interference Through observatio...

Страница 212: ...rect echoes There are several types of indirect echoes or ghost images These sometimes have the appearance of true echoes but in general they are intermittent and poorly defined Multiple echoes Multip...

Страница 213: ...shadow area There might also be multiple echoes which extend behind the obstruction Blind sector effects can normally be minimized by careful selection of the scanner site prior to installation Sea cl...

Страница 214: ...These returns sometimes appear as large hazy areas depending on the intensity of the rainfall or snow in the storm cell Mutual radar interference This can occur when two or more radar equipped vessels...

Страница 215: ...information Other vessels or objects On screen targets may be large small bright or faint depending on the size of the object its orientation and surface type Remember that the strength of an object...

Страница 216: ...the waves Consequently these echoes tend to behave erratically on the radar screen Buoys and small boats often resemble each other but boats can often be distin guished by their motion Trees and shrub...

Страница 217: ...rth Up in brackets and the radar uses 0 heading in relative motion When heading data becomes available once more North Up mode is reinstated It is not possible to select Head Up mode when the motion m...

Страница 218: ...ading in relative motion mode When heading data becomes available again Course Up mode is reinstated To select an orientation mode 1 Press the PRESENTATION softkey 2 Press RADAR MODE ORIENTATION 3 Cho...

Страница 219: ...e of the screen the radar picture is automatically reset to reveal the area ahead of the boat If heading and position data become unavailable when true motion is selected a warning message is shown th...

Страница 220: ...are limiting factors enabling the use of dual range mode The E Series system allows you to view either a short or a long range image in separate radar windows To allow this dual range must be enabled...

Страница 221: ...tings function makes the radar picture clearer by changing the sensitivity of radar reception For long ranges select a sensitivity level that gives a slight speckle in the back ground Setting the gain...

Страница 222: ...detection within clutter Rain clutter Radar detects echoes from rain or snow The strength of these echoes depends upon the altitude range density and size of the snow flakes or rain droplets and appe...

Страница 223: ...effective transmit power At zero the radar operates at its standard power 4kW or 12kW At 90 the effective power is increased by a factor of at least two Increasing power has the effect of making targ...

Страница 224: ...inute 5 minutes or 10 minutes To switch wakes display on 1 Press the ENHANCE ECHOES softkey 2 Toggle wakes to ON using the WAKES softkey 3 Select your preferred wakes setting with the trackpad 4 Press...

Страница 225: ...radar windows update to match To synchronize radar range and chart scale 1 Make a chart window active 2 Press the PRESENTATION softkey 3 Press CHART MODE AND ORIENTATION 4 Toggle to RDR on the CHART...

Страница 226: ...RANGE RINGS softkey Bearing and range The radar display shows you bearing and range data to any object you highlight To find the bearing and range to an object 1 Move the cursor to the object s positi...

Страница 227: ...to measure the distance from your vessel to a selected object by adjusting the radius of the marker so that it intersects the object s position The range is displayed on the ADJUST VRM softkey label...

Страница 228: ...page 196 Combined range and bearing You can combine a VRM and an EBL to measure range and bearing simultaneously Tracking a target with a VRM or EBL You can tell which direction an object is travelli...

Страница 229: ...o use floating VRM 1 Create a standard VRM 2 Highlight the VRM or press the VRM EBL softkey 3 Press the FLOATING VRM softkey 4 Press the ADJUST FLOAT softkey 5 Move the cursor to the point to measure...

Страница 230: ...cked objects AIS displays the identity and voyage information of other AIS enabled vessels To track a target 1 Press the TARGET TRACKING softkey 2 Highlight the object you wish to track 3 Press the AC...

Страница 231: ...4 Press the corresponding SET UP ZONE softkey 5 Choose your zone shape 6 Set the limits of the guard zone using the rotary controller 7 Press OK MARPA The Mini Automatic Radar Plotting Aid MARPA provi...

Страница 232: ...excessiveseaclutteror in deep swells Parameter Options Vector Length The time period specified for drawing length of vectors 0 5min 1 min 3 min 6min 12min 30 min 60 min Target History Plots a target s...

Страница 233: ...s heading and speed Speed Over Ground SOG and Course Over Ground COG information are required to show true target course and speed The better the quality of the heading and speed data the better MARP...

Страница 234: ...show or hide closest point of approach 1 Highlight the object with the cursor 2 Toggle to the required CPA setting using the CPA GRAPHIC softkey How motion modes affect CPA In true motion mode the ve...

Страница 235: ...e True Course True Speed CPA TCPA Target display The position of MARPA objects is marked with an icon which also indicates its MARPA status To view the MARPA list 1 Press the TARGET TRACKING softkey 2...

Страница 236: ...quippedves sels Displaybasicordetailedinformationforeachtargetvesselincludingsafetycritical target data Set up a safe zone around your boat View alarm and safety related messages This information is d...

Страница 237: ...e on NMEA or SeaTalk 9 2 Selecting a data application To select a data application 1 Select a page set that includes a data application 2 Select a page which includes a data window D9010_1 D8465_1 PAG...

Страница 238: ...which you are working Pre configured data panels The pre configured data panels include data associated with Navigation Waypoint Route Fishing or Sailing To select a pre configured data panel Vessel...

Страница 239: ...configurethedatapanelsinthiswayintheEngineMonitoringand CDI applications Renaming a panel Youcancustomizethenamesofthepanelsasrequirede g theSAILINGpanelcouldbe renamed RACING 1 Select and rename the...

Страница 240: ...cell can be split is indicated on the soft key 2 Split the highlighted cell D9106_1 Data Groups Vessel Navigation Depth Wind Time and Date Engine Environment Highlight data group Select data group SEL...

Страница 241: ...t Cell for splitting selected e g e g Cell splits vertically Soft key indicates direction of split Split horizontally Split vertically OR D9107_1 NAVIGATION Press and hold relevant soft key e g Active...

Страница 242: ...218 E Series Networked Display Reference Manual 81244_4 book Page 218 Thursday January 31 2008 1 53 PM...

Страница 243: ...pilot control on the display unit Withautopilotcontrolenabled theunitletsyouengagetheautopilotwheneverithas atargetwaypoint YoucanseeinformationforthetargetwaypointonthePilotControl pop up The default...

Страница 244: ...previous screen To disengage the autopilot in normal operation You can disengage the autopilot from the Pilot Control screen 1 Press the STANDBY softkey Emergency disengage Alternatively if the Pilot...

Страница 245: ...layed when you engage the autopilot in track mode at waypoint arrival or when you select it from the Setup Menu It gives you Autopilot status Live navigation information Toolbar with softkeys to contr...

Страница 246: ...RACK softkey to engage the autopilot and continue to the next waypoint in your route PresstheCLEARALARMsoftkeytosilencethealarmandkeeptheautopilotengaged in auto mode continuing on the current heading...

Страница 247: ...he Next Waypoint field The toolbar gives you three options Press CLEAR ALARM to silence the alarm and keep the autopilot engaged in auto mode continuing on the current heading Press STANDBY to silence...

Страница 248: ...224 E Series Networked Display Reference Manual 81244_4 book Page 224 Thursday January 31 2008 1 53 PM...

Страница 249: ...isplay of each video input You can also adjust the brightness contrast color and aspect ratio of the image Note For details of how to connect such equipment to your E Series display and the possible i...

Страница 250: ...Your Display is supplied with cabling to connect to a composite input source If your camera DVDetc usesS Videoinput youwillneedtopurchaseandfittheappropriate cabling in the configuration detailed in t...

Страница 251: ...e are reflected in the Video Setup Menu and on the video application s soft keys e g D8486_1 OK x2 Video 2 mirrors your choice for Video 1 and can no longer be selected independently of Video 1 Video...

Страница 252: ...t the cycle period is 10 seconds This can be changed 1to 99 seconds if required To specify the number of seconds between shots in the cycle 1 Open the Video Setup Menu as described on page 226 2 Speci...

Страница 253: ...image appears distorted squashed or stretched you should override this automatic setting and select the appropriate aspect ratio manually 4 3 standard format or 16 9 wide screen to rectify the distor...

Страница 254: ...230 E Series Networked Display Reference Manual 81244_4 book Page 230 Thursday January 31 2008 1 53 PM...

Страница 255: ...e layout of the individual data boxes is not suitable you can configure the system to display the data and layout of your choice see page 275 12 2 Displaying and setting up the engine monitor Before u...

Страница 256: ...ENGINE Configure ENGINE FUEL Configure FUEL RESOURCES Configure ENGINE RESOURCES Configure TWIN ENGINE Maximum tachometer range AUTO Select Number of Engines Highlight Number of Engines Set number of...

Страница 257: ...rking 12 5 What should I do when an alarm is triggered Your engine monitoring application will trigger an alarm via NMEA SeaTalk2 and display an engine alarm warning message when a problem is detected...

Страница 258: ...s corresponding softkey 3 Highlight your preferred page layout and press OK 4 In the application list highlight engine and press OK Refer to the E Series Reference Manual for more details on setting u...

Страница 259: ...CDI gives a graphical representation of yours boat s course in a rolling road format The rolling road represents a width of sea equal to the Cross Track Error XTE limits that you have specified in the...

Страница 260: ...is dis played in each 2 Select a page which includes a CDI window Once the CDI application is displayed no use is made of the soft keys You will therefore need to open a radar chart or fishfinder wind...

Страница 261: ...and assume complete responsibility and risks associated with this device and accordingly release Raymarine Sirius Satellite Radio Inc and WSI Corporation from any and all claims arising from the use...

Страница 262: ...pre configured page sets You will therefore need to customize a page set to include a weather application window Please refer to page 275 for details Specifying the weather elements You can view text...

Страница 263: ...the low er ranges To solve this zoom out to a suitable range that does display the data in more de tail To re centre the map on your boat use the FIND SHIP soft key 14 6 Placing waypoints The waypoin...

Страница 264: ...servation stations pink Lightning Wind Sea surface temperature green yellow orange Weather symbols Surface pressure 26 22 22 24 Squall line red D8613_2 Hurricane Category 1 5 Tropical storm Tropical d...

Страница 265: ...Rain Rain Rain Rain Rain Snow Snow Mixed Mixed 15 19 dBz 20 29 dBz 30 39 dBz 40 44 dBz 45 49 dBz 50 54 dBz 55 dBz 5 19 dBz 20 dBz 5 19 dBz 20 dBz Intensity Precipitation type Color code D 8569_1 Dire...

Страница 266: ...r typhoons The system displays the track the storm has taken its current and forecasted position the wind radii current position only direction and speed of travel o D8570_1 Transparent nothing shown...

Страница 267: ...cane Category 2 OK for more info OBJECT INFO Storm name Storm ID Storm Type Direction Speed Max Wind Speed Max gust Speed Pressure Date Time Position Tropical Storm Data EPSILON AL292005 Hurricane Cat...

Страница 268: ...Station Type Latitude Longitude Time Date Air Temperature Horizontal Visibility Vertical Visibility Sea Level Pressure 3 Hour Pressure Change Pressure Tendancy Wind Direction Wind Speed Peak Wind Spee...

Страница 269: ...seepage 246 2 For detailsof how to change the wind symbol please refer to page 251 Waves This option displays the current wave height in 16 levels the wave direction and wave period see below 3 7 kts...

Страница 270: ...s the marine zone at the cursor position 14 8 Animated weather graphics The animated weather option allows you to view an animation from the current time for Wave Direction Wave Period D10850 1 D8651_...

Страница 271: ...ving the cursor over a symbol when ani mationisrunning Therangeandtrackpadcontrolsdohoweverremainoperable provided the PAUSE option hasnot been selected Ranging panning will cause the animation to res...

Страница 272: ...eather Forecasts and Offshore Forecasts and High Seas Forecast or Great Lakes Forecast and Near Shore Forecast or Canadian Coastal Weather Forecast To display marine zone forecasts 1 Select the MARINE...

Страница 273: ...o clear an alert press ACKNOWLEDGE The alert is removed from the display The watchbox warning can still be viewed via the Weather Reports soft keys Note If required you can switch off the marine watch...

Страница 274: ...regions for which an alert is valid are highlighted on the weather map as a red polygon To show hide watchboxes Displaying watchbox data To display the data relating to a particular watchbox D8608_1 W...

Страница 275: ...enu To select the Weather Setup Menu Weather Setup options Note Distance units used here are the same as the system s i e If you have nm set as your system distance units then the default watchbox ale...

Страница 276: ...o set the weather graphics status to show hide continues to operate as normal Problem Reason Boat symbol not displayed No position fix On start up weather map stays in last view and does not re draw N...

Страница 277: ...nnels you can set up parentallockstolimitaccesstoselectedchannelsandalertstotellyouwhenafavorite song is being played 15 1 To start using Sirius Radio 1 Press MENU 2 On the Setup Menu select Sirius Sa...

Страница 278: ...nels 3 Press the TUNE TO CHANNEL softkey or the rotary controller to listen to the selected channel To go back to the Sirius Control screen press OK or CANCEL Table 15 1 Sirius Audio Toolbar MUTE ON O...

Страница 279: ...tkey 2 Select SCAN CHANNELS 3 Use the SCAN ALL PRE softkey to choose to scan all channels or only preset channels 4 Press SELECT to stop the scan and listen to the active channel 15 5 Hiding or showin...

Страница 280: ...lect the target channel from the Channel List 4 Press the ASSIGN TO PRESET softkey Note If the presetyou want to usealready has a channelassignedto it deletethepresetfirst To delete a channel from a p...

Страница 281: ...s the EDIT CHANNEL ACCESS softkey 2 Press the EDIT LOCKOUT PASSWORD softkey 3 Enter your old password then the new password and hint To block a channel On the Sirius Radio Control screen 1 Press the S...

Страница 282: ...a song or artist alert Press the ALERTS softkey to open the Edit Alerts screen This screen shows ten favorites and the song playing currently Youcandeleteafavoritefromthelist addthecurrentsongorartist...

Страница 283: ...e North American continent 16 2 Setting up Navtex weather Before you are able to view Navtex messages you will need to 1 Specify for the communicating NMEA port the baud rate 4 800 or 9 600 applica bl...

Страница 284: ...eed Sorting the message list Selecting message alert categories On initial power up the system provides alerts for all message categories listed in the Navtex Alert Menu If required you can switch off...

Страница 285: ...arnings ON C Ice reports ON D Search and rescue information ON E Meteorological forecasts OFF F ilot service messages OFF G Decca messages OFF H Loran messages ON I Omega messages OFF J Satnav message...

Страница 286: ...262 E Series Networked Display Reference Manual 81244_4 book Page 262 Thursday January 31 2008 1 53 PM...

Страница 287: ...t can operate in radar blind spots and can detect smaller AIS fitted vessels WARNING Smaller vessels do not have to be fitted with AIS and whilst it is mandatory for larger commercial vessels to carry...

Страница 288: ...beam Antenna loctation Draft Cargo information Destination ETA Other relevant information Time Ship s position COG SOG Gyro heading Rate of turn Navigational status Dynamic Data Voyage Related Data D...

Страница 289: ...ify the 38 400 baud for the NMEA port that communicates with the AIS transceiver or receiver see page 287 17 4Selecting the AIS function AIS is a selectable layer of the chart or radar application To...

Страница 290: ...et symbols D9056_1 097 T 11 6kt 1 237nm 00h04m33s Safety critical data Heading Large vessel Direction of turn Small vessel Sleeping target Dangerous target flashes Safe zone defined by distance or tim...

Страница 291: ...option ON OFF When a target is activated its symbol is scaled according to the size of the vessel Note AIS vector mode is derived from the samemotion mode settings asyour Chart application Note The s...

Страница 292: ...ides collision avoidance data for the highlighted target To display the AIS List D9052_1 Move cursor over relevant target Safety critical data displayed AIS DATA AUTO 1870 T 10 9kt 7 719nm 00h57m27s A...

Страница 293: ...rous if it comes within a specified distance of your vessel closest point of approach or CPA within a specified time time to closest point of approach or TCPA The CPA and TCPA are calculated using COG...

Страница 294: ...er Options Default in bold Vector Length The time period specified for drawing length of vectors 0 5min 1 min 3 min 6min 12min 30 min 60 min Target History Plots a MARPA target s previous position at...

Страница 295: ...sages 17 7AIS Alarms In addition to the dangerous target alarm previously described the system generates an alarm when a dangerous target becomes a lost target i e its signal has not been received for...

Страница 296: ...u see page 289 Note The local AIS alarms must be acknowledged at the AIS receiver Removingthe messageoraddingittotheAlarmlistonyourE Seriesdisplaydoesnotcancelthealarm REMOVE MESSAGE VIEW AIS ALARM LI...

Страница 297: ...the simulator is switched on 17 9AIS Layer Setup Menu The AIS Layer Setup Menu allows you to Select the target types displayed ALL or DANGEROUS Switch the display of AIS safety messages ON OFF View t...

Страница 298: ...274 E Series Networked Display Reference Manual 81244_4 book Page 274 Thursday January 31 2008 1 53 PM...

Страница 299: ...ge can display up to four application windows With the exception of Video you can view multiple windows of thesameapplication Forexampleyoucouldhavetwochartapplicationononepage one to view a large sca...

Страница 300: ...an switch off individual pages When you use PAGE to cycle through the pages the system will now skip any pages that are set to OFF Note A red cross will be overlaid on softkeys associated with pages s...

Страница 301: ...set to the default configuration and name 1 Display the Select Page Set Menu as described on page 276 2 Reset the page set to the default Highlight page for renaming D8669_2 RENAME PAGE SET To make c...

Страница 302: ...king Databar position The data bar can either be displayed vertically at the right hand side of your screen or horizontally across the top To change the data bar position D8273_1 Top data bar Side dat...

Страница 303: ...d of the bar indicate current steer direction In heading mode the bearing marker is RED In COG mode the bearing marker is GREEN D8274_1 Large data bar Normal data bar D8276_2 Normal Large Highlight To...

Страница 304: ...screen Compass bar setup The compass bar is set to open in heading mode To change this setting press the MENUbuttonandgototheDatabarSetupmenuwhereyoucanselecteitherHeading or COG Note IfMOB is activa...

Страница 305: ...ounters are updated every minute Data groups Data abbreviations in brackets VESSEL Vessel position Ves Pos Course over ground Speed over ground COG SOG Heading Speed Wind velocity made good VMG Wind W...

Страница 306: ...lection is added on the left Existing data moves down as new data is added Moving data Once you have selected the configure option see above you can move data within the bar D8277_2 Databar Setup Menu...

Страница 307: ...tions to set up external equipment that is connected to your system They include AIS Navtex GPS and Compass setup D8279_1 OK Save move Highlight data for moving MOVE DATA Sea Temp 57 9oF Air Temp 85 9...

Страница 308: ...ghout the system When you first power on your display the default values are used The tables that follow show the sub menus default settings and options available In an E Series Networked system chang...

Страница 309: ...d effects dead reckoning normally gives a more accurate course Dead Reckoning Position Variation Source This allows you to compensate for the naturally occurring off set of the earths magnetic field W...

Страница 310: ...sub menu below Units Setup See sub menu below System Integration See sub menu below Waypoint Password Set up Allowsyoutosetupapasswordtoprotectaccesstoyourway point and route databases See page 26 ME...

Страница 311: ...Units Select required volume unit US Gallons Imp Gallons Litres MENU ITEM OPTIONS Default in bold DSC Message When set to ON details of distress DSC messages are dis played on screen ON OFF SeaTalk A...

Страница 312: ...ch individual display When Navtex 4 800 or 9 600 selected the option to view the Navtex message list is available NMEA 4 800 Navtex 4 800 Navtex 9 600 AIS 38 400 ST290 System Select ON if your E Serie...

Страница 313: ...untdown timer alarm on or off OFF ON Timer Period IftheTimerissettoON thesystemcountsdownfromthetimeyou specify An alarm is triggered when zero is reached 00h01m 99hrs 59mins 00h00m Alarm Clock Switch...

Страница 314: ...he XTE for any current navigation exceeds the value that you have specified 0 3nm 0 01 9 99nm or equivalent in the selected Distance Unit MENU ITEM OPTIONS Default in bold Guard Zone Sensitivity Ensur...

Страница 315: ...5ft 0002ft maximumrangeof transducer Deep Depth Alarm Switches the deep depth alarm on or off If a DSM is not connected this cannot be set OFF ON Deep Depth Alarm Value Ifthe DeepDepthAlarmissettoON a...

Страница 316: ...ould be in the region of 1 0 Selecting the satellite differential system You should select the satellite group s appropriate to your area via the Other Set Up soft key WAAS United States EGNOS Europe...

Страница 317: ...g Display Setup MENU OPTION OPTIONS Default in bold Soft key Autohide Controls whether the soft key bar is automatically hidden if not used for a period of 10 seconds Pressing any key re displays the...

Страница 318: ...e page sets please see page 276 System Diagnostics This sub menu is for diagnostic use by authorized dealers Remove CF Card This sub menu allows you to safely remove the Compact Flash card that is cur...

Страница 319: ...t pieces of electrical equipment to interact with one another with a consequent adverse effect on operation In order to minimize these effects and enable you to get the best possible performance from...

Страница 320: ...ted by Raymarine for use with Raymarine electronic displays if Marine ShieldTM is not available use fresh water 1 Power off the supply 2 Rinse the window with fresh water to remove all dirty particles...

Страница 321: ...data set up menus including page sets and the data bar are reset to the factory default when you apply a settings and data reset Important Applying a settings and data reset will remove all waypoints...

Страница 322: ...em Setup menu Position mode ID Setup Simulator Bearing Mode MOB Data Type Manual Variation Language Extendeded Charater Set Ground Trip Reset Settings Reset Lat Long ON True Position Auto 01o E 00o En...

Страница 323: ...plication Installation Display Problem Solution Display does not power up Check power supply cable is sound and that all connections are tight and free from corrosion Check relevant fuses Check power...

Страница 324: ...sand tracks A factory reset is required this will erase all stored data and system settings Factory reset 1 Pressandhold 5seconds thefirstsoftkey nexttothepowerbuttonuntilthe3second count down is comp...

Страница 325: ...not read chart correctly Check the Chart Card has been inserted correctly with the display switched off Check this is the correct compact flash cartography for the unit Software version 2 30 or later...

Страница 326: ...ower cable is free from damage and corrosion Problem Solution No data message Check that cable connecting the scanner to the Display is securely connected and undamaged Scanner software incompatible m...

Страница 327: ...umber and App Version from the menu D8665_1 MENU Setup Highlight System Diagnostics menu Select System Diagnostics menu System Diagnostics Highlight software services Select software services menu Rad...

Страница 328: ...s Monday through Friday 0815 1700 Eastern Standard or Eastern Daylight Savings Time For product repair and service In the unlikely event that your Raymarine unitshoulddevelop aproblem contact your aut...

Страница 329: ...chart please provide the information to Navionics web site Discrepancy Report section at www navionics com DiscrepancyReports asp For Sirius weather For questions about the Sirius weather service ple...

Страница 330: ...306 E Series Networked Display Reference Manual 81244_4 book Page 306 Thursday January 31 2008 1 53 PM...

Страница 331: ...erational Non opera tional temperature range Humidity limit WaterprooftoCFR46 IPX6 suitableforexternalmounting 10 C to 50 C up to 95 at 35 C non condensing Controls 9 defined keys 5 soft keys trackpad...

Страница 332: ...evices displays Waypoints 1200 waypoints entered via cursor lat lon range and bear ing from present position or at boat s position 16 character name can be assigned Waypoint symbols and groups Additio...

Страница 333: ...k History 10trackswithupto1000pointsineachcanbestoredinthe units internal memory Track optimization reduces number of points used or user selectable time or distance interval Additional storage availa...

Страница 334: ...by scanner type and position Range Ring Accuracy Better than 1 5 of the max range scale in use or 22m 72 ft whichever is the greatest Bearing accuracy 1 Variable Range Markers 2 x VRM s readout nm sm...

Страница 335: ...tal Features Full color radar images 256 colors Full color pallets choiceof5 ColorGain Dualrange shortrangeupto3Nm range Super High Definition 4 12Kw options Range Scales Range Rings 1 8 1 16 nm to 72...

Страница 336: ...e Wakes 10s 30s 1 min 5 min 10 min OFF Target Expansion User selectable ON or OFF Timed TX Rotation periods 10 20 or 30 scans Repetition periods 3 5 10 or 15 minutes AIS overlay Switch AIS symbols on...

Страница 337: ...nels available Pre defined engine engine and fuel fuel resources engine and resources twin engines or triple engine support or user configured Data available Tacho boost pressure alternator oil pressu...

Страница 338: ...M HDT DBT DPT APB VLW MWV WPL RTE DSC and ZDA Selectable to 4800 4800 Navtex 9600 Navtex or 38 400 AIS NMEA Output User selectable APB BWC BWR DBT DPT GGA GLL MTW RMA RMB RMC RSD TTM VLW VHW VTG WPL V...

Страница 339: ...e DSC Digital selective calling NMEA National Marine Electronics Association DSM Digital sound module N up North up orientation EBL Electronic bearing line OSH Automatic offshore mode EMC Electromagne...

Страница 340: ...anual TVG Time variable gain VRM Variable made good TX Transmit WPT Waypoint UTC Universal time constant XTE Cross track error VMG Velocity made good Abbrev Description Abbrev Description 81244_4 book...

Страница 341: ...FLT Floating EBL VRM Radar GRD Guard zone Radar HDG Heading vector Chart MARPA MARPA target Radar MOB Man Over Board marker Chart and Radar POS Vessel s position Chart RTE Route leg Chart SHM Ship s H...

Страница 342: ...318 E Series Networked Display Reference Manual 81244_4 book Page 318 Thursday January 31 2008 1 53 PM...

Страница 343: ...ike Front The boundary between two masses of air with different tempera tures i e a mass of cold air and a mass of warm air High Alsoknownasan anticyclone anarea ofhighairpressurewith a system of wind...

Страница 344: ...ingwater3 5hoursbeforearrival of the cen tre of the hurricane Flooding near the coast destroys smaller structures with larger structures damaged by battering from floating debris Terrain continuously...

Страница 345: ...loud Low Also called a depression this region of low pressure can mean wet weather it is the opposite of high pressure or anticyclone Low Pressure A mass of air that presses down only weakly on the su...

Страница 346: ...hunderstorms with a defined sur face circulation and maximum sustained winds of 39 73 mph 34 63 kt Tropics An area on the Earth s surface that lies between 30 north and 30 south of the equator Trough...

Страница 347: ...ay area 61 Aft view 108 Air temperature in data bar 225 AIS alarms 218 active 219 list 234 local 218 classes of data 211 collision avoidance 216 displaying data 213 full AIS data 216 list 215 menu 220...

Страница 348: ...easuring 157 mode 228 for EBLs 152 Blind echoes 142 sectors 144 Boat position 50 105 symbol 50 105 115 Bottom fill 126 image 118 lock 125 Bridge NMEA heading 230 Business services 58 Buttons 9 C Canad...

Страница 349: ...tracks create route from track 88 create track 87 definition 86 edit 76 89 vectors 82 viewing the chart 49 views 90 local 91 multiple 91 system 91 waypoint arrival alarm 83 wind indication 82 XTE res...

Страница 350: ...afety contours 101 shallow alarm 132 spot soundings 101 target ID 130 133 Detecting targets 141 Dialog boxes 11 editing 13 Digital data application selecting a panel 173 Display 3D Chart 104 adjust li...

Страница 351: ...3D chart 113 cursor depth 130 deep alarm 132 depth cursor 130 digit 128 133 lines 130 133 offset 134 reading 130 target ID 130 display description 118 DSM reset 135 factors that impair performance 120...

Страница 352: ...tion 155 171 2nd echo 135 SONAR interference rejection 135 K Key beep 236 Keyboard SeaTalk2 231 L Land features 97 102 Language 15 228 Light sectors 97 102 Lighting adjusting 18 Lightning 197 List AIS...

Страница 353: ...oint 39 within a group 80 90 waypoints between groups 43 Moving objects 84 Multi media cards 19 cautions 19 use of 19 Multi media chart cards see CompactFlash cards iv Multiple echoes 142 144 Multiple...

Страница 354: ...ling 27 setting up 26 Pausing fishfinder 127 PC archiving information 25 transferring information 25 Photo aerial overlay 59 opaqueness level 60 overlay area 61 panoramic 57 Ping enable 135 rate limit...

Страница 355: ...on chart 84 picture overview 146 power off on 145 principles 141 rain clutter 154 range 157 rings 151 synchronizing with chart 84 relative motion mode 151 risk assessment 166 safezone 168 scanner oper...

Страница 356: ...d 21 Scanner operating modes 145 Scroll 133 pause 127 speed 127 133 Sea clutter 144 153 surface temperature 195 temperature at particular location 200 temperature in data bar 225 SeaTalk alarms 230 Se...

Страница 357: ...ropical 196 Surface observation stations 197 Surface pressure 199 Symbols AIS targets 214 boat 50 105 115 business services 58 MARPA 166 navigation marks 102 port 55 surface pressure 199 vessel 115 wa...

Страница 358: ...de 94 151 wind in data bar 225 Tune radar 153 TVG 138 U Uncertain AIS target 214 Unfloating VRMs EBLs 162 Units measurement 15 setup menu 229 depth 230 distance 229 measurement 15 speed 229 temperatur...

Страница 359: ...w hide 95 in new routes 68 list 37 moving 39 navigate to 35 64 using cursor 36 using the waypoint list 36 using waypoint list 65 with cursor 65 number of 33 overview 33 password protection 25 enabling...

Страница 360: ...ions 197 surface pressure 199 symbols 193 surface pressure 199 tropical statements 201 troubleshooting 206 watchbox 203 data 204 displaying 203 wave height 200 waves 199 wind 198 speed and direction 2...

Отзывы: