background image

Use and maintenance manual Aria

Pag.34 

Rev.0  22/04/2022

EN

PROCEDURES FOR USE 


If the chimney catches fire you must call the fire brigade immediately.

Checks prior to start-up 


You have read and perfectly understood the contents of this instructions manual.

Before lighting the stove, you must ensure that: 

• 

the pellet tank is full;

• 

the combustion chamber is clean;

• 

the fire door and ash drawer seals are functioning properly;

• 

the electrical plug is connected correctly;

• 

all items that could burn (instructions, various adhesive labels) have been removed;

• 

the brazier, if removable, is correctly positioned in its housing.


📌

During the first hours of use the paints used for the stove finish may release an unpleasant odour. You might also smell the 

typical odour of metal parts subject to high temperatures. Make sure sufficient air circulation is guaranteed in the room. These 

unavoidable inconveniences will disappear after the first hours of operation. To reduce your discomfort to a minimum, keep 

the stove on for a few hours on low power and in the beginning, do not overload it, avoiding intense heating-cooling cycles


📌

At the initial start-up, the paint finishes drying and hardens. Accordingly, to avoid ruining it, we advise you not to touch the 

stove’s painted surfaces at this time.

Auger loading

Before starting the stove for the first time, whenever the stove is in alarm “06 - Pellets finished”, and in any case whenever the hopper 

has emptied completely, the initial feed screw loading is required. This phase serves to fill the pellet loading system so that, at the 

time of ignition, the correct pellet loading takes place in the brazier.In the event that the feed screw operations are not carried out, 

there may be stove ignition failures. 


After loading the auger and before lighting the stove, always remember to empty the brazier and check that the brazier is 

clean. Never empty the brazier inside the hopper.


After each maintenance operation, make sure that the brazier is positioned correctly in its seat.


In models with self-cleaning brazier it is not necessary to remove the pellets in the brazier: the pellets loaded are sufficient 

for subsequent ignition.

User’s manual HANDHELD TOUCH RADIO

User’s manual HANDHELD TOUCH RADIO

Pag.22 

Pag.23 

Vers. 01 of:07.04.14

Vers. 01 of:07.04.14

Loading the auger

MENU

USER

SCREW FEEDING

SCREW FEEDING

CHRONOTHERMOSTAT

AIR-PELLET SET

STOVE STATE

USER

MANUFACTURER 

ENGINEER

MENU

USER

MANUFACTURER 

ENGINEER

USER

USER

COMFORT CLIMA

COMFORT CLIMA

COMFORT CLIMA

COMFORT CLIMA

ENABLE COMFORT

ENABLE COMFORT

ENABLE COMFORT

RESTART DELTA

RESTART DELTA

SHUTDOWN DELAY

SHUTDOWN DELAY

SHUTDOWN DELAY

SHUTDOWN DELAY

ENABLE COMFORT

ENABLE COMFORT

COMFORT CLIMA DELTA

COMFORT CLIMA DELTA

RESTART DELTA

SHUTDOWN DELAY

SETTINGS

SCREW FEEDING

CHRONOTHERMOSTAT

AIR-PELLET SET

STOVE STATE

ALWAYS EMPTY THE BRAZIER BEFORE TURNING THE STOVE ON AND ALWAYS CHECK  

THAT ALL NONE OF ITS HOLES IS CLOGGED NEVER EMPTY THE RBAZIER INSIDE THE HOPPER.  

FIRE HAZARD.  

Carry out this operation to facilitate stove’s first start operations; You should also check that you have introduced pellets  

into the hopper and wait until the stove is in “SHUTDOWN” or “FINAL CLEANING” mode. The number expressed in sec-

onds indicates the rotation time of the infeed screw during the first loading cycle. Once this time has elapsed, the infeed  

screw stops immediately and then pellets are emptied from the grate before turning on the equipment.  

Below are given the steps for accessing the relative menu.  

Press the key  “access 

menu” to access  

the  

MENU page  

Press the key  

“confirm”  

to access the  

USER page  

At the end of the auger loading, the display shows 0 “and automatically switches to the USER menu page.  

Press the key for several times until the Stand-by page is displayed.  

Setting operating temperature and power: 

Set the two values following the indications given in the chapter “Description of thr display” 

Turning the device on 

Keep the key ON/OFF pressed for a few seconds to turn on the stove.  

Press CONFIRM to enable  

the rotation of the auger  

The appearance of the message “ADJUST THE RDS SYSTEM” indicates that the initial parameter testing procedure  

and calibration has been unsuccessfully. This indication does not cause stove blockage (see the SIGNALLING POP UP  

section).  

On the display of the handheld set appears the following:  

Press and hold the ON/OFF button to turn off the stove door, and reset any alarms triggered.  

In case the infeed screw operations described avobe have not been executed, the stove may fail to turn on. In this case,  

carry out the operations described above and   empty the brazier and reset the alarm.  

If the stove still fails to turn on, check that the grate is properly installed and perfectly adherent to the base, and also check that  

there are no deposits that prevent the smooth passage of air to enable ignition. If the problem persists, contact the support ser

-

vice. 

Sequence of ignition phases  

SWITCH-ON- initial pellet loading phase; 

WAIT FLAME - flame 

development  wait  

phase; 

FLAME PRESENT - flame stabilization  

phase and reduction of combustible  

inside the brazier;  

What happens if the batteries are empty?  

If the battery is discharged, within the  

“drop” is shown a symbol that indicates  

that the battery is empty, while maintain-

ing active the features of your device.  

WORK - operation phase 

described in  

the dedicated chapter;  

As soon as the level of the battery  

prevents the radio communication  the 

handheld set displays on full screen  the 

picture of empty battery and all device 

functions are locked  until the batteries 

are replaced   

CONNECT AN EXTERNAL THERMOSTAT WITH A SIMPLE DRY CONTACT, THEREFORE, NOT POWERED. MORE-

OVER, WE RECOMMEND YOU USE A THERMOSTAT WITH A MINIMUM OFFSET OF 3°C IF YOU INTEND TO USE  

THE COMFORT CLIMA FUNCTION.  

Operating phases of the appliance 

Modulation 

During the work phase, the appliance should reach the room temperature set; when this condition is met, the stove switches to  

MODULATION mode in which fuel consumption and ventilation are minimum.  

If you wish to detect the ambient temperature by means of an external thermostat (optional), this must be connected to  

the appropriate connector on the rear side of the stove; and you will have to activate the reading in “SETTINGS - EN  - 

ABLE THERMOSTAT.” On display appears the writing TON / TOFF based on thermostat request.  

Comfort climate 

The activation of this function enables the stove to reduce pellet consumption by activating the modulation phases, after the desired  

temperature has been reached. Subsequently, the stove checks that the temperature is maintained steady for a preset  time. If this 

condition is met, it automatically switches off, and on display appears the writing ECO.  

The stove turns on again when the temperature drops below the set threshold. 
Below are given the steps for accessing the relative menu.  

Press the key  

“access menu” to 

access  

the  

MENU page  

Press the key  

“confirm”  

to access the  

USER page  

Once you have accessed the Climate Comfort menu, it is possible to operate on the 3 types of settings dedicated to the function:  

Press the key for several times until the Stand-by page is displayed.  

Press the key “selection” for  

“selection”  

to switch to the second page  

of USER MENU and select  

CLIMATE COMFORT.   

Press the “menu access” 

button to access the 

MENU screen. 

Press the “confirm” 

button to access the 

USER screen

Press the “confirm” 

button to activate feed 

screw rotation 

Switching the appliance on and off

From the “Home” screen, it is possible to switch the stove on and off by keeping the ON / OFF button pressed on the device for a 

few seconds. An acoustic signal will warn you that the appliance has switched on or off. In case it is not possible using your remote 

control you can switch the appliance on / off using the appropriate button on the electronic board.


Do not switch off the heater by unplugging the plug from the wall socket.


📌

The appearance of the “SET RDS” message indicates that the initial parameter testing and calibration procedure was not 

carried out correctly. This indication does not imply blocking the stove (see SIGNALING POP UP section).

MENU

USER

TECHNICIAN

PRODUCER

USER

LOADING AUGER

CHRONOTHERMOSTAT

SET AIR-PELLET

STOVE STATUS

LOADING AUGER

Содержание Aria

Страница 1: ...USE AND MAINTENANCE MANUAL Aria...

Страница 2: ......

Страница 3: ...uiksaanwijzing Beachten Sie die Warnungen und Hinweise betreffend die Installation und regelm ige Wartung in der Bedienungsanleitung Respete las advertencias y las indicaciones de instalaci n y manten...

Страница 4: ...c thermostat room temperature control No Useful efficiency NCV as received with electronic room temperature control No Useful efficiency at nominal heat output th nom 91 5 with electronic room tempera...

Страница 5: ...andard The notified laboratory T V Rheinland Energy GmbH NB 2456 performed the determination of the product type on the basis of type testing under system 3 and issued test report K31932021T1 8 Declar...

Страница 6: ...o Trademark Marque Ravelli Modello Model Mod le Aria L oggetto della dichiarazione di cui sopra conforme alla pertinente normativa di armonizzazione dell Unione The object of the declaration described...

Страница 7: ......

Страница 8: ......

Страница 9: ...n do not discard it without reading it Incorrect installation maintenance and improper use of the product relieve the Manufacturer of all liability deriving from use of the stove For further informati...

Страница 10: ...uels 18 TECHNICAL CHARACTERISTICS 19 Technical diagram Aria 20 Main parts 21 Description of operation 21 Recharge the fuel 22 Doors opening 22 User training 22 Safety devices 23 SHIPPING AND INSTALLAT...

Страница 11: ...ing 38 Stove phase general layout 40 MAINTENANCE 43 Safety warnings for maintenance 43 Cleaning 43 Extraordinary maintenance 45 Failure cases 47 TROUBLESHOOTING 50 The appliance does not work 50 Diffi...

Страница 12: ...Maximum water temperature TW max set Maximum adjustable water temperature pWnom Max working pressure 230 V 50 Hz Alimentation Distance to combustible materials dS L Left side dC Ceiling dS R Right si...

Страница 13: ...the gaskets the paint job the stainless steel or cast iron combustion grille the resistance the Majolica cladding the aesthetic parts any damages caused by unsuitable installation and or use of the pr...

Страница 14: ...any inconsistency arises it will be necessary to follow the text in the original language or contact our Technical Documentation Office Symbols used in the manual symbol definition This symbol is use...

Страница 15: ...y use original spare parts Any tampering and or replacements that have not been authorised by Ravelli can pose a danger to the user s safety In the event of particularly adverse weather conditions the...

Страница 16: ...contract and herein the operating manual procedures are followed routine maintenance is carried out according to the times and methods set forth extraordinary maintenance is promptly carried out when...

Страница 17: ...gulation chimney provide a suitable system for the supply of combustion air air intake or intake duct for watertight appliances always perform maintenance with the appliance off and cold perform clean...

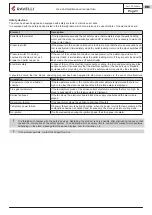
Страница 18: ...Ravelli recommends using wood pellet classified A1 and A2 according to the EN ISO 17225 2 2014 standard or certified DIN PLUS more restrictive than the A1 class or ONORM M 7135 Pellet may be light or...

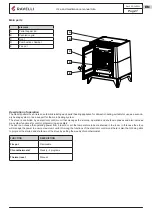
Страница 19: ...nsumption max W 260 Electrical power consumption reduced nominal W 30 50 Stand by electrical consumption W 3 8 smoke air inlet mm 35 smoke outlet pipe mm 80 Hopper capacity kg 17 Seasonal energy effic...

Страница 20: ...Pag 20 Rev 0 22 04 2022 EN 718 621 513 223 156 35 ENTRATA ARIA 80 USCITA FUMI 373 205 45 Measurements Unit of measurement Aria Height mm 718 Width mm 621 Depth mm 513 Weight kg 127 Technical diagram A...

Страница 21: ...electronic control unit that manages the start up operation and shutdown phases and also includes many other functions for control programming and safety The user can choose the operating power from 5...

Страница 22: ...RM button you can read the detail of the warning doors and ash pan open If the combustion chamber door the pellet hopper lid and or the ash drawer are not closed within 1 minute the stove switches off...

Страница 23: ...standard equipped with a grounding circuit and all the safety systems required by the standards It should be noted that the stove s operating program has been designed to stop stove operation in the e...

Страница 24: ...d that the safety distances from flammable materials are observed Verification of system compatibility has a priority over any other assembly or installation operation Local administrative regulations...

Страница 25: ...anufacturer Do not connect the appliance to a collective chimney The chimney must be built applying the following regulations it must observe product standard EN 1856 1 it must be made of materials th...

Страница 26: ...the presence of other combustion appliances or VMC system it is necessary to check the appliance for correct operation The appliance must be placed inside living quarters It must never be installed o...

Страница 27: ...another one installed so that the outside section can be inspected It is prohibited to install two 90 bend since the ashes would quickly obstruct smoke passage causing draught problems in the applianc...

Страница 28: ...ickly obstruct smoke passage causing draught problems in the appliance See Fig 2 INTERNAL CHIMNEY Fig 5 Protection from rain Covering sheet Air tight steel sheet metal T fitting with collection chambe...

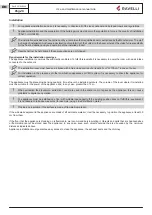
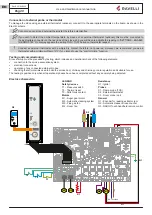
Страница 29: ...connected after the installation and assembly has been completed of the appliance and must remain accessible after installation To make the electrical connection proceed as described below First conn...

Страница 30: ...ND Safety devices T1 Pressure switch T2 Resettable thermal breaker T3 Pellet tank contact Motors M1 Infeed screw gear motor M2 Automatic cleaning system M3 Fume exhaust system M4 Room fan Resistance R...

Страница 31: ...ble in the menu Select the desired language with the scroll buttons and confirm your selection with the confirmation button In order to operate correctly the remote control should be interfaced with t...

Страница 32: ...of the battery on the back of the remote control as shown in Figure A and insert the 3 batteries mini pen style battery AAA 1 5V in the housing of the remote control and observe the poles Install the...

Страница 33: ...N ADJUST LANGUAGE SCREW FEEDING CHRONOTHERMOSTAT AIR PELLET SET STOVE STATE The display is subdivided into three parts 1 It shows the current room temperature measured by the handheld set Moreover if...

Страница 34: ...COMFORT CLIMA DELTA RESTART DELTA SHUTDOWN DELAY SETTINGS SCREW FEEDING CHRONOTHERMOSTAT AIR PELLET SET STOVE STATE CONNECT AN EXTERNAL THERMOSTAT WITH A SIMPLE DRY CONTACT THEREFORE NOT POWERED MORE...

Страница 35: ...ct therefore not powered moreover we recommend you use a thermostat with a minimum offset of 3 C if you ntend to use the comfort clima function Description of menu functions Press the key to access th...

Страница 36: ...ure If the type of system designed requires controlling the 3 way valve diagram 1 and 3 it is necessary to purchase the optional kit from the retailer or the authorized Ravelli dealer CHRONO CHRONO EN...

Страница 37: ...RECOMMEND YOU USE A THERMOSTAT WITH A MINIMUM OFFSET OF 3 C IF YOU INTEND TO USE THE COMFORT CLIMA FUNCTION Operating phases of the appliance Modulation During the work phase the appliance should rea...

Страница 38: ...FW VERSION LANGUAGE LANGUAGE LANGUAGE LANGUAGE ADJUST ADJUST ADJUST ADJUST In Home mode instead of room temperature measured and settable appears the line T ON if the room in which the thermostat is i...

Страница 39: ...l confirm of data and switch to the page within SETTINGS menu The stoves equipped with ventilation system can heat the area in which are installed through the heat generated by the window and the room...

Страница 40: ...set is reached see the dedicated section WAITING START RESTART Switch on is requested but with the stove in cooling phase once this condition is met it restarts automatically IGNITION RESTART The HOT...

Страница 41: ...or is connected incorrectly Contact the Support Service No power to fume extractor Contact the Support Service The fume extractor is blocked Contact the Support Service AL 05 NO IGNITION The pellet ta...

Страница 42: ...obstruction or voltage drop Check the mains voltage AL 14 AUGER PHASE No cable connection to power the gear motor Check the mains voltage AL 15 AUGER TRIAC An internal part of the electronic board tha...
Страница 43: ...e stove operating mode and combustion control can affect maintenance activity frequency Cleaning Perform the cleaning operations so as to guarantee correct stove operation The table below lists the ne...

Страница 44: ...cold stove clean the glass with a cloth and glass cleaner Note there are stove glass cleaning products available on the market Combustion chamber cleaning To clean the ash drawer proceed as follows s...

Страница 45: ...ng with their replacement Replace a worn component before it is completely broken to prevent any damage caused by sudden component breakage PARTS FREQUENCY 1 SEASON Deep combustion chamber cleaning Do...

Страница 46: ...operation must be carried out by a Ravelli Assistance Centre Schedule this type of cleaning with the Ravelli Assistance Centre The stove is equipped with some hatches for cleaning the internal smoke d...

Страница 47: ...eplace the electronic board contact the Technical Assistance Service AL 15 The flame does not ignite Check that the igniter warms up Check and if necessary replace the igniter AL 05 Air inlet duct blo...

Страница 48: ...sed perfectly or the gasket are worn Close the door and have the gaskets replaced with original ones AL 05 AL 06 The stove stops automatically Alarm presence Check the alarm table Any alarm Active chr...

Страница 49: ...ot work Remote control battery low Replace battery or connection to the stove via cable Faulty remote control Replace remote control The stove always works at maximum power Temperature not set correct...

Страница 50: ...s at the inlet and outlet for prolonged downtime DISPOSAL AT END OF SERVICE LIFE Warnings for the correct disposal of the product Demolition and disposal of the appliance is under the exclusive liabil...

Страница 51: ...lays Sensors Spark plugs Electronic boards Batteries Dispose of separately at authorised centres in accordance with WEEE 2012 19 EU and its national transposition E METAL STRUCTURE Dispose of separate...

Страница 52: ...r s parer cet appareil et ou les piles ou les accumulateurs des autres types de d chets et de le confier au service municipal de collecte On peut demander au distributeur de pr lever le d chet d appar...

Страница 53: ...r at forebygge ventuelle skader for milj et eller sundheden bedes brugeren om at behandle dette udstyr og eller de medf lgende batterier eller akkumulatorerne separat fra andre affaldstyper og at leve...

Страница 54: ......

Страница 55: ......

Страница 56: ...f free to make any variations to the features of its products without notice Aico S p A Headquarter Via Consorzio Agrario 3 25032 Chiari BS Italy Research and Development Centre Viale del commercio 12...

Отзывы: