Important information on spreading
10
100
Normal spreading in or out of the headlands tramline
When continuing spreading in the field after headland tramline spreading, please
note the following:
Move the border spreading unit TELIMAT out of the spreading area.
Figure 10.4:
Normal spreading
[A] End of spreading fan when spreading in the headlands tramline
[E] End of spreading fan when spreading in the field
[T] Headlands tramline
[X] Working width
The metering slides must be opened or closed at different distances to the field
border of the headlands when travelling backwards and forwards.
Driving out of the headlands tramline
Open
the metering slides if the following requirement is met:
-
The end of the spreading fan on the field [E] is at approx. half of the work-
ing width + 4 to 8 m from the field boundary of the headlands.
The tractor is then located at different distances in the field, depending on the
spreading distance of the fertiliser.
Driving into the headlands tramline
Close the metering slides
as late as possible
.
-
The end of the spreading fan should ideally come to lie on the field [A] at
a distance of approx. 4 to 8 m further than the working width [X] of the
headlands.
-
This cannot always be achieved, depending on the spreading distance of
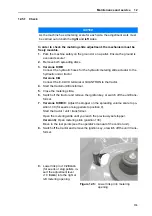
the fertiliser and the working width.
Alternatively, the headlands tramline can be passed or a 2nd headlands track
can be prepared.
Follow these instructions in order to ensure an environmentally friendly and eco-
nomical working method.
E
A
X
Содержание MDS 14.2
Страница 8: ...Intended use 1 2...
Страница 28: ...Safety 3 22...
Страница 38: ...Technical data 4 32...
Страница 42: ...Axle load calculation 5 36...
Страница 44: ...Transportation without tractor 6 38...
Страница 86: ...Machine settings 8 80...
Страница 96: ...Calibration and discharging residual material 9 90...
Страница 110: ...Important information on spreading 10 104...
Страница 114: ...Faults and possible causes 11 108...
Страница 117: ...Maintenance and service 111 12 1 Flat springs 2 locking bolts Figure 12 1 Locking bolt locked in correctly 2 1...
Страница 146: ......

