background image


Safety Instructions 

 
1.  Please read these safety instructions carefully. 
2.  Keep this User Manual for later reference. 
3.  Disconnect this equipment from the electrical outlet before cleaning. Do not use liquid or 

spray detergent for cleaning. Use moisture sheet or cloth for cleaning. 

4.  For plug-in equipment, the outlet should be located near the equipment and should be 

easily accessible. 

5.  Keep this equipment from humidity. 
6.  Rest this equipment on a reliable surface when installing. A drop or a fall could cause 

injury. 

7.  Do not leave this equipment in an unconditioned environment where storage temperatures 

rise above 40º C; it may damage the equipment. 

8.  The ventilation openings on the equipment are for air convection to keep it from 

overheating. DO NOT COVER THE OPENINGS. 

9.  Make sure the voltage of the power source connecting to the equipment is appropriate. 
10.  Place the power cord in such a way that people cannot step on it. Do not place anything 

over the power cord. The power cord must be rated for the voltage and current marked on 
the product’s electrical ratings label. The voltage and current rating of the cord should be 
greater than the voltage and the current rating marked on the product. 

11.  Please note all cautions and warnings on the equipment. 
12.  If the equipment is not in use for an extended time period, disconnect the equipment to 

avoid being damaged by transient over-voltage. 

13.  Never pour any liquid into ventilation openings. This could cause fire or electrical shock. 
14.  If one of the following situations arises, get the equipment checked by service personnel. 

− 

The power cord or plug is damaged. 

− 

Liquid has gotten into the equipment. 

− 

The equipment has been exposed to moisture. 

− 

The equipment is not working well, or you cannot get it to work according to this User 
Manual. 

− 

The equipment has dropped and is damaged. 

− 

The equipment has obvious signs of breakage. 


15.  Never open the equipment. Only qualified service personnel should open the equipment. 


Содержание TZ1500

Страница 1: ...User Manual TZ1500...

Страница 2: ...This page intentionally left blank...

Страница 3: ...B V Eglantierbaan 16 2908 LV C ll d IJ l Raritan Computer Japan Inc Kuga Building 7F 11 6 K 4 h Raritan Computer Taiwan Inc 5F 121 Lane 235 P Chi Rd H i Ti Copyright 2003 Raritan Computer Inc KVM_TZ15...

Страница 4: ...This page intentionally left blank...

Страница 5: ...y and if not installed and used in accordance with the instructions may cause harmful interference to radio communications Operation of this equipment in a residential environment may cause harmful in...

Страница 6: ...This page intentionally left blank...

Страница 7: ...CIM On Screen User Interface OSUI Functions 12 Help Menu 13 Selection Menu 13 Edit Menu 14 System Profile Menu 14 System Profile Menu 15 LCD Panel 17 Factory Preset Timing for Reference 17 Power Indi...

Страница 8: ...Z CIM Specifications 33 LCD Panel 34 Model Differentiation 34 APPENDIX B TROUBLESHOOTING 35 Z CIM Troubleshooting 36 APPENDIX C FREQUENTLY ASKED QUESTIONS 37 APPENDIX D GLOSSARY 41...

Страница 9: ...d in such a way that people cannot step on it Do not place anything over the power cord The power cord must be rated for the voltage and current marked on the product s electrical ratings label The vo...

Страница 10: ...This page intentionally left blank...

Страница 11: ...fficient access to servers and other network devices as well as allowing you to manage the setup administration and maintenance of rackmount servers in data centers server rooms and other space critic...

Страница 12: ...2 KVM DRAWER T1500 USER MANUAL Product Photos KVM Drawer TZ1500 UKVMSPD Z CIM Unit...

Страница 13: ...Category 5e UTP cable Administration Admin Port for on site firmware upgrades Package Contents The complete KVM Drawer TZ1500 package consists of 1 1U 19 Rack Mount KVM Drawer console 1 Mounting Kit i...

Страница 14: ...4 KVM DRAWER T1500 USER MANUAL...

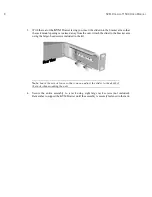
Страница 15: ...hort brackets with the two grid sliders or the longer brackets with the four grid sliders Select the pieces according to the depth of the rack in which the unit will be mounted 1 With the rear of the...

Страница 16: ...unit Attach the slider to the bracket arm using the larger head screws included in the kit Note Leave the screws loose so that you can adjust the slider to the depth of the rack when mounting the uni...

Страница 17: ...omputer being connected to the KVM Drawer and then connect the 6 pin mini DIN keyboard and mouse connectors on the Z CIM to the computer s keyboard and mouse ports 5 Plug the power cord into the KVM D...

Страница 18: ...y the highlight turns green 5 Type in a desired computer name and press the Enter key the highlighted area will turn yellow 6 Press the S key to save the new name 7 Press the F2 key to return to the S...

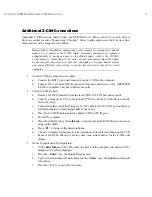
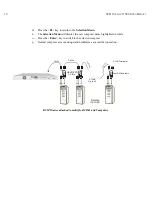
Страница 19: ...ctors on the UKVMSPD Z CIM to computer s keyboard and mouse ports 2 Attach Z CIM to chain a Remove Z CIM Terminator from the last Z CIM s UTP IN port and set aside b Connect a Category 5e UTP cable to...

Страница 20: ...ighlighted in white o Press the Enter key to switch to the selected computer p Normal computer access and operation indicates a successful connection KVM Drawer attached to multiple Z CIMs and Compute...

Страница 21: ...gory 6 UTP Cable Belden MediaTwist 1872A Solid Use of non certified cabling can result in video and data degradations that users may find unsatisfactory Certified Raritan cable products listed above a...

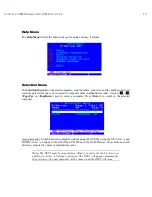
Страница 22: ...erial numbers and scan rates Selection Menu is used to select and then switch between selected channels to access computers F3 View the Edit Menu change computer name or scan rate Can also be used to...

Страница 23: ...e PageUp or PageDown keys to select a computer Press Enter to switch to the selected computer As an alternative Switch between computers without using the OSUI by using the UP Arrow and DOWN Arrow but...

Страница 24: ...will turn yellow 5 Press S to save changes and exit or ESC and then N to exit without saving changes 6 Press the Home key if you wish to designate this computer as your home computer An H will appear...

Страница 25: ...Individual scanning is available Default setting is Global When scan mode is activated the word Scan at the bottom of the OSUI is highlighted in yellow Global Scans each channel for the same amount of...

Страница 26: ...tter S to save Hot Key Use keys to select ScrollLock CapsLock NumLock or Left Alt or Left Shift Default setting is ScrollLock Rapidly pressing selected Hot Key twice activates Z4200U s OSUI Previous C...

Страница 27: ...on interlaced 36 00 800 x 600 37 879 60 Non interlaced 40 00 800 x 600 48 077 72 Non interlaced 50 00 800 x 600 46 875 75 Non interlaced 49 50 800 x 600 53 674 85 Non interlaced 56 25 836 x 624 49 715...

Страница 28: ...dowing in Z CIM configurations employing long distance video runs 250 feet or more or unusually high refresh rates Admin The Admin Port is a proprietary serial port used to upgrade KVM Drawer firmware...

Страница 29: ...en unit is turned off via the on off button Up Arrow button at left of LCD Panel Press to call up Z CIM Selection Menu and scroll upward through it Down Arrow button at left of LCD Panel Press to call...

Страница 30: ...ically configure all aspects of visual display The message AUTO CONFIGURE appears and the LCD panel will flicker momentarily until the KVM Drawer finds the ideal profile To close the OSD Main Menu hig...

Страница 31: ...the highlighted option MAIN MENU AUTO TUNE BRIGHTNESS CONTRAST COLOR QUALITY POSITION LANGUAGE RECALL EXIT 800X600 H37 8KHZ V 59 8HZ OSD Main Menu Auto Tune Select the Auto Tune function to allow the...

Страница 32: ...o increase or decrease the video raster luminance 4 Press the MENU button to return to the OSD Main Menu Contrast Select the Contrast function to change the difference in brightness between the light...

Страница 33: ...Color and then press the MENU button to view the Color Main Menu MAIN MENU 9300 7500 6550 USER AUTO COLOR RETURN 800X600 H37 8KHZ V 59 8HZ Color Main Menu 3 Press the or the button to select the desir...

Страница 34: ...tton to return to the Color Main Menu b Select the Auto Color function on the Color Main Menu to allow the KVM Drawer to automatically adjust the amount of Red Green and Blue on the LCD panel When you...

Страница 35: ...ss the or the button to highlight Quality and then press the MENU button to view the Quality Main Menu MAIN MENU SIZE PHASE NOISE TEXT GFX SHARPNESS RETURN 800X600 H37 8KHZ V 59 8HZ Quality Main Menu...

Страница 36: ...button to return to the Quality Main Menu PHASE 42 Phase Control Panel c Noise On the Noise control panel use the and buttons to adjust electrical interference or snow that appears on the LCD Panel Pr...

Страница 37: ...the MENU button to return to the OSD Main Menu Position Select the Position function to change the location of graphics displayed on the LCD panel 1 Press the MENU button to activate the OSD Main Menu...

Страница 38: ...the position of the On Screen Display panel on the LCD panel MAIN MENU HORIZONTAL VERTICAL CENTER RETURN 800X600 H37 8KHZ V 59 8HZ OSD Position Main Menu i Select the Horizontal function to move image...

Страница 39: ...mage Position or OSD Position Main Menu VERTICAL 45 Vertical Control Panel iii Select the Center function if you want the KVM Drawer to center the image s on the LCD panel automatically CENTER DOING C...

Страница 40: ...l reflect the current highlighted option and press the MENU button to change all OSD menus to the chosen language MAIN MENU ENGLISH GERMAN FRENCH ITALIAN SPANISH 800X600 H37 8KHZ V 59 8HZ Language Mai...

Страница 41: ...close the OSD Main Menu 1 Press the MENU button to activate the OSD Main Menu 2 Press the or the button to highlight Exit and press the MENU button to close the OSD Main Menu Note The OSD Menu disapp...

Страница 42: ...32 KVM DRAWER T1500 USER MANUAL...

Страница 43: ...Glass for LCD 08 x 9 8 x 13 1 2mm x 249mm x 333 mm Maximum Resolution XGA 1024 x 768 Input signal format RGB Analog Video Keyboard PS 2 notebook style with touchpad Touchpad Integrated touchpad with...

Страница 44: ...e maximizing rack space for the servers The TZ1500 integrates Raritan s Z Series switchless KVM switch and enables selection and control of up to 42 servers It is ideal for server management where spa...

Страница 45: ...more information Press the AUTO button Unstable Screen Check if PC display resolution is no greater than 1024 x 768 at 85hz Check if PC display resolution matches the factory preset timings Change PC...

Страница 46: ...ort I have located the second channel on the Selection Menu but it is not connecting to the second computer in the Z CIM chain Computer channels are organized alphabetically by assigned name rather th...

Страница 47: ...n technology to control up to 42 servers and eliminate the traditional KVM switch box and all hard to manage server to switch cable It is designed to support the most challenging demands of server man...

Страница 48: ...l incentive for recommending Belden products Can I use plain Cat 5 cable instead of Cat 5e Yes however you may not get the same performance as you would with Raritan certified Category 5e UTP or Categ...

Страница 49: ...e present time no Category 6 standard currently exists all products currently available in the marketplace claiming to be Category 6 UTP cable actually conform to a proposed standard not an establishe...

Страница 50: ...40 KVM DRAWER T1500 USER MANUAL...

Страница 51: ...ld in System Profile Menu for toggling PowerSave feature on and off Home Channel The channel designated as the users Home computer via the Edit Menu F3 This designation will enable the user to quickly...

Страница 52: ...de Scan Toggle Function key F6 for activating AutoScan Scan Mode Field in System Profile Menu Can be set to either Global or Individual Scan Rate Time interval in seconds that a channel s computer is...

Отзывы: