background image

56


After lift 

measurement, enter “preparation


before Caster measurement” 

screen.


5.5 Caster measurement 

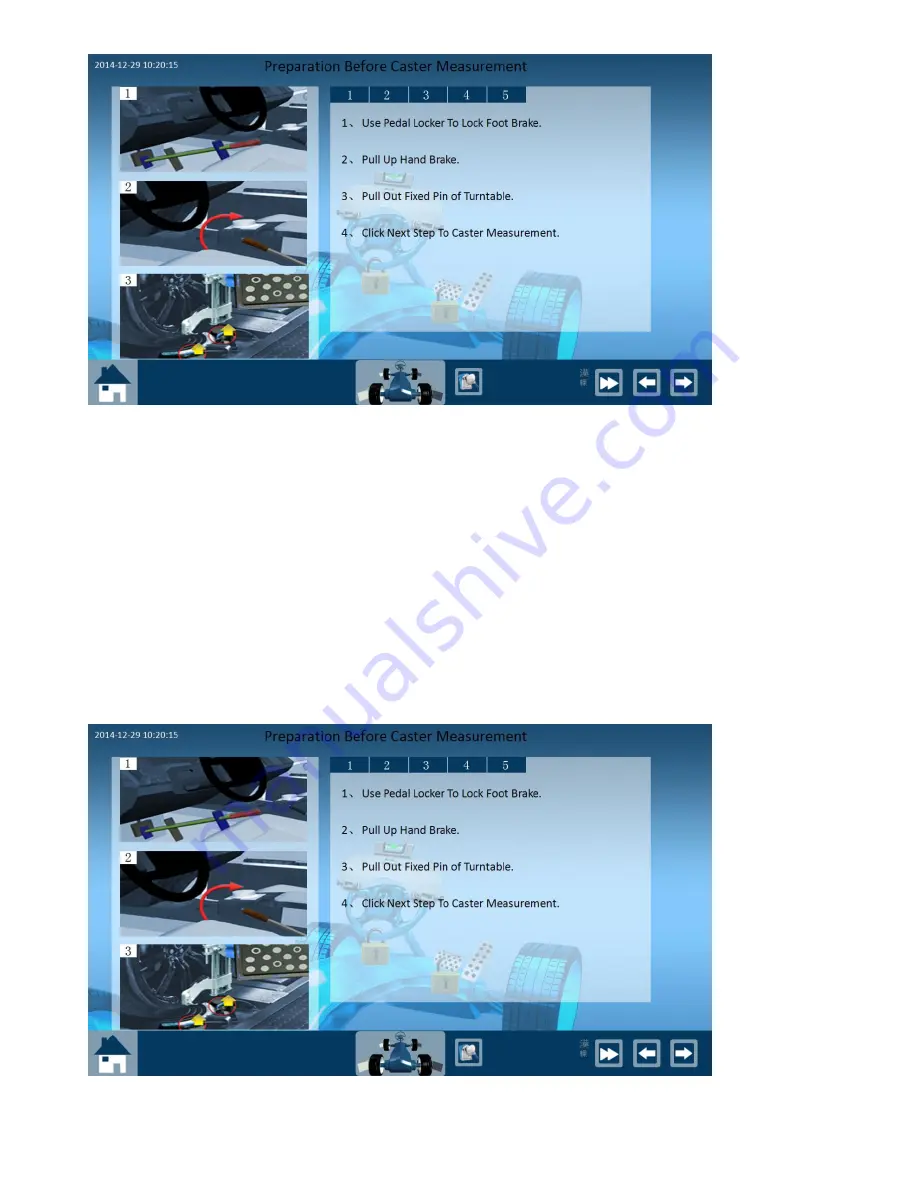
After measurement, enter “preparation before caster measurement”, 

operator need to pull up hand brake and lock pedal locker, shake the 

vehicle head and tail 3 times, let the suspension in release condition.   

Содержание 3DP4100

Страница 1: ...ining and thoughtful operation on the part of the operator DO NOT operate or repair this equipment without reading this manual and the important safety instructions shown inside Keep this operation man ual near the alignment system at all times Make sure that ALL USERS read and understand this manual 1645 Lemonwood Dr Santa Paula CA 93060 USA Toll Free 1 800 253 2363 Tel 1 805 933 9970 Fax 1 805 9...

Страница 2: ...ets Exposure Values Adjustment 34 35 Super Measurement 36 37 Conventional Measurement 38 41 Single Direction Measurement 41 43 Short Distance Measurement 43 47 Lift Measurement 47 53 Caster Measurement 53 61 Straighten the Steering Wheel by Eye 61 63 Report Before Adjustment 63 Adjustment and Widgets 64 65 Oil Gauge Status 66 Digital Type Status Explanation 67 Enlarge Adjustment Values 68 Unit Con...

Страница 3: ... and or other accompanying instructions supplied 3 Normal wear items or service normally required to maintain the product in a safe operating condition 4 Any component damaged in shipment 5 Other items not listed but may be considered general wear parts 6 Damage caused by rain excessive humidity corrosive environments or other contaminant s THESE WARRANTIES DO NOT EXTEND TO ANY COSMETIC DEFECT NOT...

Страница 4: ...e safety instructions Keep them readily available for machine operators t Make certain all operators are properly trained know how to safely and correctly operate the unit and are properly supervised t Allow unit operation only with all parts in place and operating safely t Carefully inspect the unit on a regular basis and perform all maintenance as required t Service and maintain the unit only wi...

Страница 5: ...alified serviceman 4 Do not let cord hang over edge of table bench or counter or come in contact with hot manifolds or moving fan blades 5 If an extension cord is necessary a cord with a current rating equal to or more than that of the equipment should be used Cords rated for less than the equipment may overheat Care should be taken to arrange the cord so that it will not be tripped over or pulled...

Страница 6: ...r switch off disconnect the batteries in all sensor heads and unplug the unit before servicing t Contact with high voltages can cause death or serious injury Risk of eye injury t Debris dirt and fluids may drop from vehicle t Wear approved safety goggles when servicing t Knock off any loose debris t Clean surfaces as needed to avoid any materials from falling from vehicle t Debris dirt and fluids ...

Страница 7: ...hen performing vehicle services t Tools that break or slip can cause injury OWNER S RESPONSIBILITY To maintain machine and user safety the responsibility of the owner is to read and follow these guidelines l Follow all installation instructions l Make sure installation conforms to all applicable Local State and Federal Codes Rules and Regulations such as State and Federal OSHA Regulations and Elec...

Страница 8: ...s where bystanders and customers may be present Proper unit installation is necessary for safe use and efficient operation Proper installation also helps protect the unit from damage and makes service easier Always keep this manual with the unit Installation Instructions Appropriate procedures must be employed for effective assembly of your new Target 3D PRO wheel aligner system Please refer to In...

Страница 9: ...STEM REQUIREMENTS This equipment uses a 3D software 64 bit program which can be installed on Windows 7 or Windows 8 Operating Systems TECHNICAL PARAMETERS Power Supply 110V 240V Frequency 50 60HZ Working Temperature 5ºC 40ºC 41ºF 104ºF LIFT REQUIREMENTS It is required that the wheel alignment operation area should have enough space to install a one unit four post lift or scissor lift and plenty of...

Страница 10: ...cambercancauseinside tire wear The vehicle will pull to the side with the most positive camber if there is a difference in camber angle between sides POSITIVE CAMBER Positive Camber is often used to induce understeer in some cars during hard cornering where most drivers cannot drive oversteer conditions that may be caused by negative camber Excessivepositivecamberwillcauseoutsidetirewear The vehic...

Страница 11: ...outboard the Centerline of the wheel typi cal of Front Wheel Drive Vehicles The Scrub radius will change the effect that vehicle forces impose on the toe Positive Scrub Radius will tend to create a force moving the wheels outward on a rear drive vehicle Negative Scrub radius creates a force that forces the wheels out on a front wheel drive vehicle while under power This is found on front wheel dri...

Страница 12: ...es typically require some amount of toe in such that when drag acts to separate the front wheels the front ends track at zero toe This assumes a typical positive scrub radius On most front wheel drive vehicles the torque on the front wheels acts to pull the front edges of the front wheels together when a positive scrub radius exists In this situa tion some toe out will allow the front wheels to tr...

Страница 13: ... is out of focus loosen the camera fixed screw with a Phillips screwdriver 4 Use hand to turn the outside of lens slowly untill you notice the image is clear Turn clockwise or counter clockwise to adjust as necessary 5 After the camera lens has been adjusted drive the vehicle onto the lift ensure that the front wheels are centered with the turntables Apply the hand brake to make sure the car will ...

Страница 14: ... FRONT AND REAR TARGETS INSTALLATION Check clamps are installed on the wheel and turn the top knob to lock the wheel clamp The claws of the wheel clamp should be fixed on the external edge of the rim To install the targets insert the locating pin of the targets in the groove of clamps and rotate the targets until they are tilted forward towards alignment cameras Incline the targets about 5 degrees...

Страница 15: ...ove camera crossbeam until targets are correct color When installed correctly the front targets will appear blue on the screen and the rear targets will show green See pictures below Adjusting Camera Beam Fixed Camera Beam Raise lift to proper height and position it on the locks Unlock fixed knobs on the camera crossbeam run the software program to target searching screen adjust the camera beam po...

Страница 16: ...ng wheel to the right If both low LED indicators on the right and left camera are green and flickering the steering wheel is in the middle position When the two LED indicators on the right camera are red and the left camera shows a green flickering light on the top and a red light underneath this means you should turn the steering wheel to the left If the LED indicators on both cameras are green a...

Страница 17: ...urn the center knob of the clamp to adjust its size to be suitable for rim Make sure the 4 claws of the clamp stick to the wheel rim closely Turn the knob of the clamp to fix it on the wheel tightly HOMEPAGE AND MENUS Homepage Software program homepage is the beginning of mea surement there are two measurement ways four wheel alignment two wheel alignment The operator can begin to measure after ch...

Страница 18: ...2 5 Conventional measurement screen buttons Back to homepage Settings Search targets Choose measurement ways 返 Back to homepage Settings Search targets 键 Restart Previous step Next step 键 Choose history customer information 键 Next step 键 Previous step Settings Back to homepage Search targets ...

Страница 19: ...rt before adjustment screen buttons 4 2 7 Measurement results screen buttons Back to homepage Setting s Print Add customer information Search targets Review measurement values Previous step Next step Next page Close ...

Страница 20: ...ering wheel of two wheel alignment measurement Back to homepage Mm and degree convert Search targets Choose measurement functions Previous step Next step Individual angle adjustment Back to homepage Search targets Revise thrust angle Previous step Next step ...

Страница 21: ...ixed version Enter camera exposure adjustment 进入灰度值调整界 Target blocked indication 目标板遮挡指 Lift moving indication 举升机升降指 Close 关闭按 Camera beam lifting indication 相机横杆升降指 Lift moving up indication 举升机向上举升指 Lift moving down indication 举升机向下降落指 Camera beam lifting indication 相机横杆升降指 ...

Страница 22: ...22 㐀 䰀椀昀琀椀渀最 椀渀搀椀挀愀琀椀漀渀 ...

Страница 23: ...ndication If the target is blocked during measurement the wheel in the software program screen is in red color See below photos for reference Target indication area 目标板提示 Targets are normal Front left target blocked Front targets both blocked Front and rear targets all blocked ...

Страница 24: ...ing vehicle specification and go to preparation before measurement screen directly After conventional measurement push vehicle measurement the operator can skip Caster measure ment and go to straighten steering wheel screen directly Previous Page On adjustment screen clcik previous page can enter all measurment values check screen Next Page On adjustment screen click next page can enter individual...

Страница 25: ...earch targets screen to check the targets status position and gray value when install equipment or before measurement or during measurement Search Targets Screen of Fixed Version 3D Alignment Search Targets Screen of Automatic Version 3D Alignment ...

Страница 26: ...ight board exposure time and camera gain Gray values adjustment screen Exposure time adjustment of right targets Exposure time adjustment of left targets Calculate exposure time automatically Gray value of rear left target Gray value of rear right target Gray value of front left target Gray value of front right Enter gray value adjustment screen ...

Страница 27: ...ear targets gray value within the correct range or it is red if the gray values out of correct range 4 6 3 Gray values range of front targets 1 The gray values range of front targets is 210 255 If the front target gray value is less than 210 when the operator run the cameras on preparation before measurement screen the system will indicate to enter gray value adjustment screen to adjust values to ...

Страница 28: ...on the four wheels if choose four wheel alignment It only need to install two targets on the front wheels if choose two wheel alignment 3 It will display green triangle after been selected 4 Click the measurement way will enter vehicle specification selection 5 Operator can choose the new vehicle specification or choose the saved customer information to enter measurement procedure ...

Страница 29: ...on 5 2 1 Choose vehicle specification 1 Operator can click new measurement button to enter choose vehicle specification screen Then go on measurement New measurement Search by brand Search by model Choose database Check detailed vehicle specification ...

Страница 30: ...cation For example we choose Alfa Romeo 156 then we click to check detailed specification will see below photo Check detailed vehicle specification information Wheelbase and tread Loading Rear wheels data Front wheels data Vehicle mode ...

Страница 31: ...ction directly 2 It must input license plate number when input customer information 3 The customer information will be saved automatically after click next step And will display on customer list area 4 Operator also can click history customer information to choose saved history information Customer list area History customer information Input customer information area ...

Страница 32: ... click history customer information button on homepage 5 3 1 Choose history customer information Click next step to enter preparation before measurement after choose saved customer information can check the history adjustment report History customer information save delete Add and input customer information History reports ...

Страница 33: ...ndication screen 2 First operator need to observe if the targets position and status are correct on preparation before measurement screen 3 Second observe if the targets exposure values is in green color the software screen will indicate to adjust the exposure values if it is not green 4 Third prepare according to the three steps indication on the screen Printout Button close 按 键 ...

Страница 34: ...al push vehicle way 5 4 2 Preparation targets exposure values adjustment 1 If the targets exposure value on the preparation before measurement screen is out of standard range will affect the measurement precision When the operator click next stop will appear the indication camera exposure values is incorrect that will affect measurement precision if transfer to adjust the exposure time Exposure va...

Страница 35: ...exposure values of front and rear targets by adjust the exposure time of left and right cameras Exposure value of rear target Exposure value of front target Adjustment button of right camera exposure time Adjustment button of left camera exposure time ...

Страница 36: ... left and right side targets are exactly the same all the way around If the operator is not able to get one of the values possibly something is blocking one of the targets and disturbing the whole process Click X to close this screen Operator will be taken back to the Preparation for Measurement screen Now click on the forward arrow to go to the next step screen auto adjusts Next is Conventional R...

Страница 37: ...37 ...

Страница 38: ...38 ...

Страница 39: ...ent way used for small working place that doesn t have enough space to push the vehicle We don t recommend customer always use this way because the measurement precision maybe not as good as other measurement ways Operator choose super measurement item on preparation before measurement screen Then enter preparation before super measurement screen the operator must prepare according to the indicati...

Страница 40: ...40 Click next step to begin super measurement Measuring now After super measurement enter preparation before Caster measurement screen ...

Страница 41: ... measurement screen Then click next step to enter conventional measurement screen On conventional measurement screen push the vehicle slowly to the tail direction according to indication on the screen till the number from Pushing distance reference Targets display Push direction and distance reference ...

Страница 42: ... When STOP appear on the screen it must stop pushing immediately and waiting for indication When the screen appears opposite arrow indication push the vehicle to head direction slowly till the number from 10 to 0 and appear STOP ...

Страница 43: ...STOP appear on the screen it must stop pushing immediately and waiting for calculating results After conventional measurement enter preparation before Caster measurement screen Check primary measurement results ...

Страница 44: ...44 5 4 5 Single direction measurement Operator choose single direction measurement item on preparation before measurement screen Then click next step to enter single direction measurement screen ...

Страница 45: ...n measurement screen push the vehicle slowly to the arrow indication direction till the number from 10 to 0 and appear STOP When STOP appear on the screen it must stop pushing immediately and waiting for calculating results ...

Страница 46: ...t enter preparation before Caster measurement screen 5 4 6 Short distance measurement Operator choose short distance measurement item on preparation before measurement screen Then click next step to enter short distance measurement screen ...

Страница 47: ... appear on the screen it must stop pushing immediately and waiting for indication On the Short Distance Measurement selection push the vehicle slowly to the direction indicated by the green arrow shown on the screen In this case push forward until the countdown from 10 reaches 0 When the STOP sign displays operator must stop pushing immediately and wait for the next indication ...

Страница 48: ...umber from 10 to 0 and appear STOP When STOP appear on the screen it must stop pushing immediately and waiting for indication If the green arrow shows in the opposite direction roll back the vehicle until the countdown from 10 to 0 stops When the STOP sign displays operator must stop pulling back the vehicle immediately and wait for the next indication ...

Страница 49: ...ears opposite arrow indication again push the vehicle to head direction slowly till the number from 10 to 0 and appear STOP When STOP appear on the screen it must stop pushing immediately and waiting for calculating results ...

Страница 50: ...r measurement screen 5 4 7 Lift measurement Operator choose lift measurement item on preparation before measurement screen Then click next step to enter preparation before lift measurement screen The operator need to prepare according to the indications on the screen ...

Страница 51: ...1 Operator click any wheel button can begin lift measurment we choose to click front left wheel as example Front left wheel button Rear left wheel button Front right wheel button Rear right wheel button ...

Страница 52: ...e screen indicate to elevate front left wheel The front left wheel enlarge and appear turning path in red color also has green arrow to indicate how to turn the wheel So turn the wheel to tail direction slowly according to the indication ...

Страница 53: ...eel and waiting for the next indication The screen appear the opposite direction indication so the operator turn the wheel to the opposite head direction slowly according to the indication on the screen till back to the original position and appera STOP ...

Страница 54: ...54 Waiting when appear STOP on the screen The front left wheel turn green and appear OK means the front left wheel measurment finished other three wheels measurement repeat the same procedures ...

Страница 55: ...let the 4 wheels of the vehicle on the lift or on the ground totally Then strongly press vehicle head 3 4 times strongly press vehicle tail 3 4 times release the tires and suspension tension caused by vehile elevated Click next step to continue ...

Страница 56: ...e Caster measurement screen 5 5 Caster measurement After measurement enter preparation before caster measurement operator need to pull up hand brake and lock pedal locker shake the vehicle head and tail 3 times let the suspension in release condition ...

Страница 57: ...t has three ways 10 degree 20 degree and max turning degree 10 degree Caster KPI included angle 20 degree Caster KPI included angle toe out on turn Max turning degree Caster KPI included angle toe out on turn max steering angle Caster measurement screen Turning degree display Direction arrow indication Turning direction indication Caster re measurement ...

Страница 58: ...hen the steering wheel turn to right direction exceed 10 degree the steering wheel on the screen will indicate to turn to left direction also the green arrow turn to left so the operator need to turn the steering wheel to the left direction ...

Страница 59: ...e to turn to right direction to the center position also the green arrow turn to right so the operator need to turn the steering wheel to the right direction till the center position Stop turning steering wheel when the steering wheel exceed 0 degree and the screen appear STOP waiting for the calculating results ...

Страница 60: ...el to the right direction exceed 10 degree continue to turn the steering wheel to the right direction exceed 20 degree When turning the steering wheel to the right direction exceed 15 degree steering wheel and arrow on the screen both indicate to turn to right direction ...

Страница 61: ...tion exceed 20 degree steering wheel and arrow on the screen both indicate to turn to left direction Operator turns the steering wheel to the left exceed 20 degree steering wheel and arrow on the screen both indicate to turn to right direction to exceed 0 degree ...

Страница 62: ...en the steering wheel exceed 0 degree and the screen appear STOP waiting for the calculating results 5 5 3 Max turning degree Caster measurement Enter Caster measurement screen turn the steering wheel to right direction from beginning ...

Страница 63: ... direction till can t turn and stop then turn the steering wheel to the left direction after 2 seconds Turn the steering wheel to the left direction till can t turn and stop then turn the steering wheel to the center position after 2 seconds ...

Страница 64: ... Four wheel alignment straighten the steering wheel by eye When choose four wheel alignment operator can enter straighten steering wheel by eye screen after push vehicle measurement directly or after Caster measurement There are four steps indications on the screen the operator must do them before click next step to report before adjustment or will affect the adjustment precision ...

Страница 65: ...r can enter straighten steering wheel by eye screen after push vehicle measurement directly or after Caster measurement But first it need to confirm if the steering wheel of the measured vehicle has offset during driving It need to click revise thrust line manually button to revise the thrust line if has offset Revise thrust line manually ...

Страница 66: ...ions on the screen then click next step to straighten steering wheel by eye screen then there are four steps indications on the screen the operator must do them before click next step to report before adjustment or will affect the adjustment precision 5 7 Report before adjustment ...

Страница 67: ...ustment widgets explanation 3D software adjustment widgets divided as pointer type of oil gauge and digital type Adjustment screen will display the adjustable information by ruler number pointer and color It displays the minimum and maximum value of standard value under the ruler The dynamic value above the ruler is the current measuring data The display area color represents the relationship betw...

Страница 68: ...cification Current measuring data Adjustment pointer Within standard specification range Out of standard specification range Digital type Standard vale Out of standard specification display range color Current adjustment angle Current measuring data Adjustment pointer ...

Страница 69: ...status explanation Current measuring values has big difference with standard vehicle specification Current measuring values near the standard vehicle specification Current measuring values within the standard vehicle specification range ...

Страница 70: ... explanation Current measuring values has big difference with standard vehicle specification Current measuring values near the standard vehicle specification Current measuring values within the standard vehicle specification range ...

Страница 71: ...nvenient for the adjustment Click any place again will be back to original size 6 1 4 Unit convert Operator click unit convert button can convert the value display way it can convert from degree to degree and minute Also can convert Toe unit to mm and inch Toe unit convert need to input tire diameter of the measured vehicle Right camber Left Camber unit change button ...

Страница 72: ...stem will convert the unit of adjustment value from degree to degree and minute or from degree and minute to degree 6 1 4 2 Toe unit convert Operator click the unit convert button to choose mm and degree convert system will appear the dialog box to require to input the wheel diameter first And then click confirm to convert ...

Страница 73: ...73 Choose rim diameter choose rim diameter from the list Rim diameter range list ...

Страница 74: ...g values after alignment these values for the operator to judge the real situation of the measured vehicle Click the turn page button or press up key of the keyboard on adjustment screen can check all the measurement values and additional values Additional data Turn page key Close button ...

Страница 75: ...ick menu button to choose re measure Caster item if wants to re measure the Caster 6 4 Rear wheels adjustment Enter rear wheels adjustment screen after Caster adjustment Rear wheels adjustment procedure Camber Toe Click next page enter individual rear wheel Camber adjustment rear wheel Toe adjustment thrust angle adjustment There are lift adjustment single wheel measurement and other functions on ...

Страница 76: ...justment of rear wheel Camber Adjustment functions menu Camber adjustment of rear right Camber adjustment of rear left Total Toe of rear wheels Single Toe of rear right Single Toe of rear left Unit convert Page turning ...

Страница 77: ...77 Individual adjustment of rear wheel Toe Individual adjustment of rear wheel thrust angle ...

Страница 78: ...perator click adjustment menu and choose lift adjustment item to enter lift adjustment screen Then the operator must prepare according to the indications on the screen before lift adjustment operation Rear wheel adjustment function ...

Страница 79: ...ification on the adjustment screen and click close after adjustment After adjustment and click close button will enter below screen the operator must operate according to the indications on the screen Then click close to back to adjustment screen ...

Страница 80: ...click adjustment function menu on adjustment screen Elevate the measured wheel re measure the wheel according to the indications on the screen Enter single wheel measurement screen operator choose the wheel that need to re measured click the corresponding wheel on the screen to enter next step Click close to exit Front right wheel button Rear right wheel button Front left wheel button Rear left wh...

Страница 81: ...mple click front left wheel icon on the screen to enter front left wheel measurement Operator turns the wheel to the tail direction according to green arrow indication Stop turning the wheel when appears STOP and waiting for indication ...

Страница 82: ...82 Turn the wheel to head direction when appears opposite arrow indication Stop turning the wheel when appears STOP on the screen and waiting for calculating results ...

Страница 83: ...r wheels or click close to exit 6 5 Front wheels adjustment Click next step to enter front wheels adjustment screen after rear wheels adjustment Front wheels adjustment procedure Camber Toe There are many items can be chosen after click front wheels adjustment menu Individual adjustment function is the same as rear wheels adjustment ...

Страница 84: ... Individual Toe of front left Adjustment of front right Camber Individual Toe of front right Right Caster Left Caster Total Toe of front wheel Unit change Adjustment function menu Turning page key Front wheels adjustment functions menu ...

Страница 85: ...ont wheels adjustment screen Enter steering wheel adjustment screen operator must adjust the value very close to 0 based on the values display on the screen then means the steering wheel on the center position Steering wheel angle offset Individual toe of front right wheel Individual toe of front left wheel ...

Страница 86: ...ent screen Toe lock adjustment used for the vehicle steering link and bar adjustment position is narrow not easy to adjust Operation way turn the wheel to enlarge the space to adjust steering link and bar Enter Toe lock adjustment screen and operate according to the indications on the screen then click next step ...

Страница 87: ...87 Still operate according to the instructions on the screens and click next step Turn steering wheel according to the standard specification to adjust one side Toe then click next step after finished ...

Страница 88: ...e Toe after one side Toe adjustment finished Operate according to the indications on the screens Click close if adjustment finished After Toe adjustment operator still need to operate according to the indications on the screens and click close button ...

Страница 89: ...ro Toe function on the adjustment screen This function used for Caster value is too large Toe value change will affect Camber value during the adjustment so the correct Camber value should when Toe is zero Enter Measure Camber At Zero Toe function operate according to the indications on the screen ...

Страница 90: ...tor turn the steering wheel to near 0 the turning indication will stop and screen will appear STOP and steering wheel on the screen turn green At this time operator must stop turning the steering wheel and wait Front left Toe Turning wheel indication box Steering wheel turning indication Front left Camber Front right Toe Front left Camber restart ...

Страница 91: ...nsfers to front right wheel The operator repeats the same operation procedure as front left wheel When finished click close to enter next screen Operate according to the indications on the screen and click close button to back to adjustment screen Front right wheel measurement finished click close button to exit ...

Страница 92: ...92 ...

Страница 93: ...enance button on each software program screen operator can enter system maintenance to set system parameters or make calibration System maintenance screen include system setting camera calibration RCP camera view and vehicle data adding System maintenance ...

Страница 94: ...ase read this chapter instructions carefully 8 1 System setting Click system setting to enter the setting screen It includes system parameters language selection password modification system information backup and relevant information 8 1 1 System parameter On system parameter screen choose the modified item and click save button ...

Страница 95: ... unit inch mm Load bearing KG pound Angle unit 1 99 1 59 Toe unit degree MM inch Resolution 0 00 0 0 Search target way manually automatically If trace targets No Yes Accessory option LED angel eyes assistant indicator Choose measurement way precise calculation of measurement results quick calculation of measurement results ...

Страница 96: ...96 8 1 2 Language selection Click the flag icon to choose the language that customer need 8 1 3 Password modification ...

Страница 97: ...s are broken system will indicate the RCP file doesn t match camera ID and the repair camera ID button will flickering in red and white color Customer can click button to repair the camera ID automatically if doesn t change the new cameras Restore factory settings restore the camera gain exposure time and other information that set in the factory Repair camera ID Restore factory settings Backup sy...

Страница 98: ...ant information include equipment information register information and customer information 8 1 5 1 Equipment information Equipment information display the current equipment s camera ID hardware ID and software version and driver version ...

Страница 99: ...ires date If display unlimited means the equipment unlock forever Generate activating code it will generate a serial codes when using date expired Import unlock code the unlock code can import as TXT file Input generating code the operator input this code will unlock the equipment 8 1 5 3 Customer information Customer can add LOGO and their information on homepage and printout page ...

Страница 100: ...ion Click camera calibration on system maintenance screen can enter camera calibration screen It includes RCP double camera calibration RCP verification TID and distance measurement target calibration The password is 12345678 ...

Страница 101: ...rew the M8 knobs to the corresponding position See below photo for reference 8 2 1 1 Confirm the targets position 1 Operator must trace the targets to confirm the targets position Use rear targets as calibration target So put the calibration bar with two rear targets on 1m position behind the center of turntable the center of the targets must be parallel with camera beam also the targets must be v...

Страница 102: ...ator can choose this option when the light environment has large change animation indication of calibration bar position Animation help Lift trace targets indication Next step enter RCP Close automatic exposure time calculation ...

Страница 103: ...he targets view field in the camera make sure the targets display on the software screen are in green color When the next button color from gray to white means targets trace finished can continue to next step adjust lift height to trace targets indication Change to white color ...

Страница 104: ...se keyboard or press key to adjust camera beam height to adjust the targets view field position 8 2 1 2 Calibration step 1 After trace targets successfully enter next step to RCP screen Operator need to move the right side of calibration bar forward about 300mm left side keep the original position Make sure the two targets on the calibration bar are vertical to the ground and prepare to calibrate ...

Страница 105: ...y value of targets through adjust exposure time Click begin to calibrate button the indication calculating camera exposure time please don t block targets appears on the screen Target status Calibration bar position photo Exposure time Gray value of target Restart Begin to calibrate ...

Страница 106: ...libration beam slowly to the vehicle tail direction according to the animation indication Turn the calibration beam slowly to the vehicle head direction when the arrow animation on the screen to vehicle head direction ...

Страница 107: ...culating staged calibration data please prepare next calibration at this time operator can move the calibration bar to prepare the next calibration step 8 2 1 3 Calibration step 2 After calibration step 1 finished operator need to move the right side of calibration bar backward about 300mm back to original 1m position ...

Страница 108: ...he ground and prepare to calibrate Click next step to begin second step calibration If the gray value of targets out of standard range operator can change the gray value of targets through adjust exposure time Click begin to calibrate button the indication calculating camera exposure time please don t block targets appears on the screen ...

Страница 109: ... direction according to the animation indication Turn the calibration beam slowly to the vehicle head direction when the arrow animation on the screen to vehicle head direction When the screen appears STOP the operator must stop turning the calibration beam ...

Страница 110: ...culating staged calibration data please prepare next calibration at this time operator can move the calibration bar to prepare the next calibration step 8 2 1 4 Calibration step 3 After calibration step 2 finished move the calibration bar backward about 1m so the distance from calibration bar to turntables is about 2m ...

Страница 111: ...out 300mm left side keep the original position Make sure the two targets on the calibration bar are vertical to the ground and prepare to calibrate Click begin button then turn the calibration beam slowly to the vehicle tail direction according to the animation indication ...

Страница 112: ...he screen appears STOP the operator must stop turning the calibration beam Turn calibration beam to head direction till the screen appear STOP and stop turning The screen will indicate calculating staged calibration data please prepare next calibration at this time operator can move the calibration bar to prepare the next calibration step ...

Страница 113: ...r backward about 300mm back to original 1m position and then move the left side of calibration bar forward about 300mm Make sure the two targets on the calibration bar are vertical to the ground and prepare to calibrate Turn the calibration beam slowly to the vehicle tail direction according to the animation indication ...

Страница 114: ...d direction when the arrow animation on the screen to vehicle head direction When the screen appears STOP the operator must stop turning the calibration beam After calibration step 4 finished the screen appears calibration succeed calibration results saved ...

Страница 115: ...of the wheel very closely Run wheel alignment software program choose TID on camera calibration screen Click TID located on the left side of the screen and then enter TID NOTE 1 Make sure the claw of the clamp must stick to the rim of the wheel very closely and tightly Because it is the important element to guarantee the precise measurement 2 If the customer chooses the super measurement function ...

Страница 116: ... example if you choose the front left wheel click the front left wheel button and the system will indicate calculating camera exposure time please son t block targets Operator must turn the wheel slowly to the vehicle tail direction according to arrow indication and turning path indication on the screen ...

Страница 117: ...en STOP appears on the screen stop turning and turn the wheel to the opposite direction according to the arrow indication When you see STOP stop turning and turn the wheel to the opposite direction according to the arrow indication ...

Страница 118: ...he front left wheel TID Continue doing the other three wheels TID procedure the same way as you did the front right wheel 8 3 Camera View Lens view screen displays the original images of targets in color here you can also test the left and right camera s lens view range See next image ...

Страница 119: ...sitivity of camera chip Exposure Time Adjustment The measurement precision maybe affected if the working environment lighting is too bright or too dark due to the dots of targets brightness will change Operator can adjust targets image brightness by adjusting exposure time Also can click claculate exposure time auto matically to adjust automatically Gray Value Represents the brightness of targets ...

Страница 120: ...tes Toe in N Negative toe out mm degrees min degrees 1 100 Camber degrees min degrees 1 100 Tolerance left right degrees min 1 100 adjustable non adjustable Castor degrees min degrees 1 100 Tolerance left right degrees min 1 100 adjustable non adjustable KPI SAI degrees min degrees 1 100 included angle degrees min degrees min 1 100 Toe out on turns at 20 degrees min degrees min 1 100 Lock angles m...

Страница 121: ... N 0 03N 0 70N 2 39 3 39 2 65 3 65 1N 3N 0 9 N 0 25 N 0 15N 0 42N 0 2 N 0 42 N 0 03N 0 70N 2 39 3 39 2 65 3 65 3N 5N 0 26 N 0 42 N 0 43N 0 70N 0 39 N 0 1 P 0 65N 0 02P 2 39 3 39 2 65 3 65 1N 3N 0 9 N 0 25 N 0 15N 0 42N 0 39 N 0 1 P 0 65N 0 02P 2 39 3 39 2 65 3 65 o o o o o o 2N 1 0 17 N 8 0 28N 0 13 0 25 N 20 0 42 0 33 3 9 30 3 15 0 50 4N 1 0 34 N 8 0 57N 0 13 0 22 N 20 0 37N 0 33 3 9 30 3 15 0 50...

Страница 122: ...nt Data Book We use the above vehicle specification information as an example to add vehicle specification to database Input the vehicle specification that software doesn t have Click Settings on the homepage Click Add vehicle specifications to database ...

Страница 123: ...and logo or choose the vehicle manufacturer and the relevant country and logo populate automatically Click next step to input manufacture model first year and ending year according to example vehicle information Other information is optional ...

Страница 124: ...e Values and also input Tolerance Values Input vehicle specification as shown below Note Middle Values must be entered with the symbol if the specification number is negative Tolerance Values DO NOT have to be input with the symbol even if the specification is negative After values have been input press SAVE ...

Страница 125: ... Save button to save the vehicle specification Click OK Check the vehicle specification we just input as shown below Next drag the tool bar to the end to find the vehicle model information that was just entered ...

Страница 126: ...e Specification to read the complete vehicle specification information as shown in the image below If the operator wants to input the vehicle specification by max value min value and middle value way please see below input way ...

Страница 127: ...values and min all must have symbol with number if it is negative We use above book listed on pages 117 118 as an example Toe is 0 28N 0 13 So Max 0 28 0 13 0 15 Min 0 28 0 13 0 41 Middle values 0 28 2 Click Save button to save the vehicle specification Click OK ...

Страница 128: ... symbol with number If the number is negative it MUST input symbol with number to gether 2 When entering the number it MUST input complete For example the number on the book is 09 you must input 0 09 CAN NOT only input 09 3 When entering vehicle specification we require to input by degree unit So if the vehicle specificationonthebookisinch youneedtocalculatefrominchtodegree Thecalculationformulais...

Страница 129: ...e damaged under this situation SOLUTION Ensure the voltage selection switch is set to match the power at your location before connection You will need to change the power supply if the above situation happens REASON Connecting with industrial power 380V will burn the power supply Computer also will be damaged under this situation SOLUTION Change the computer power 3 POSSIBLE CAUSE Computer works b...

Страница 130: ... camera connection are loose or camera may be broken CHECK If the camera USB connection of HUB communication board is loose SOLUTION Pull out and insert again POSSIBLE CAUSE If there are any problems with the camera connection during measurement messages will pop up on the screen REASON HUB communication board and camera connection are loose or camera may be broken SOLUTION Pull out and insert aga...

Страница 131: ...indicates the communication board with the PC is not connecting Or if the message appears during the vehicle measurement SOLUTION The plug from the USB of the communication board is not properly connected to the PC it may be loose or the board may be broken HUB COMMUNICATION BOARD TROUBLESHOOTING ...

Страница 132: ...___________________________________________ ____________________________________________________________________ ____________________________________________________________________ ____________________________________________________________________ ____________________________________________________________________ ____________________________________________________________________ ___________...

Страница 133: ...___________________________________________ ____________________________________________________________________ ____________________________________________________________________ ____________________________________________________________________ ____________________________________________________________________ ____________________________________________________________________ ___________...

Страница 134: ...____________________________________ ____________________________________________________________________ ____________________________________________________________________ ____________________________________________________________________ ____________________________________________________________________ ____________________________________________________________________ __________________...

Страница 135: ...135 ...

Отзывы: