Manual-16
DELAY
All DSP Programs provide two types of Delay blocks.
Coarse Delay in the Input Block section, before the cross-
overs or splitters, and Fine Delay in the Output Block, after
the crossovers or splitters.
COARSE DELAY
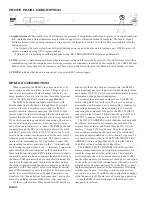
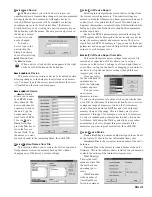
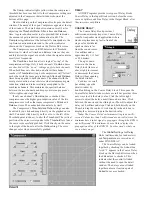
The Coarse Delay block provides 1
millisecond minimum step sizes. Coarse Delay
is useful in speaker stack applications where
stacks are placed many feet in front of the
stage or for distributed
speakers that are far
from the sound source.
One millisecond is
approximately 1.13 feet
or 0.34 meters.
The up or down
arrows in the Coarse
Delay block (shown at
above right) increment
or decrement the Coarse
Delay without opening
the detail window.
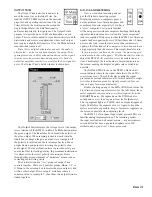
For direct or scroll
bar editing, open the
detail window by
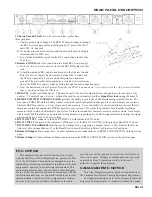
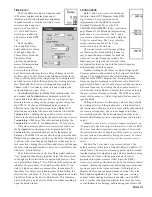
double-clicking on the Coarse Delay block. This opens the
Coarse Delay detail window where a scroll bar provides three
easy ways to edit the delay value. Click the left or right
arrows to adjust the delay one millisecond at a time. Click
between the arrows and the sliding box (Thumb) to adjust the
delay in 10 millisecond steps. Click and hold directly on the
Thumb to drag the control. Click directly in the edit box to
display the cursor and type in the desired value.
Note: The Coarse Delay’s minimum setting is one milli-
second. Values less than 1 millisecond are not valid, since the
minimum time it takes signal to propagate through the RPM is
one millisecond. This minimum Coarse Delay displays the
propagation delay of the RPM 26. In other words, what you
see is what you get.
The
Global Settings
for
Delay
Units
(milliseconds, feet and meters)
and
Temperature
are covered next,
under FINE DELAY.
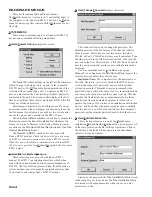
The Coarse Delays can be locked
together by checking the
Linked
box.
A red ‘
1
’ appears in the Coarse Delay
block on the Device Edit screen when
the
Linked
box is checked. This
indicates that the control is linked
without the need to open the detail
window. The delays are not linked
together unless at least one pair of
Linked
boxes are checked.
The
Comp.
indicator lights yellow when the compressor
threshold has been reached. All other Compressor settings are
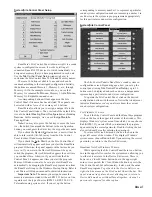
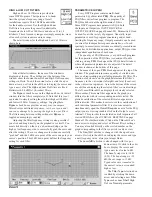
adjusted in the Compressor detail window shown at the
bottom of this page.
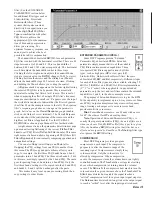
Double-clicking on the Compressor block opens the detail
window. The name of the open Compressor appears at the top
of the window. The detail window contains a scroll bar for
adjusting the
Threshold
,
Ratio
,
Attack
time and
Release
time. A gain reduction meter is also provided that indicates
the amount of gain reduction (attenuation) in dB. The
Compressing
indicator at the bottom left corresponds to the
top Gain reduction indicator and to the yellow indicator
shown on the Compressor block on the Device Edit screen.
The Compressor uses an RMS detector for Threshold
detection. Avoid short Attack and Release times as they can
audibly distort the signal, especially when the signal contains
mostly low frequencies.
The
Combine
check box allows logical “or-ing” of the
compression settings. Only if both channels’
Combine
boxes
are checked will the “or-ed” settings apply to both channels.
When both boxes are checked, and after either channel
reaches its
Threshold
setting, both compressors will “follow”
each other with the same gain reduction,
Attack
and
Release
times being applied to both channels. The channel with the
most gain reduction always dictates what instantaneous gain
reduction, attack and release settings are applied to the
combined channels. This maintains the spectral balance
between the two channels and keeps your stereo program’s
left-to-right sound stage intact.
If only one channel’s
Combine
box is checked, that
compressor uses the higher gain reduction value of the two
compressors as well as that same compressor’s
Attack
and
Release
times. The unchecked channel acts by itself.
The Compressor’s
Threshold
and
Ratio
settings can also
be edited if you click and drag directly on the graphed curve
itself. You must click directly on the curve, to the left of the
Threshold point (or knee), to alter the
Threshold
. The vertical
position of the cursor corresponds to the
Threshold
level once
the curve is successfully grabbed. Click directly on the curve
to the right of the knee to alter the
Ratio
setting. The curve
changes color when successfully grabbed.

