background image

Page  10

SOF_7.5.1-07-04

Effective date: 28-Sep-07

MAINTENANCE

User Guide

CustomAir

®

by RAMVAC®

Inspect Dryer

1.  Operate the compressor until the pressure of the tank
  reaches at least 45 psi.
2.  Turn the compressor off with the Power button on
  the C1 Control.
3.  Carefully open the tank petcock .
4.  If no water drains from the tank when the valve is opened the 
  dryer is working and go to step 6. 
5.  If water drains from the tank when the valve is opened the
  dryer is not working.  See “Dryer Service Procedure” on web


at 

www.ramvac.com 

or contact 

RAMVAC

®

 at 1-800-572-6822.

 6.  Return compressor to service.

Test Safety Valves

 1.  Run compressor until 45 psi shows on the gauge.
 2.  While the compressor is still running, pull ring on safety valve.  

 Note:  A loud burst of escaping air will be heard when air is

    released from the safety valve.

 3.  If no air comes out of safety valve, the valve is defective and valve
 

must be replaced immediately.


Caution: 


Bleed air from system before servicing.

 4.  Repeat procedure for each safety valve.  (one for each head plus
 

one at tank inlet)

 5.  Return compressor to service.

Test Compressor for Leaks


 1.  Close valve to facility plumbing. 
 2.  Run compressor until it shuts off at 100 psi.
 3.  Turn compressor off with the power button on the C1 Control. 
 4.  Let compressor set for 5 minutes.
 5.  If the pressure drop is more than 5 psi in a 5 minute time period,
 

leaks must be repaired.  

 6.  Repair if needed.
 7.  Open valve to facility plumbing.
 8.  Return compressor to service.

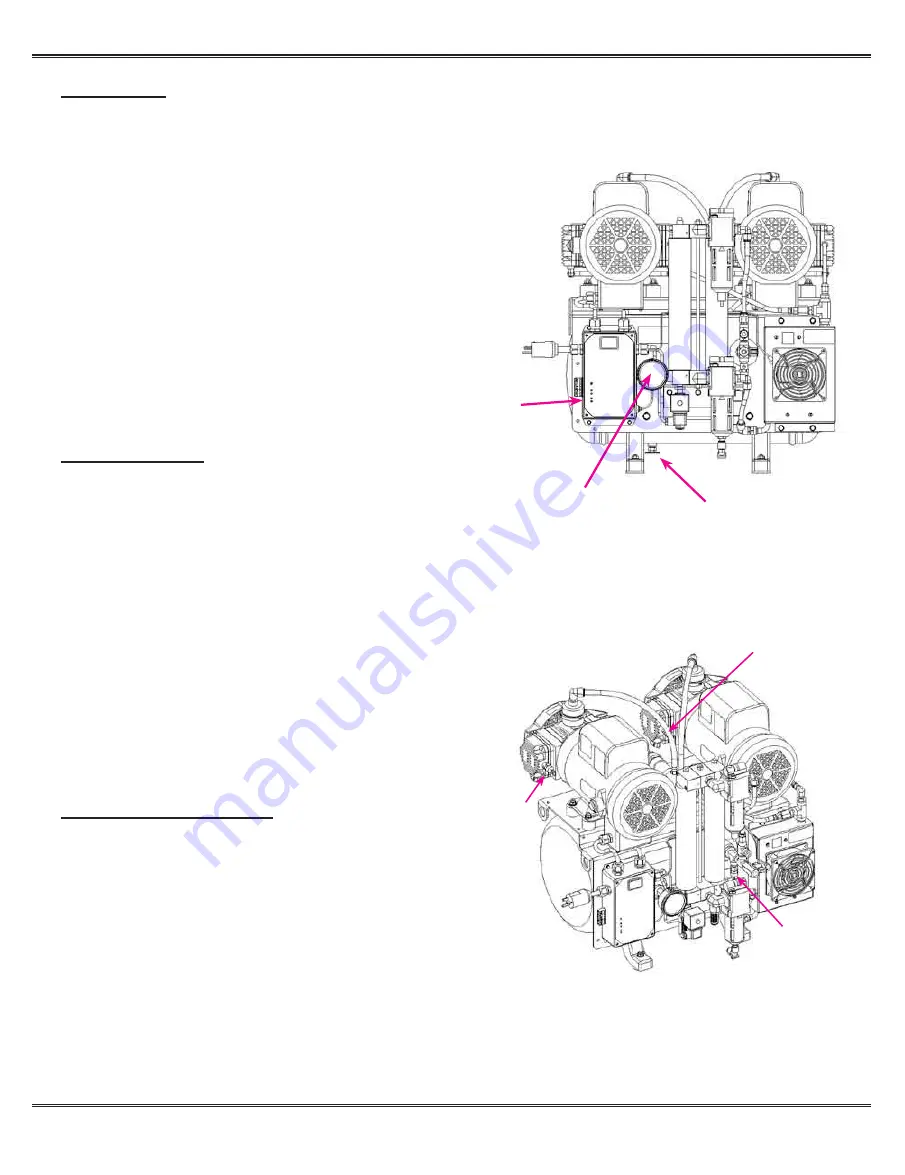
Tank Petcock

C1 Control

Pressure Gauge

Safety Valve

Safety Valve

Safety Valve

Содержание CustomAir 1000 Series

Страница 1: ...ssors to be operated simultaneously in larger clinics CustomAir compressors are designed using trouble free solid state transducers in lieu of mechanical pressure switches to ensure dependability and...

Страница 2: ...b A w sound cover CFM output at peak airflow SCFM at 100 psi Pump up cycle time sec from 80 100 psi Tank size in gallons Filter Dryer Duty Dryer Dew Point Total HP 1022 2 3 100 208 253 5 1 136 24 x 20...

Страница 3: ...Dental Compressed Air System USER GUIDE Installation and Maintenance Manual For 1000 Series with C1 Control...

Страница 4: ...nal invitation to visit our manufacturing facility in the beautiful Black Hills of South Dakota Matt Olson General Manager RAMVAC Dental Products Inc 800 5 RAMVAC 800 572 6822 Safety and Regulatory In...

Страница 5: ...e Page 8 Filter Maintenance Page 9 Inspecting Dryer Page 10 Testing Safety Valves Page 10 Testing Compressor for Leaks Page 10 Speci cations Page 11 Troubleshoooting Page 12 Warranty Inside back cover...

Страница 6: ...ly contact the freight carrier and supplier 3 Remove lag screws holding the compressor to shipping pallet 4 Verify additional parts shipped with the compressor a Additional parts shipped with all comp...

Страница 7: ...ctrical outlets Electrical cicuit is a dedicated 20 amp circuit C1 Control and Motor Control Box for the 1029T compressor use a 20 amp time delay fuse See Specifications for more electrical informatio...

Страница 8: ...Filter Coalescing Filter Heat Exchanger and Fan Desiccant Dryer Cartridge Pressure Gauge Safety valve Safety Valve Model 1025D is pictured Other models have identical features with the exception of m...

Страница 9: ...particulate lter to remove any remaining particulates from the air It is then collected in the tank where a pressure gauge displays the tank air pressure The tank pressure is monitored by a pressure...

Страница 10: ...1 Turns motors off at 100 psi 2 Turns motors on at 80 psi 2nd motor will start with a 1 second delay Provides a 24VAC low voltage signal to the remote panel Accepts the remote switch input Controls th...

Страница 11: ...rminals Toggle Switch or other non illuminated switch option Vac Switch Vac Light Common F 24 VAC G 24 VAC H AC Common Illuminated Remote Switch C1 Controller Terminals Note Maximum wire length for lo...

Страница 12: ...commended levels High temperatures will shorten the life of the air compressor Follow the recommended preventative maintenance schedule Preventive Maintenance Schedule This is a recommended schedule f...

Страница 13: ...nd remove 5 Remove lter by turning completely out 6 Install new 5 micron lter 7 Position lter bowl push up slightly and turn into place 8 Plug power cord into outlet 9 Return compressor to service Rep...

Страница 14: ...e compressor is still running pull ring on safety valve Note A loud burst of escaping air will be heard when air is released from the safety valve 3 If no air comes out of safety valve the valve is de...

Страница 15: ...8 FRN 25 UNIT POWER CONSUMPTION 5 1 amps 12 0 amps 5 9 amps 8 4 amps 9 5 amps 15 4 amps UNIT DIMENSIONS w x d x h 24 x 20 5 x 28 24 x 20 5 x 26 5 24 x 20 5 x 26 5 24 x 20 5 x 26 5 27 x 22 x 36 WEIGHT...

Страница 16: ...s 4 Dryer malfunction 5 Valves sticking 1 See Test Compressor for Leaks 2 Test facility air lines for leaks 3 Replace intake lters 4 Contact RAMVAC 5 Contact RAMVAC Compressor gets too hot 1 Ambient t...

Страница 17: ...acuum System 2 Years from date of installation RAMVAC Vacuum Pumps only 10 Years from date of installation RAMVAC OWL 2 Years from date of installation CustomAir by RAMVAC 6 Years 4200 hours from date...

Страница 18: ...Brand of the The Integrated Supplier PHONE 866 DTE INFO www dentalez com SOF_7 5 1 07 04 Effective date 28 Sep 07 2007 RAMVAC Dental Products All rights reserved No part of this publication may be co...

Отзывы: