Appendix 2 - Installation Instructions
– Page 10
Plumbing Watermaker Into Your Vessel
Regardless of whether you have a Rainman Naked system or the traditional Rainman in the blue case, the
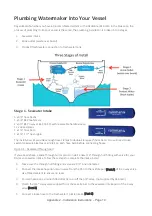
process of plumbing it into your vessel is the same. The plumbing installation is broken into 3 stages.
1.
Seawater intake
2.
Brine outlet (waste over board)
3.
Product (fresh) water connection to fresh water tank
Stage 1 - Seawater Intake
5 x
3/4”
hose barbs
1 x
3/4”
BSP tee female
1 x
3/4”
BSP 3 way valve 316 S/S with reversable handle sleeve
12 x Hose clamps
1 x
1/2”
hose barb
1 x
1/4”
-
1/2”
hex nipple
The installation kit provides enough hose clamps to double clamp each hose barb. You will need to use
sealant (example SikaFlex or similar) on each hose barb before connecting hoses.
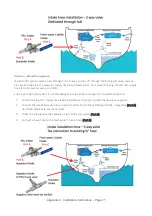
Option 1 - Dedicated Through Hull
If you already have a spare through hull or plan to install a new
3/4”
through hull fitting with valve for your
Rainman seawater intake, follow these steps to complete the intake install.
1.
Make sure the through hull fitting and valve are
3/4”
inner diameter.
2.
Connect the intake hose non-return valve from the PSU to the middle port (Port A) of the 3 way valve.
Use thread sealant to ensure no leaks.
3.
You will need a sea strainer fitted directly to or off the
3/4”
valve. (not supplied by Rainman)
4.
Plumb the
3/4”
3 way valve supplied from the sea strainer to the seawater intake port of the 3 way
valve (Port B).
5.
Connect a loose hose to the fresh water / pickle intake. (Port C)

