


Weather Station - Model “PRO”
Nov., 2001 Page
26
Model “PRO”- Weather Station
Cozz GT27145B
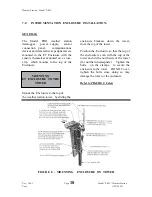
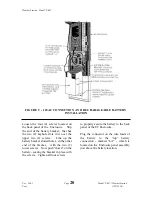
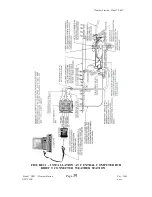
INSTALLATION OF 034A
WIND SENSOR:
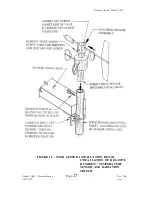
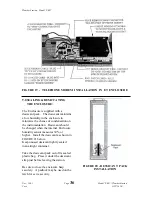
Refer to FIGURE 12 below:
With the Sensor Cross-Arm securely
installed to the Enclosure you are ready
to install the 034A Wind Sensor
instrument. The wind vane is oriented
after the datalogger has been
programmed and the location of True
North has been determined. Orientation
is most easily done with two people, one
to aim and adjust the sensor, while the
other observes the wind direction
displayed by CR10KD Keyboard
Display or a laptop PC computer.
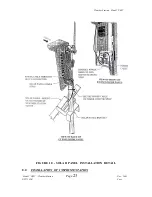
Remove the aligning screw from the
base of the 034A wind sensor unit.
Place the 034A wind sensor into the
mounting shaft, that is clamped to the
end of the sensor cross-arm by means of
a U-Bolt clamp.
(The short, black mounting shaft,
included with the 034A wind sensor will
NOT be used).
Secure the 034A wind sensor in the
mounting shaft, by aligning the threaded
hole in the wind sensor with the hole in
the side of the mounting shaft, and re-
installing the aligning screw.
Next loosen the set screw in the top of
the 034A wind sensor (the seet screw
opposite the one securing the wind
direction point). Place the end of the
wind vane into the hole. Properly orient
the vane to be in a true vertical position
and secure it by tightening the set screw.
Attach the wind sensor cable connector
to the connector on the 034A wind
sensor.
Without allowing the mounting shaft for
the 034A wind sensor to “slip down” (it
may be a good idea to mark the position
of the U-Bolt on the shaft so that you can
correctly position it should is “slip”)
slightly loosen the nuts of the “U-Bolt”
clamp of the mounting shaft - just
enough so you can rotate the mounting
shaft but not allow the shaft to “slip
down”.
Establish a reference point on the
horizon for True North.
Sighting down the instrument center
line, aim the counter weight at True
North. Display input location #8 for
wind direction, using the *6 Mode of
the datalogger.
While holding the wind vane position,
slowly rotate the sensor base/mounting
shaft until the datalogger indicates 0
degrees. Securely tighten the clamp
nuts.
REFER TO NEXT PAGE FOR FIGURE 12
Содержание Pro
Страница 2: ......
Страница 10: ......
Страница 35: ...Weather Station Model PRO Model PRO Weather Station Page 25 Nov 2001 GT27145B Cozz FIGURE 11 CROSS ARM MOUNTING...
Страница 80: ......