


8
Note:
• It is recommended to power OFF your radio while charging. However, if power is turned on while charging, you may not be
able to transmit a message if the ba
�
ery is completely empty. Allow
�
me for the ba
�
ery to charge to 1 bar before
a
�
emp
�
ng to transmit a message.
• For op
�
mal ba
�
ery life, remove the radio from the charger within 6 hours. Do not store the radio while connected to the
charger.
3. INSTALLATION OF ACCESSORIES
Before the radio is ready for use we need to a
�
ach the ba
�
ery pack, as well as charge the ba
�
ery.
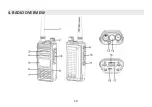
3.1 Installing/ Removing the Antenna
a. Installing the Antenna: Screw the antenna into the connector on the top of the transceiver by holding the antenna at its
base and turning it clockwise un
�
l secure.
b. Removing the Antenna: Turn the antenna counter-clockwise to remove it.
3.2 Installing the belt clip
a. At the back of the radio there are two parallel screws mounted above the ba
�
ery, remove these and thread them through
the holes on the belt clip as you screw them back into the radio body.
b. Removing the Belt Clip: Unscrew counter-clockwise to remove the belt clip.
3.3 Installing the ba
�
ery pack
Before a
�
aching or removing the ba
�
ery make sure your radio is turned o
ff
by turning the power/volume knob all the way
counter-clockwise.
a.
Make sure the ba
�
ery is aligned in parallel with the radio body with the lower edge of the ba
�
ery about 1-2cm below the
edge of the radio.
b.
Once aligned with the guide-rails, slide the ba
�
ery upward un
�
l you hear a click as the ba
�
ery locks in place.
Remove the ba
�
ery pack
Содержание GA-5E
Страница 1: ...GA 5E EN DE...
Страница 13: ...10 4 RADIO OVERVIEW...
Страница 64: ...56 4 RADIO OVERVIEW 4 1 4 1 Tasten und Bedienelemente des Funkger ts...
Страница 105: ......
Страница 106: ......