Radio Shack 22-813 Скачать руководство пользователя страница 8

O

per

at

ion

8

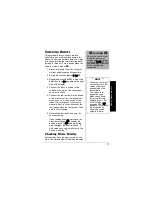
Your meter automatically enters the
auto range mode when you turn it on.
In the auto range mode,
appears and the meter automatically
selects the next higher or lower range
(if available) when the measurement
causes the display to overflow or
underflow.

Ô

1.

2. To select manual range mode, press

RANGE

while the meter is in auto-range

mode.

disappears.

3. Repeatedly press

RANGE

to select

different ranges. The decimal point
shifts each time you press

RANGE

.

4. Hold down

RANGE

for about 2 seconds

to exit manual range mode and return
to its auto-range mode.

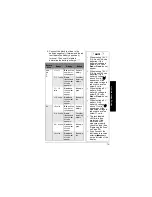
5. Set the meter to the different

measurement ranges. The unit of
measure that appears on the display
shows the range that the meter is
currently set to.

For example,

mV

appears in the 400

mV range. Also, note the position of the
decimal. For example, if

0.000V

appears, the meter is set to measure
less than 4 volts. If

000 V

appears, the

meter is set to measure up to 600 volts.

AUTO

Ô

 NOTE 

Ô


Overflow is when the
meter tries to display
4001 or more units.
Underflow is when
the meter tries to
display 379 or fewer
units.

If nothing appears on
the display, press
any button to turn on
the meter.

The display might
show a “phantom”
reading in some DC
and AC voltage
ranges when the test
leads are not
connected to a
circuit. This is
normal. The high
input sensitivity
produces a
“wandering” effect.
When you connect
the test leads to a
circuit, a real
measurement
appears.

AUTO

Содержание 22-813

Страница 1: ...et the range when measuring values you know are within a certain range Latest IC and Display Technology ensures reliability accuracy stability and ease of operation Bar Graph Display makes nulls peaks...

Страница 2: ...rated for installation category II max 3600 VA Never apply voltages to the meter that exceed the limits given in the specifications Never apply more than 600V DC or AC between the input jacks and grou...

Страница 3: ...ate that this product has been evaluated by Underwriters Laboratories for the accuracy of its readings Your meter requires three AAA batteries not supplied Your meter also has these additional feature...

Страница 4: ...Laboratories The maximum current that this meter can measure at this jack is 400 mA DC and AC Caution Be extra careful when making high voltage measurements DO NOT TOUCH TERMINALS OR PROBE ENDS Cauti...

Страница 5: ...r You can order replacement leads from your local RadioShack store o oWARNING o To avoid electrical shock disconnect both of the test leads from any equipment before you install or replace the meter s...

Страница 6: ...wn any button while turning on the meter The meter turns on and all segments on the display appear Release the button you are holding down to turn off the test CAUTION Be sure to select the correct fu...

Страница 7: ...the function dial to then press SELECT twice appears Measurement Function select using SELECT button 1 Measures DC voltage 2 Measures AC voltage 1 Measures amperage DC 40 400 mA AC 40 400 mA 2 Measur...

Страница 8: ...ges The unit of measure that appears on the display shows the range that the meter is currently set to For example mV appears in the 400 mV range Also note the position of the decimal For example if 0...

Страница 9: ...d ddd V 40 V dd dd V 400 V ddd d V 600 V ddd V 40 mA dd dd mA 400 mA ddd d mA 4 A d ddd A 10 A dd dd A 400 ddd d 4 k d ddd k 40 k dd dd k 400 k ddd d k 4 M d ddd M 40 M dd dd M NOTE V mA is fuse prot...

Страница 10: ...press any button or select another function o USING POWER LOCK Follow these steps to set the meter so that it does not turn off automatically 1 Rotate the function dial to OFF to turn off the meter 2...

Страница 11: ...e measuring C D AA and AAA batteries One segment of the bar graph appears for each 0 6 volts if you are measuring 9 volt batteries If all segments of the bar graph appear the battery being measured is...

Страница 12: ...pens touch the test leads together or change the meter s setting to clear it oWARNING o When measuring high voltages always clamp the meter s black test lead to ground or neutral first then the red te...

Страница 13: ...AC voltages If you want to measure 3 phase line to line voltage please note the following Because of the dangers inherent in measuring three phase circuits we strongly recommend you do not use this m...

Страница 14: ...nection must be in series with the circuit under test o 1 Disconnect power from the circuit you will test and discharge all capacitors 2 Rotate the function dial to 3 Repeatedly press SELECT to select...

Страница 15: ...ther lead of the component you want to measure or remove one of the leads of the component you want to measure from its circuit and touch the test leads across the component If the meter is set to aut...

Страница 16: ...s and the buzzer sounds if the circuit resistance is less than about 50 ohms meaning the circuit has low ohmage or is shorted Open appears and the meter s buzzer does not sound if the circuit resistan...

Страница 17: ...t you want to measure from its circuit and touch the test leads across the component Then note the first reading 6 Reverse the test leads and note the second reading If one reading shows a value and t...

Страница 18: ...ter shows a higher voltage using the red test lead is the anode side CHECKING BATTERIES The meter can accurately check batteries under designated load conditions You can use the meter to test 1 5V C D...

Страница 19: ...volts Good and the number of volts appear Battery is good 9 volts Good and the number of volts appear Battery is full NOTE When testing 1 5V C D AA and AAA size batteries if the battery s voltage is b...

Страница 20: ...lly wipe it with a cloth slightly dampened with water Do not use harsh chemicals cleaning solvents or strong detergents to clean the meter o REPLACING THE FUSE If the meter does not operate you might...

Страница 21: ...insert the fuse into the fuse holder 5 Replace the back cover of the meter then secure it with the screws SPECIFICATIONS Accuracies at 23 C 5 C 75 RH DC VOLTS Maximum Measurement 600V 400mV 0 5 of Rea...

Страница 22: ...in Last Digit 400k 4 0M 1 2 of Reading 4 in Last Digit 40M 2 0 of Reading 4 in Last Digit BATTERY TEST 1 5V C D AA 150mA 10 load current 5 0 of Reading 4 in Last Digit 1 5V AAA 50mA 10 load current 5...

Страница 23: ...ource 3 AAA batteries Operating Temperature 41 F to 104 F 5 C to 40 C Storage Temperature 4 F to 140 F 20 C to 60 C Humidity Maximum Relative Humidity 80 for temperatures up to 87 8 F 31 C decreasing...

Страница 24: ...u In the event of a product defect during the warranty period take the product and the Ra dioShack sales receipt as proof of purchase date to any RadioShack store RadioShack will at its option unless...

Отзывы: