


16
M
a
king
M
easure
m
ent
s
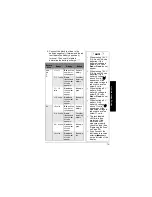
As with the voltage range, use the
measuring units that appear on the
display to determine the current
resistance range. If only
Ω
appears, the
values of the measurements are in
ohms. If k and
Ω
appear, the meter is
measuring kilohms (1 kilohm = 1000
Ω
).
If M and
Ω
appear, the meter is
measuring megohms (1 megohm =
1,000,000
Ω
).
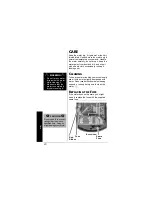
C
HECKING
C
ONTINUITY
You can use the meter to check for shorted
or open electrical circuits.
1. Disconnect power from the circuit you
will test and discharge all capacitors.
2. Rotate the function dial to
¹
/
§
/
Ω
.
3. Repeatedly press
SELECT
to select the
continuity function.
¹
appears on the
right side of the display.
4. Connect the black test lead to one side
of the circuit you want to check.
5. Connect the red test lead to the other
side of the circuit you want to check.
Shrt appears and the buzzer sounds if
the circuit resistance is less than about
50 ohms (meaning the circuit has low
ohmage or is shorted). Open appears
and the meter’s buzzer does not sound
if the circuit resistance is greater than
about 50 ohms (meaning the circuit is
not shorted and greater than about 50
ohms).
Ô
NOTE
Ô
•
The jack labeled
+V.
Ω.
mA
is fuse-
protected. If the
meter cannot
measure in 40/
400mA ranges,
check the fuse (see
“Replacing the Fuse”
on Page 20).
•
With no resistance
connected across the
test leads (meaning
resistance is infinite),
O.F
appears when
you set the meter to
measure resistance.
This is normal.
•
If you want to set the
meter to manual
range mode, press
RANGE to set
manual range mode
and repeatedly press
RANGE to change
the range.
•
If you are measuring
resistance of about
1M
Ω
or more, the
display might take a
few seconds to
stabilize. This is
normal.
CAUTION
Do not connect the test
leads to a source of
voltage with the function
dial set to
¹
/
§
/
Ω
. This
could damage the meter
or the circuit being
connected.


