background image

Installation Manual 


Combi -  cod. 99943NA – November 2002 


18 


MAINTENANCE 


To keep the boiler in efficient and safe operating condition, we 

recommend you perform the following checks at least once a 

year:  

• 

Check all seals on the gas side and replace gaskets to 

restore perfect seal as required.  

• 

Check all seals on the water side and replace gaskets to 
restore perfect seal as required.  

• 

Visually check combustion and the combustion chamber; 

dismantle and clean the chamber if necessary.  

• 

Check the primary exchanger and clean it if necessary. 

• 

Check functioning of gas safety systems: Insufficient gas 

safety device (flame detection sensor for electronic ignition 
boilers) thermocouple for pilot light boilers. 

• 

Check functioning of heating safety systems: safety 

thermostat for temperature limit, safety sensor for pressure 

limit. 

• 

Check the exhaust flue safety device 

• 

Check the max. and min. modulation pressures and the 

modulation. 

• 

Check that the electrical connection conforms to the 
description in the instruction manual  for the boiler. 

• 

Check the domestic hot water flow rate and 

temperature. 


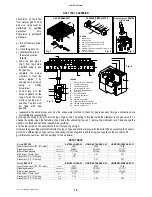
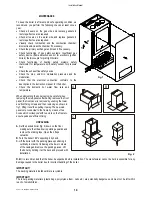
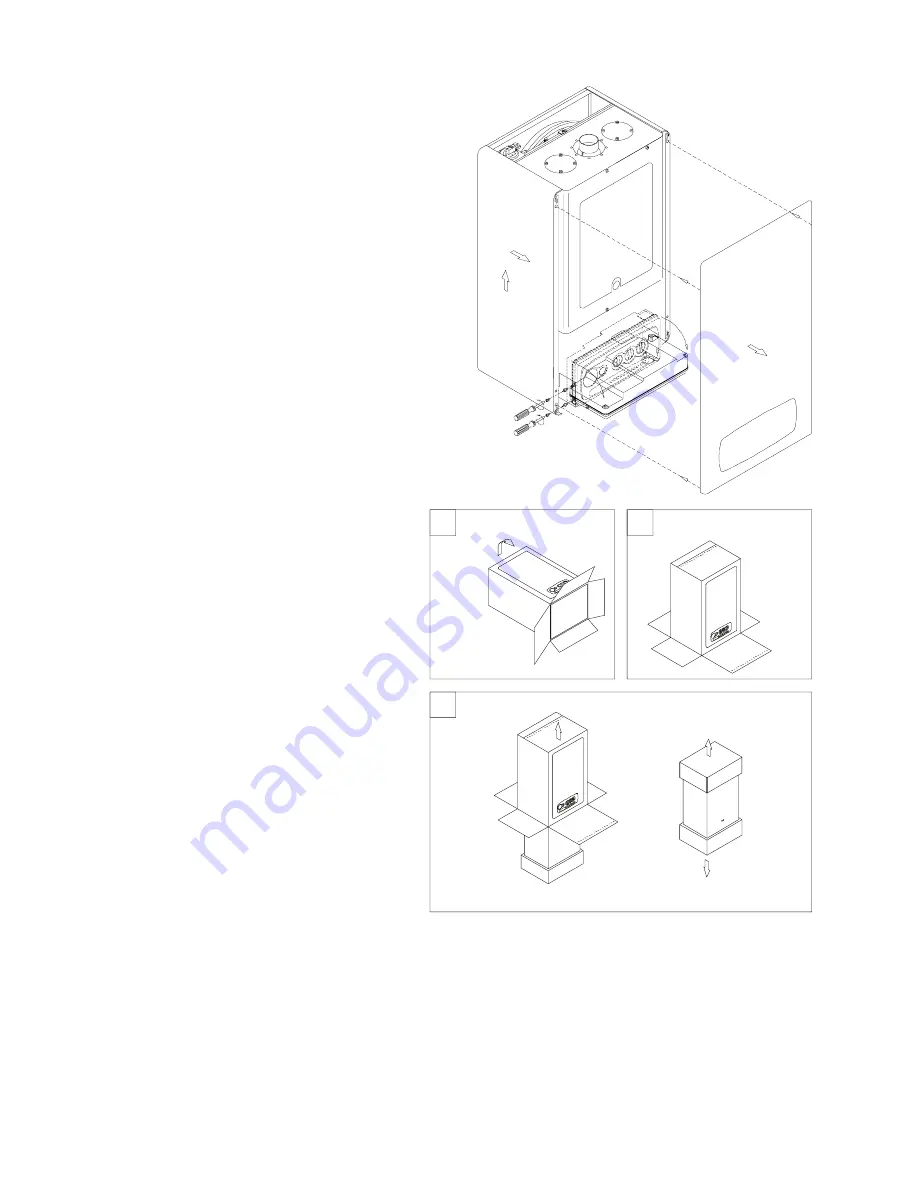
When dismantling the boiler casing, be careful when 

removing the side panels after having removed the front 

panel; the front panel is removed by undoing the lower 

and front fixing screws and then removing as shown in 
fig.1, lifting it and then pulling it away. The new side 

panels are connected to the frame by means of two 

hooks which correspond with two slots on the frame to 

ensure quick and efficient fixing  


UNPACKING 

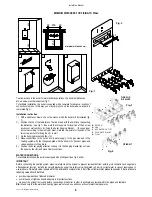
A.

 Set the packed boiler (fig. 2) down on the floor 

making sure that the arrow is pointing upwards and 

remove the sticking tape. Open the 4 flaps 

outwards. 

B.

 Turn the boiler 180° supporting it by hand. 

C. 

Lift the boiler with the packing pieces positioning it 

vertically in order not to damage the lower corners 

of the casing and remove the packing pieces. Lift 

the boiler by holding it at the back and proceed with 

installation.  


N.B.

 It is recommended that the boiler be unpacked before installation. The manufacturer cannot be held responsible for any 

damage caused to the boiler due to incorrect handling of the boiler. 


IMPORTANT! 

The packing materials (cardboard) are recyclable. 


IMPORTANT! 

The inner packing materials (plastic bags, polystyrene foam, nails etc.) are potentially dangerous and must not be left within 

reach of small children. 

2

1

Fig. 2 

A

B

C

Fig. 1 

Содержание RSF 24 E

Страница 1: ...LISH Technical Specification RADIANT BRUCIATORI S p A Montelabbate PU ITALY By Technical Department INSTALLATION AND MAINTENANCE MANUAL FOR GAS FIRED WALL HUNG BOILERS Model RSF 20 E RSF 24 E TYPE C R...

Страница 2: ......

Страница 3: ...4 BOILER INSTALLATION page 6 ELECTRICAL CONNECTIONS page 8 16 17 BOILER CONTROL PANEL page 8 STARTING UP THE BOILER FOR THE FIRST TIME page 9 BOILER ADJUSTMENTS page 11 GAS TYPE CONVERSION page 12 REG...

Страница 4: ...expansion vessel 2 WARNINGS REGARDING INSTALLATION Warranty expires 12 months from date of installation and in all cases no later than 18 months from date of construction First start up must be perfor...

Страница 5: ...w 11 15 BTU h 37498 51187 Heating temperature adjustment C 30 80 30 80 Max working pressure heating bar 3 3 Min working pressure heating bar 0 3 0 3 Expansion vessel capacity initial pressure 1 bar Li...

Страница 6: ...aust into a flue duct and the air intake directly from an external wall To insert a bend reduce total flue length by 1 5 m R RETURN G GAS C HOT WATER F COLD WATER A HEATING FLOW NOTE USE ORIGINAL RADI...

Страница 7: ...8 Pipework that supplies the boiler must be a 22 mm ininterrupted supply from meter to the isolation cock of the boiler The complete installation must be tested for soundness as described in the above...

Страница 8: ...d Where the lowest part of the terminal is fitted less than 2m 6 6ft above a balcony above ground or above a flat roof to which people have access the terminal MUST be protected by a purpose designed...

Страница 9: ...d to the heating system with the fittings supplied with the boiler JIG Connect pipes and valves as shown in the picture 5 Position the boiler paying attention to hang it to the hanging bracket do not...

Страница 10: ...or and 4 C Hot water sensor and protects the boiler down to 2 C external temperature To protect the internal Radiators a room thermostat or remote control must be fitted NOTE The frost system will onl...

Страница 11: ...nd open the electrical control box by lifting the cover as shown in fig 1 E With the electrical control box now open make the following connections Connect the yellow green wire to the terminal marked...

Страница 12: ...eaks The checking procedure for the gas burner attachment is carried out with the boiler working make sure the electrical mains switch is OFF remove the front cover by pulling it forwards undo the sid...

Страница 13: ...pressure is equal to that stated on the plate to check the minimum undo one wire from the modulator coil and check on the gauge that the minimum pressure is equal to that stated on the plate if the m...

Страница 14: ...ll screwdriver for any adjustments Turn clockwise to increase gas pressure to the burner at start up by setting the trimmer to maximum calibration pressure of modulator see page 16 Turn counter clockw...

Страница 15: ...replace it with the new one supplied in the conversion kit g calibrate the new max and min settings for the modulator DATA TABLE Models RSF 20 E NATURAL GAS G 20 LIQUID BUTAN GAS G 30 LIQUID PROPANE...

Страница 16: ...de out the coil 1 located above the gas valve Fig D Tighten plastic screw 3 by turning it clockwise be careful not to break it Fig E Use a no 17 spanner to undo the lock nut 5 which holds the core 4 o...

Страница 17: ...lve body following instructions from no 1 to no 4 see fig 1 To separate the motor from the valve body proceed as follows 1 Press button A under the motor 2 Simultaneously keep the A button pressed and...

Страница 18: ...N CHAMBER 4 ROOM SEALED CHAMBER COVER 5 ROOM SEALED CHAMBER BACK 6 HEAT EXCHANGER Mod 20 000 HEAT EXCHANGER Mod 24 000 7 D H W EXCHANGER H20 H20 PB 21 73 D H W EXCHANGER H20 H20 PB 24 73 8 EXCHANGER A...

Страница 19: ...C6 C7 RS1 R58 R22 R21 4 2 1 3 15 14 22 LED2 LED1 LED3 LED4 RAVI II R31 42 R18 R17 yellow blue R48 FA1 C20 R49 R23 R24 R47 C19 C21 red brown R39 C9 M9 R62 R61 R57 J16 R38 C5 J20 R37 41 R16 C14 IC2 J7...

Страница 20: ...24 18 22 12 13 12 11 EA 8 ER 6 RPA P 15 PTC2 14 5 20 21 V RVA 16 2 1 3 7 4 PA VD NET FILTER IG R CY CY CX N L AIR PRESSURE SWITCH FAN PUMP RELAY CONTACT D H WATER RELAY CONTACT FAN RELAY CONTACT THER...

Страница 21: ...e When dismantling the boiler casing be careful when removing the side panels after having removed the front panel the front panel is removed by undoing the lower and front fixing screws and then remo...

Страница 22: ...lace it d change over polarity e make earth connection f fit conversion kit 4 Boiler on temperature rises rapidly and extinguishes flame light 2 fig 1 on a circulation pump burned out or blocked b air...

Страница 23: ...24028LA CIRCULATING PUMP MOTOR 9 9 13 96008LA 3 BAR PRESSURE RELIEF VALVE 1 2 9 9 14 59010LA WATER PRESSURE SWITCH 1 8 9 9 15 96030LA AUTOMATIC AIR VENT VALVE 5020 3 8 9 9 16 95011LA 8 LT EXPANSION TA...

Страница 24: ...s and illustrations contained in this leaflet have been carefully prepared but we reserve the right to make changes and improvements in our products whitch may affect the accurancy of the information...

Отзывы: