background image

Pro-MPEG DVB-ASI Gateway  


QVidium™ Technologies, Inc. 

Quick Start Guide 

6/18 

© 2006 QVidium™ Technologies, Inc. 

Configuring the System


This chapter tells you how to use the LCD Front Panel Console interface and how to 
configure basic system settings. However, the Front Panel Console is also capable 
of extensive control and configuration of the system. For a detailed view of the Front 
Panel menu structure and status screens, please see the Appendix. 


2.1  Using the LCD Front Panel Console 


After you have made the network and power connections, you can configure the network settings 
using the LCD Front Panel Console. 
 
Before you begin, make sure that you have the following information ready: 


ƒ


IP address assigned to the system 


ƒ


Subnet mask of your network 


ƒ


Gateway/router address (necessary only if communicating with other networks)  


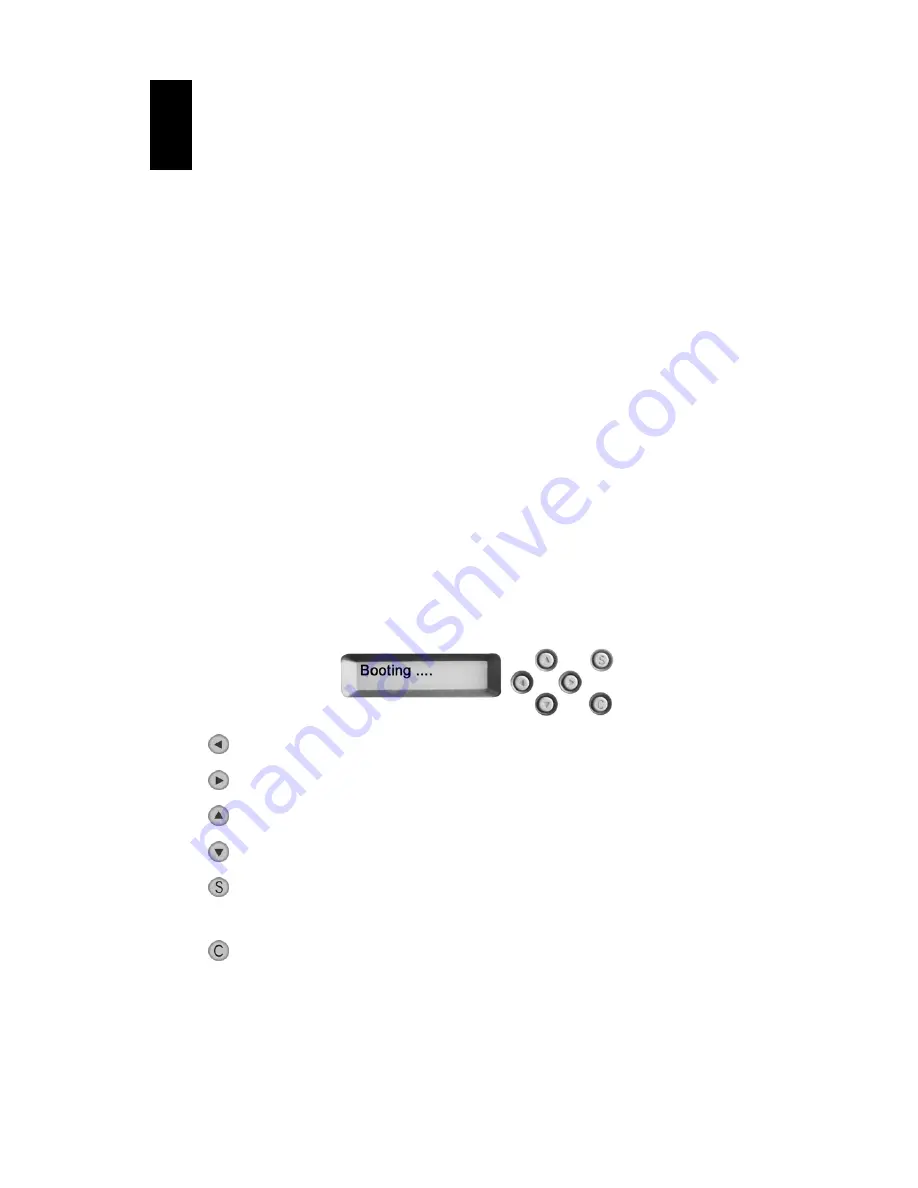
The LCD screen on the front of the system displays two lines of text. The first line shows the 

information required; the second line shows the data already entered. You can enter the data by 
using the arrow buttons to the right of the LCD screen.  

 
The LCD screen has two modes of operation: status mode and control/configuration mode. In 

status mode, it rotates through a sequence of status screens. In control/configuration mode, it 
provides front-panel access to configuration, setup, and operation of the system. 


  The Left arrow button moves the cursor to the left. 


  The Right arrow button moves the cursor to the right. 


  The Up arrow button increases the digit located at the cursor position


  The Down arrow button decreases the digit located at the cursor position. 


  The S (Select) button accepts the data entered or selects the option displayed. In 

status mode, it toggles between holding and rotating among the status screens. 


  The C (Cancel) button cancels the data entered or the option displayed. In status 

mode, it changes the mode to control/configuration mode. 


Содержание Pro-MPEG DVB-ASI Gateway

Страница 1: ...QVidium TECHNOLOGIES INC Pro MPEG DVB ASI Gateway Quick Start Guide 2006 QVidium Technologies Inc 12989 Chaparral Ridge Road San Diego CA 92130 Phone 858 792 6407 Fax 858 792 9131...

Страница 2: ...0 3 Transmitting a Stream 11 3 1 Creating a network transmit stream 11 3 2 Starting a network transmit stream 12 3 3 Stopping a network transmit stream 12 4 Receiving a Stream 13 4 1 Creating a networ...

Страница 3: ...s the features and functions of the product 1 1 Unpacking After unpacking the shipping carton you should find these items QVidium Pro MPEG FEC DVB ASI Gateway 1 rail kit 4 rubber feet 2 power cords US...

Страница 4: ...4 seconds to turn off the system 2 Power Indicator Glows green when the power is on 3 LAN1 Indicator Indicates a media network connection 4 LAN2 Indicator Indicates a management network connection 5 F...

Страница 5: ...4 LAN1 Connector Connects the LAN cable for media 5 LAN2 Connector Connects the LAN cable for management 6 Serial Port Connects a serial device 7 VGA Port Connects an external CRT monitor 8 USB Ports...

Страница 6: ...n on the front of the system displays two lines of text The first line shows the information required the second line shows the data already entered You can enter the data by using the arrow buttons t...

Страница 7: ...Media interface although both LAN1 and LAN2 can be used for video traffic as well as system control 4 Press the Select button You should see on the display LAN1 IP Addr 192 168 000 031 5 Use the Left...

Страница 8: ...u should see the Setup option 3 Press the Select button You should see the LAN1 IP Addr option on the second line 4 Press the Down arrow button You should see the LAN2 IP Addr option on the second lin...

Страница 9: ...You should see the LAN2 IP Addr option on the second line 4 Press the Down arrow button You should see the LAN1 Phy option on the second line To set the physical characteristics for LAN2 press the Dow...

Страница 10: ...sks are 255 255 255 0 You may not need to change them 3 The default gateway is an IP address of a router or gateway on the same network that the media interface is connected to For example if your med...

Страница 11: ...IP address of the management interface or the media interface 1 Select the TX Stream menu on the left side of the web page 2 Select the Streams menu option underneath the TX Stream menu A Network Tran...

Страница 12: ...ea to the right of the menu system 3 Select a stream from the list 4 Select the Start button You should see Stream name started where name is the stream you selected in step 3 3 3 Stopping a network t...

Страница 13: ...he IP address of the management interface or the media interface 1 Select the RX Stream menu on the left side of the web page 2 Select the Streams menu option underneath the RX Stream menu A Network R...

Страница 14: ...in area to the right of the menu system 3 Select a stream from the list 4 Select the Start button You should see Stream name started where name is the stream you selected in step 3 4 3 Stopping a netw...

Страница 15: ...ium Technologies Inc Quick Start Guide 15 18 2006 QVidium Technologies Inc 5 Troubleshooting For troubleshooting information the latest software and to contact us call or e mail us at Phone 858 792 64...

Страница 16: ...p Tx Config Dest IP Addr Dest Port TS Pkts IP FEC Columns FEC Rows Row FEC Off On Receive IP Rx Control Enter to Start Stop Rx Config Rcv Port Rx McastIP Net Jitter ASI Bitrate System Name Ping Ping I...

Страница 17: ...h dashed or dotted outlines as appropriate After a brief period the status screen rotation will revert to the standard order as shown above but with the optional network status and or ping status scre...

Страница 18: ...erference or radio or television reception which can be determined by turning the equipment off and on the user is encouraged to try one or more of the following measures Reorient or relocate the rece...

Отзывы: