


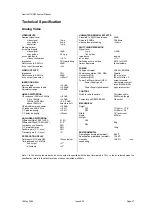

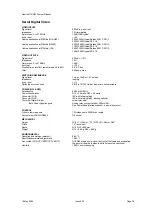
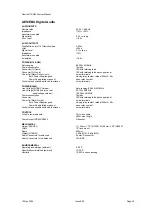
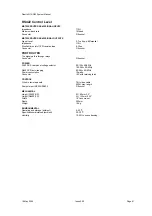


Quartz Q16/Q32 System Manual
18 May 2004
Issue 5.00
Page 42
MAINTENANCE
Maintenance Philosophy
Customers have different approaches to equipment maintenance. As technology becomes more
complex it becomes increasingly difficult for technicians to maintain equipment. Also equipment is so
much more reliable than only a few years ago, so there are less opportunities to repair it!
Quartz can supply spare modules if you can fault find down to module level or spare parts and
extender modules if you are able to diagnose faults down to component level. If your approach is to
undertake at least some of your own maintenance then read on!
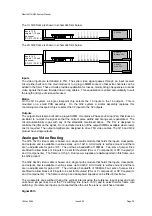
Module Removal and Replacement
The modules in the frame can be removed for maintenance. Unscrew the two front panel catches and
lower the front panel. Note that the Local Control Panel, if fitted, is attached to the plug-in modules by
a pair of ribbon cables. Switch off the unit with the standby/on switch (left = off or standby) at the
front of the power module. Open the latches of the ribbon cable connectors and disconnect the panel.
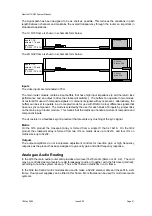
A blank front panel, usually with a
power on
indicator board, is fitted to most units not having a
control panel. It is attached to the power supply module by a flying lead which can be detached from
the power supply module by pulling upwards. Do not allow the blank front panel to hang by the lead
as this may apply excess stress to the lead and cause premature failure.
The plug-in modules can be removed using the handles. These handles act as levers to aid removal
and insertion of the module plus they incorporate a locking mechanism to prevent the modules
coming loose, especially useful in a mobile application. Pull the handles to initially release the lock
and then to withdraw the module.
When replacing the module it is essential to ensure that the handles are wide open as you push the
module into the guides until the resistance of the edge connectors is felt. Then push evenly on the
handles to push the module securely home. Check that it is locked in place by pulling the handles
without releasing the lock.
Fault Finding
Experience shows that the most common faults are the simplest! This section describes some of the
most likely faults to be encountered in this equipment and how to rectify them.
Initial Checks
Before assuming that there is a fault in the routing system, check the equipment connected to the
system and its cabling to ensure that the signals and power are reaching the equipment correctly.
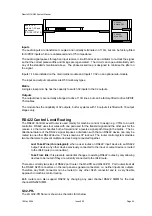
Fuses
These are probably the most likely part to fail during the equipment's life.
If there is no sign of
life
from the frame or panel check the mains/power fuse. This is located inside a
drawer in the mains/power inlet socket. To check the fuse unplug the power cord, open the drawer
and check the rating. Replace with the value marked on the unit. Push the drawer home and plug the
power cord in again.
If one or more of the two left-hand pilot LEDs in the power module is out then check the dc fuses.
These are located on the power module. Remove the front panel of the frame and withdraw the
module after first releasing the module lock on the handle. Replace any defective fuses with ones of
the correct rating. Replace the module in the frame locking it in place.
The DC fuse for the remote panel can be accessed by removing the panel from its installation. Unplug
the Q-link T-piece and then the power cord, remove the top cover and check the fuse. Replace with
one of the correct rating. Replace the cover and re-install.


