background image

Quantum Scalar 50 TC2201 iSCSI Bridge Upgrade Instructions

81-81792-01 A01

July 2007

TC2201 Upgrade Procedure

11

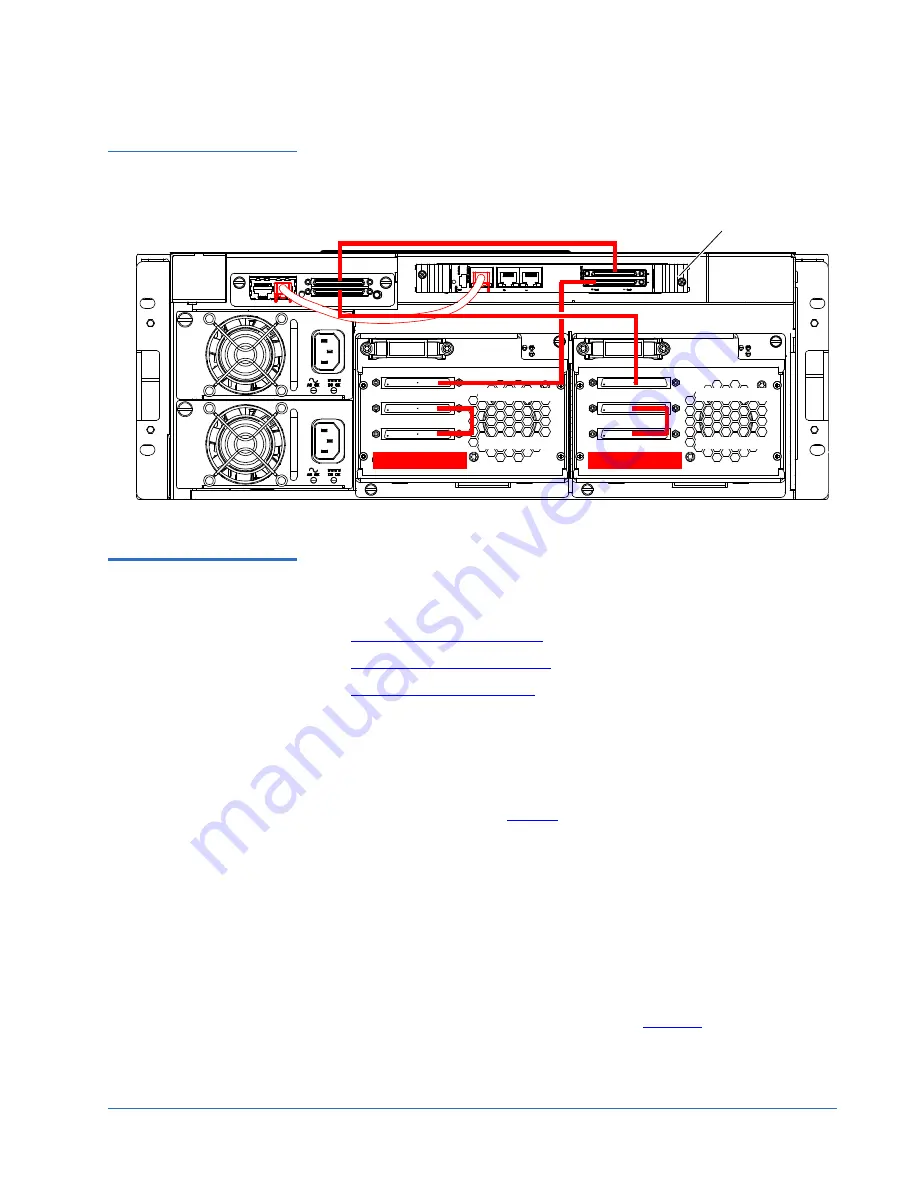
Figure 11  Scalar SCSI 
Connections (Half-Height 
Drives)

Configuring the 
TC2201 Bridge 
Software

0

After the TC2201 is installed, you must configure the bridge and map the tape 

drives and library robotics controller to the iSCSI port. Configuring the 

TC2201 consists of the following steps:

Accessing the TC2201 Bridge

Discovering Attached Devices

Configuring the iSCSI Ports

Accessing the TC2201 Bridge

0

To access the TC2201 bridge:

1

Turn on the library power by pressing the power button located on the 

front of the library (see 

figure 2

).

2

Open a web browser on a PC located on the same subnet as the library.

3

In the 

Address

 field, type 

http://IPaddress/

 where IP address is the IP 

address for the Scalar 50 library (refer to the 

Quantum Scalar 50 User’s 

Guide

 PN 81-81768 for information on the Scalar 50 remote management 

web pages).

4

Select the 

iSCSI Bridge

 tab from the 

Setup

 page on the Scalar 50 remote 

management web pages.

5

Select the TC2201 bridge you want to configure.
The 

TC2201 Home Page

 screen displays (see 

figure 12

).

TC2201

Tape drive 1

Tape drive 2

Tape drive 3

Tape drive 4

Содержание Scalar 50

Страница 1: ...tion 3 Preparing for the TC2201 Installation 3 Required Upgrade Kits 3 Required Tools 4 TC2201 Upgrade Procedure 4 Preparing the Quantum Scalar 50 Library 4 Removing Tape Drive SCSI Cables 5 Installin...

Страница 2: ...reserved Your right to copy this document is limited by copyright law Making copies or adaptations without prior written authorization of Quantum Corporation is prohibited by law and constitutes a pun...

Страница 3: ...e Operation 0 Once a TC2201 bridge option is installed and tested the library operates exactly as a Scalar 50 with a SCSI host interface Operation of the library via the operator control panel OCP is...

Страница 4: ...e Drive SCSI Cables Installing the TC2201 Bridge Installing the Ethernet Cables Installing SCSI Cables Configuring the TC2201 Bridge Software Preparing the Quantum Scalar 50 Library 0 To prepare the S...

Страница 5: ...cables must be removed prior to cabling the TC2201 1 Locate the SCSI cables connecting each pair of tape drives in the library and the host systems see figure 3 Tape drive 1 is in the upper right hand...

Страница 6: ...te to the CPCI card cage and expose the slot needed for the TC2201 installation 2 With the SCSI ports located to your right as you face the back of the library slide the first TC2201 into the slot of...

Страница 7: ...each bridge to the CPCI card cage by tightening the captive screws located in the ejector latches with a PHILLIPS screw driver see figure 6 Figure 6 Securing the TC2201 Bridge 5 Repeat step 2 through...

Страница 8: ...ape Drives Installing SCSI Cables with Half Height Tape Drives Installing SCSI Cables with Full Height Tape Drives 0 Use the following procedure to connect the SCSI cables and terminators to the tape...

Страница 9: ...ble VHDC 68 pin to HD 68 pin from the top port of tape drive 2 to Port 1 on the TC2201 e Install a terminator on the bottom port of tape drive 2 Figure 8 Cabling a TC2201 Bridge to the Tape Drives Fig...

Страница 10: ...8 pin from the top port of the system controller board to Port 0 on the TC2201 b Connect a SCSI cable VHDC 68 pin to HD 68 pin from the bottom port of the system controller board to the upper port of...

Страница 11: ...TC2201 Bridge 0 To access the TC2201 bridge 1 Turn on the library power by pressing the power button located on the front of the library see figure 2 2 Open a web browser on a PC located on the same s...

Страница 12: ...Quantum Scalar 50 TC2201 iSCSI Bridge Upgrade Instructions 81 81792 01 A01 July 2007 12 TC2201 Upgrade Procedure Figure 12 TC2201 Home Screen Main menu...

Страница 13: ...ts 1 From the Home screen click Ethernet from the main menu The bridge prompts you for a username and password 2 Enter root for the username and password for the password The Ethernet screen displays...

Страница 14: ...figure 15 Figure 15 SCSI Bus Screen SCSI ID 7 is the default SCSI Initiator ID for each of the TC2201 s SCSI buses If any devices attached to a TC2201 bus are using SCSI ID 7 then that bus s Initiator...

Страница 15: ...the tape drive and media changer to the iSCSI ports To configure the iSCSI ports 1 Click iSCSI Mapping from the Main menu The iSCSI Mapping screen displays see figure 16 Figure 16 iSCSI Mapping Scree...

Страница 16: ...n list 6 To make the changes permanent select the Submit button After the iSCSI host information is configured you must map the attached devices to the appropriate iSCSI port 7 From the iSCSI Mapping...

Страница 17: ...s or unfilled entries from this map select the Remove Gaps button When removing gaps from the table this option also renumbers all Indexes in sequential order starting with Index 0 d To delete a speci...

Страница 18: ...displays see figure 19 Note Maps named Auto Assigned may not be modified cleared filled or have entries removed Note Map settings are saved to memory when any of the buttons within the page are selec...

Страница 19: ...Quantum Scalar 50 TC2201 iSCSI Bridge Upgrade Instructions 81 81792 01 A01 July 2007 TC2201 Upgrade Procedure 19 Figure 19 System Reboot Screen 11 Select Yes and click Submit The TC2201 reboots...

Страница 20: ...Quantum Scalar 50 TC2201 iSCSI Bridge Upgrade Instructions 81 81792 01 A01 July 2007 20 TC2201 Upgrade Procedure 81 81792 01 A01 81 81792 01 A01...

Отзывы: