

R
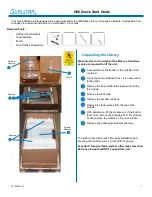
Q80 Quick Start Guide
511023 Rev. 2
2
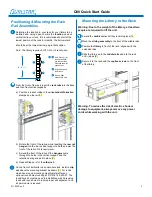
Positioning & Mounting the Rack
Rail Assemblies
Determine the location in your rack for your library to be
installed and, using a pencil, mark the
location
on each
vertical rail in your rack. It is recommended to start at the
Mounting the Library in the Rack
Warning: Due to the weight of the library, at least two
people are required to lift the unit.
Extend the
middle rails
until they lock into place (1).
lowest position of the rack for stability. The bottom mark
should be at the lowest narrow gap in that position.
Note: The library requires 6U (10.5 in.) of rack space.
Each EIA unit (1U)
starts at a narrow
gap and has three
holes and two wide
gaps above it
Wide Gaps within
the EIA unit
Narrow Gaps
between EIA units
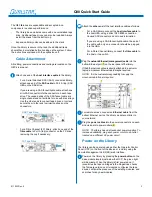
From the front of the rack, insert the
rack rails
into the back
and then front vertical supports.
a) Position a rail according to the
orientation information
stamped on the rail (1).
Move the
sliding assembly
to the front of the middle rails.
Position the
library
in front of the rack, aligned with the
extended rails.
Slide the library onto the
middle rails
and into the rack
until it stops (2).
Secure it to the rack with the
captive screws
on the front
of the library.
b) Rotate the front of the rail up while inserting the
rear rail
hanger
into the rear vertical support, and then lower the
front of the rail until it is nearly level.
c) Extend the front of the rail until the
hangers
come
through the holes in the vertical support and the
retention spring snaps into place (2).
d) Repeat Steps a–c for the
other rail.
On the front of both rails in a square-hole lock, install a
clip
nut
above the mounting bracket as shown (1). For racks
which have round mounting holes Qualstar offers an
optional round hole mounting kit P/N 376 142 483-01. The
round hole kit must be used in installations which are using
racks with round holes to insure proper unit alignment, one
kit per module is required.
Warning: To reduce the risk of electric shock or
damage to equipment, always remove any power
cords while working with the unit.
C
D
C
A
6U (10.5 in.)
D
B
A B


